i3-TECHNOLOGIES i3TOUCH EX Series Скачать руководство пользователя страница 33

i3TOUCH EX Series - Manual 

|

 33

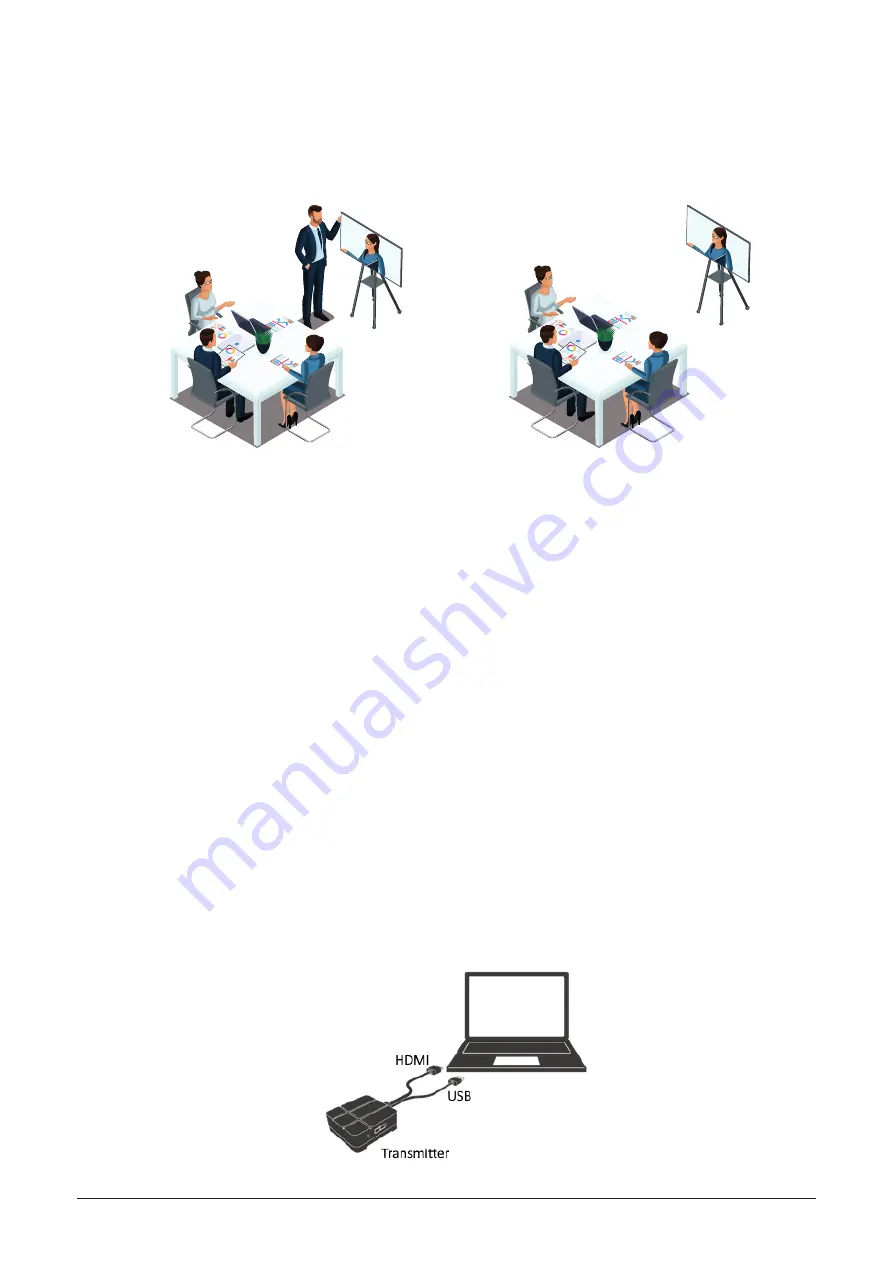
Open / closed meeting mode

Use the Meeting Mode button to change the meeting dynamic according to the type of your meeting.

OPEN: Allows anyone to connect and immediately show the screen content.
CLOSED: Allows anyone to connect, however, the controls to display the screen content are on the i3TOUCH 
EX. A connected user is standby in the background, until the screen content is activated through the List 
button. 

Closed Mode is best suited for a presentation-type meeting (or part of the meeting). The person standing at 
the display is the operator and switches between the screen content. 
Open Mode is better suited for a conference-type meeting (or part of the meeting) where every connected 
user can take over and show their screen content.

Enable / disable touch

Allow or deny the touch input on the screen of the i3TOUCH EX to control the connected computer.
NOTE: Touch functionality only works via the i3ALLSYNC Transmitting clients on Windows and MacOS.

Use the i3ALLSYNC HDMI transmitter (optional accessory)

i3-Technologies also offers the i3ALLSYNC HDMI Transmitter (purchased separately) for meeting attendees 
(guests) that can’t or won’t install the client software. Once the i3ALLSYNC HDMI Transmitter is paired only 
once with the display, you only need to plug in the HDMI and USB cable and press the button to immediately 
share the HDMI content on-screen.

Connect to i3TOUCH EX with i3ALLSYNC HDMI transmitter (device not included)�

If using the i3ALLSYNC HDMI Transmitter device, just connect and screensharing will start with the press 
of a button. The i3ALLSYNC interface provides useful instructions for each operating system to start the 
presentation.

Closed Mode 

(presenter starts  

each video stream)

Open Mode 

(everyone can  

video stream freely)

Содержание i3TOUCH EX Series

Страница 1: ...i3TOUCH EX Series Manual 1 i3TOUCH EX Series Manual...

Страница 2: ...Install batteries 10 Range of remote control 10 Connections 11 Home Interface 14 Start whiteboarding 14 Start presenting 15 Hamburger menu 15 Video input source 16 Other apllications 16 The settings m...

Страница 3: ...i3TOUCH EX Series Manual 3 Whiteboard 24 Initial calibration 24 Floating tools menu 24 Annotate 29 Floating tools menu 29 Browsing 31 Present 31 Quick Troubleshooting 34 Maintenance 35...

Страница 4: ...hat the unit s operating voltage is identical with your local power supply Please use the original power cable from the accessory bag don t modify or lengthen it Please unplug power supply when there...

Страница 5: ...n a residential installation This equipment generates uses and can radiate radio frequency energy and if not installed and used in accordance with the instructions may cause harmful interference to ra...

Страница 6: ...ol Panel Prepare to install Parts 1 Magnetic stylus holders 2 Bottom loudspeakers 3 Power indicator light 4 Remote control signal receiver 5 Light sensor 6 PIR sensor 7 Multi function button 8 Press e...

Страница 7: ...hard disk USB drive USB keyboard and or mouse etc 5 Touch Touch signal output to the external computer 6 VGA External computer video input 7 Audio In External computer audio input 8 SPDIF Carry multic...

Страница 8: ...8 i3TOUCH EX Series Manual Remote control...

Страница 9: ...le or disable Touch 16 Blue Screen Freeze application 17 Turn off or turn on the screen backlight 18 PC s Backspace key 19 Navigate up Android Windows Linux MacOS 20 Navigate left Android Windows Linu...

Страница 10: ...using old and new batteries 3 After battery is installed close the back cover of battery components and make the following clip buckled to the bottom Range of remote control Remote control can work w...

Страница 11: ...port of external computer Use USB cable to connect to external computer USB port Or use Type C cable to connect to Type C out put port of external computer After cable connection plug in power cord a...

Страница 12: ...ch to HDMI port Audio and video equipment output Use HDMI cable to connect audio and video equipment with HDMI input After cable connection plug in power cord and switch power on Press to turn equipme...

Страница 13: ...i3TOUCH EX Series Manual 13 LAN connection USB connection...

Страница 14: ...rable button You can customize the link and label of this button through the settings menu or in the startup wizard at first boot The EDU studio equips the display with a colorful fun background and e...

Страница 15: ...etings Press the hamburger icon on the left or right side of the display to open the menu Clicking the hamburger button will make the menu appear with a number of options 1 Exit the menu and navigate...

Страница 16: ...In the bottom right corner you can find the button to access the settings menu Clicking the video input button will make the menu appear with a number of options 1 Switch to the Android video source...

Страница 17: ...i3TOUCH EX Series Manual 17 Settings When opening the settings menu you get an overview of all the settings you can adjust...

Страница 18: ...18 i3TOUCH EX Series Manual Connectivity settings Make a connection to your network and internet via Wi Fi or Ethernet cable...

Страница 19: ...internet verify that your display is running the latest firmware In the settings application press About Device Press the Check Update button to validate your firmware version online If a newer versi...

Страница 20: ...isplay in the Display settings menu The i3TOUCH EX also features an environment light sensor to automatically adjust the brightness Turn Automatic Brightness Control on to activate this feature Audio...

Страница 21: ...h display Enable Disable the Motion Sensor If the motion sensor does not detect presence movement in the room for 15 minutes the display will automatically shut down Set an automatic time based schedu...

Страница 22: ...The image will be paused until you press the button again 4 Windows Task view Trigger the task view on a Windows computer connect ed with USB C or inserted as OPS 5 Windows Function key Perform the pr...

Страница 23: ...i3TOUCH EX Series Manual 23...

Страница 24: ...ow the instructions on screen to calibrate and activate this quick erase gesture Floating tools menu Clicking on the floating tools menu will activate it and show 6 options Close i3NOTES this will als...

Страница 25: ...quickly change marker or pen colors The plus icon can be used to select a custom color for that tool After selecting a custom color the plus icon will be replaced by the selected color In order to ch...

Страница 26: ...by a space There are also 2 other options Get meetings This will get all your calendar events from today On selecting one it will add all email ad dresses of that event and add them to the mailing lis...

Страница 27: ...to be connected to the same local network After closing the QR dialog the PDF will immediately be unavailable for download Required your network firewall will need to allow peer to peer connections Us...

Страница 28: ...update the page numbers of the remaining pages This action is permanent Whiteboard canvas This is the biggest part of the whiteboard Here you can write using the canvas tools Passive stylus The passiv...

Страница 29: ...n the annotate application and once you return to the whiteboard application all your screenshots will be available in separate pages There are 2 export options Fullscreen Screenshot This will take a...

Страница 30: ...permanently remove all notes from the current canvas Pointer The pointer option enables the user to interact with the device without needing to close the annotate application This will hide the curre...

Страница 31: ...on to quickly and easily stream the screen content of any mobile device to the display Download transmitting client software i3ALLSYNC is our client software available for most operating systems and d...

Страница 32: ...op the shared content from all connections Start annotating Press this button to start the annotating function of the i3TOUCH EX This button behaves exactly as the Annotate button in the hamburger men...

Страница 33: ...Allow or deny the touch input on the screen of the i3TOUCH EX to control the connected computer NOTE Touch functionality only works via the i3ALLSYNC Transmitting clients on Windows and MacOS Use the...

Страница 34: ...corresponding to it If in internal computer mode check whether internal computer is started With horizontal or vertical stripes or image dithering Check whether signal wire is well connected Check wh...

Страница 35: ...vent electric shock Clean screen Please mix and stir even a little fabric softener or tableware detergent with alcohol Please use a soft cloth to be completely soaked in the mixture Please take out cl...

Отзывы: