Camera’s default IP:
192.0.0.16.
Default Login:
i3admin;
Default PW:
i3admin
CONNECT CAMERA TO i3 SRX-PRO SERVER
LAN
i3 SRX-Pro Server
Via Gigabit Switch
QUICK START GUIDE
Ax63C 3MP IP Box Camera
Change your Annexxus camera’s default IP Address:
1. Close SRX-Pro Server software by pressing
Alt+Shift+Ctrl+F4
.
2. Change the IP address of the onboard NIC (LAN) of your SRX-Pro
Server (or of NIC1 if your SRX-Pro Server has two onboard NIC cards) to
192.0.0.XXX to match the default IP range of your Annexxus IP camera.
3. Connect your Annexxus camera to i3 SRX-Pro Server (see diagram
above).
4. Restart SRX-Pro Server software. Log in and go to the Setup -> IP
Camera tab.
5. Click
ACT Config Tool
icon. If your NVR does not have Annexxus
Configuration Tool, download and install it from
http://i3international.com/software-downloads
website.
6. In ANNEXXUS Configuration Tool window, a list of active network
cameras will be displayed. Select your desired camera in the list.
7. Enter the new IP address and Subnet Mask of the camera in the
Device(s) Communication Update area and click Update. The new
camera IP address must match the original range of your SRX-Pro
LAN or NIC1 card. E.g. If your original SRX-Pro Server’s IP address
was 192.138.10.122, change your Annexxus camera’s IP address to
192.138.10.XXX.
Remember: Annexxus Cameras cannot share an IP address, each
camera requires its own unique IP address.
8. Wait a few moments for a “Success” message in the Result field.
9. Repeat Steps 7-9 for all detected Annexxus cameras in the ACT.
10. Change the IP address of the NIC back to its original setting (reverse
Step 2).
Ensure you can connect to your camera using its new IP Address:
11. Open an Internet browser window and enter the new IP Address you
have just assigned to your Annexxus camera in Step 7.
12. Enter the default camera User Name and default Password in the pop-
up login window.
13. Annexxus camera interface will be displayed in the Internet Explorer
window.
You should be able to see the camera image on the screen.
If you do not see the camera image on the screen, call i3 International
technical support team for troubleshooting tips: 1.877.877.7241
Add your Annexxus camera to IP Camera tab in SRX-Pro Server:
14. Ensure that the latest version of GiPi updater is installed on your Server.
Latest GiPi available from
http://i3international.com/software-
downloads
.
Note: SRX-Pro must be closed while GiPi updater is installed. After GiPi
updater installation, start i3 SRX-Pro Server software again.
15. Log In and go to the
Setup
>
IP Camera
tab.
16. Click the
Search & Add
button to display connected Annexxus
cameras.
17. Select the detected camera in the list and click
Select
.
18. In the Select IP Camera window, enter the default camera User Name
and Password, then click
Add
. Selected camera will be added to the IP
Camera list.
19. Assign the IP camera to the SRX-Pro video channel in the
Ch In.
column.
Your Annexxus camera is now connected to SRX-Pro Server and is ready to
record. You may change resolution and frame rate for the Annexxus camera
in the IP Camera tab menu or you may choose to configure the camera’s
settings via Web Setup.
Scan this QR code to view and download
the full User Manual for this camera. Please
contact our Technical Support team if you have
any questions or concerns regarding camera
installation or if you require software services
or support. Technical support can be reached
by email at:
or by
phone toll free
1.877.877.7241
.
Scan for complete
User Manual
i3 INTERNATIONAL INC.
1.866.840.0004
www.i3international.com
Canada 780 Birchmount Road, Unit 16,
Scarborough, ON, M1K 5H4
U.S.A 4450 Witmer Industrial Estates Unit 4
Niagara Falls, NY 14305
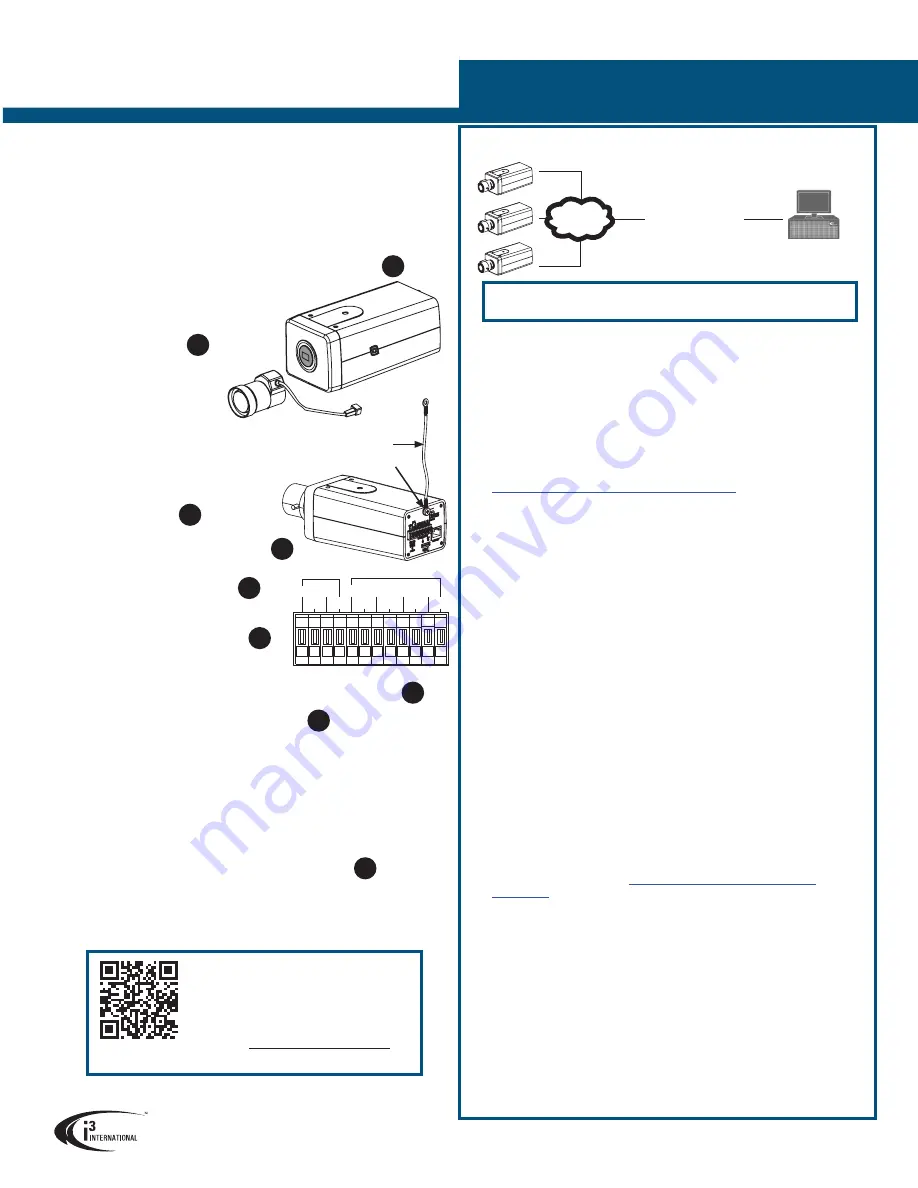
Mount the camera
4. Mount the camera using the
Mounting Thread
Hole and a suitable
i3’s bracket/housing combo
to mount the camera for an
indoor/outdoor installation.
recording (not included).
Connect the camera to a power source
• PoE:
Using an Ethernet cable, connect the camera to a PoE-
capable network device. Power will be supplied through the
Ethernet cable. OR
• DC12V or AC24V:
Use the power terminals
on the rear panel. If using DC12V power supply, mind the polarity
(Red+/White–). Do not use if using PoE power.
Adjusting the View and Focus
10. Position mounted camera for the desired field-of-view.
11. Connect the camera to the SRX-Pro Server to preview video image
(see instructions in the box on the right).
12. Adjust lens’ zoom and focus.
13. If the accurate focus is not achieved by using lens’ adjustment
controls, press and hold the ABF pin hole button for
2 seconds to calibrate camera’s back focus for an
accurate focus.
7. Connect external input/output
devices to the ALARM IN/OUT ports,
if using.
8. Connect the camera to the
network using the ETHERNET
port.
9. (Optional) Insert microSD card into
the slot on the camera, for edge
INSTALLATION
Install the lens
1. Remove the protective CMOS cover.
2. Attach your lens onto the camera’s lens mounting ring.
•
CS-Mount lens: Attach the lens directly to the camera. i3
recommended lenses are CS-Mount lenses and do not require a
spacer.
•
C-Mount lens: You must mount the supplied CS-C mount adapter
ring first and then attach the C-Mount lens.
3. Connect auto-iris cable to the
DC (Auto) Iris Control Port
(where applicable).
3
2
4
AUDIO
ALARM
IN
OUT
GND GND
GND GND
COM1 COM2
IN2
IN1
OUT1 OUT2
4
10
8
Safety wire (not included)
Safety wire screw
5. (Optional) Attach the safety
wire (not included) to the
safety wire screw.
Connect all peripheral devices
6. Connect i3-recommended
microphone and speaker to
the AUDIO IN/OUT
ports, if using.
5
10
6


