background image

27

Rev. 130816

i3-TRNG-CAMS-Ax46/66.indd

7.  Repeat Steps 1-6 for additional Privacy Zones, if applicable.

Click 

Clear All

 to delete all the privacy zones.

After making any setting adjustments, remember to click the 

Save


button to save any changes made.

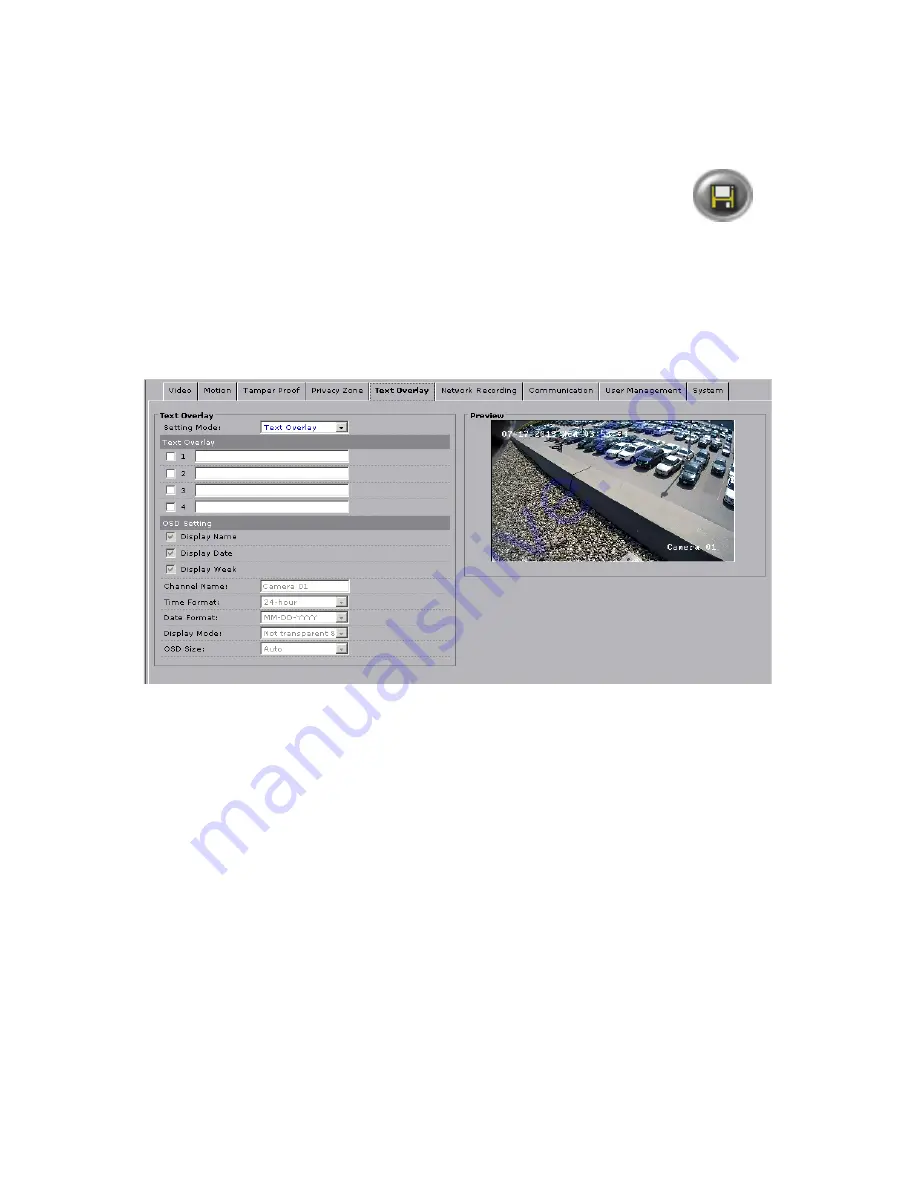
5.6 Text Overlay

The camera can be made to display text on top of its video in live viewing. Configure 
text overlay in this tab.

• 

Setting Mode: Choose between Text Overlay and OSD Setting.

Text Overlay:


The options here are only enabled if the Mode is set to Text Overlay. Input up 
to 4 lines of text in the four fields. To enable any one of the four lines, check its 
corresponding checkbox. Uncheck its corresponding checkbox to disable the line of 
text. The text will appear in the Preview window. Click and drag the text around in 
the preview window to reposition it.

OSD Setting: 

A number of on-screen display options are available. Check any of 

Display Name

Display Date

, or 

Display Week

. You may also provide a 

Channel Name

. Other 

options are as follows:

Содержание Ax46-series

Страница 1: ...ect or operate this product read these instructions carefully Save this manual for future use CONTENTS 1 Warnings and operation notes 3 2 Unpacking 5 3 Installation 6 4 Connecting to the SRX Pro Serve...

Страница 2: ...utors shall be liable to any person or entity with respect to any liability loss or damage caused or alleged to have been caused directly or indirectly by this information Furthermore i3 International...

Страница 3: ...o all local codes and to maintain your warranty When installing your Ax46 66 camera be sure to avoid excessive heat such as direct sunlight or heating appliances contaminants such as dust and smoke st...

Страница 4: ...o remove finger prints and dust from the dome cover Use a blower to remove dust from the lens Clean the body with a soft dry cloth If it is very dirty use a cloth dampened with a small quantity of neu...

Страница 5: ...ly assembled camera the dome camera packing box includes 1 User Manual and Annexxus Finder CD x1 2 Guide Pattern sticker x1 3 Torx key x1 4 Plastic Anchor x3 5 Round Head Screw Tapping type x3 If any...

Страница 6: ...g the camera your network camera should be accessed from your local network 3 1 Camera Parts and definitions Mounting base Horizontal stand Vertical stand Lower dome Infrared lamp plate Lens Black lin...

Страница 7: ...straight in front of the camera as much as possible To mount the camera do the following 1 Prepare the surface for mounting Drill screw holes on the surface with the supplied camera mounting template...

Страница 8: ...Adjust the camera s pan and tilt position to obtain an optimal view ing angle Loosen the tilt lock screws inside the camera Adjust the tilting posi tion within 65 degrees and tighten the tilt lock scr...

Страница 9: ...9 Rev 130816 i3 TRNG CAMS Ax46 66 indd Fig 3 7 Reattach dome...

Страница 10: ...P XPe 7 Pro or 7e Internet Explorer Version 8 0 or later CPU Intel Pentium Core 2 or higher Memory 1GB or more VGA card supporting Direct X 9 0 or above Power Supply Your camera requires a DC12V PoE p...

Страница 11: ...1 Open Security tab in the Internet Options window 2 If the camera operates inside of the Intranet click the Intranet icon If the camera operates outside outside of the Intranet click the Internet ic...

Страница 12: ...l Annexxus Finder application Annexxus Finder application discovers all Annexxus cameras connected to your network 7 Follow the Annexxus Finder installation instructions until the application has been...

Страница 13: ...nexxus Cameras cannot share an IP address each camera requires its own unique IP address 11 Enter the default camera password 1234 in the Input Password field and click Save 12 Wait a few moments as t...

Страница 14: ...xus Finder 14 Now that the new IP address has been successfully assigned to your camera make sure you can connect to it through the Internet Explorer 15 Launch Internet Explorer on your SRX Pro Server...

Страница 15: ...tp i3international com drivers gipi Please contact i3 Technical Support team for access information 2 Once the latest GiPi updater has been installed restart i3 SRX Pro Server software 1 The Annexxus...

Страница 16: ...16 i3 TRNG CAMS Ax46 66 indd Rev 130816 1 Log In and go to the Setup IP Camera tab 2 Click the Search button to display connected Annexxus cameras...

Страница 17: ...n click Add 3 The selected camera will be added to the IP Camera list Don t forget to assign the IP camera to the SRX Pro video channel in the Your Annexxus camera is now connected to SRX Pro Server a...

Страница 18: ...tup go to Setup IP Camera tab select the camera in the list of added IP cameras and click the Advanced Setup button The password window should be displayed Enter the default camera User Name admin and...

Страница 19: ...ed in the Live View mode only and is disabled when in the Setup mode Next click the Setup button to access Annexxus camera Setup features 5 1 Basic Setup You may switch to the advanced setup at any ti...

Страница 20: ...y will remain constant resulting in high quality video images Network infrastructure must be able to provide the set bandwidth to account for bit rate variations CBR Constant Bit Rate This setting wil...

Страница 21: ...layed at the top of the Internet browser page Video Adjustment Brightness adjust the image brightness level Values range from 0 to 100 Contrast adjust the image contrast level Values range from 0 to 1...

Страница 22: ...e time span between frames between 1 400 The default value will follow the Frame Rate Advance Settings White Balance Set White Balance mode to MWB manual white balance AWB1 auto white balance Locked W...

Страница 23: ...meras placed in an indoor setting with stable lighting conditions Motion Settings Enable Detection Check to enable uncheck to disable Enable Dynamic Analysis for Motion Check to enable uncheck to disa...

Страница 24: ...e holding down the left mouse button drag the cursor to draw a rectangular area over the zone desired 4 Release the mouse button The motion detection rectangle will be the grey shaded area in the Prev...

Страница 25: ...hese instructions 1 Click Enable Tamper Proof to activate the feature 2 Position your mouse cursor over the Preview window press and hold the left mouse button 3 While holding down the left mouse butt...

Страница 26: ...raw the privacy zone follow these instructions 1 Click Enable Mask to activate the feature 2 Position your mouse cursor over the Preview window press and hold the left mouse button 3 While holding dow...

Страница 27: ...etween Text Overlay and OSD Setting Text Overlay The options here are only enabled if the Mode is set to Text Overlay Input up to 4 lines of text in the four fields To enable any one of the four lines...

Страница 28: ...ab the camera can be configured to send out an email alert every time motion is detected It can also record video to a configured FTP server based on motion or on pre set schedule SMTP Server SMTP Ser...

Страница 29: ...menu Parent directory will be enabled In the Parent directory drop down menu select between Use Device Name Use Device Number and Use Device IP Address to save the recording to the folder with that s...

Страница 30: ...down menu DHCP Enable or Disable to have the network automatically assign an IP address to the camera IP Address Manually enter the camera s IP address here This option should NOT be used if DHCP is e...

Страница 31: ...ut may result in somewhat jerky low quality video Balanced The video as seen by a user in Live View will be a compromise between being as close to real time as possible and having smooth playback Best...

Страница 32: ...remember to update this information in the IP Setup tab of the SRX Pro Server Three types of user permissions exist Administrator Operator and Viewer Administrator users have access to the camera s se...

Страница 33: ...n the Password field and Confirm Password fields of the Modify User area 4 To change permission type select either Administrator Operator or Viewer in the Permission drop down menu 5 Click Modify or A...

Страница 34: ...n in the camera s System setup tab and locate the new firmware file Then click the Upload button and wait while the firmware is being updated on your camera Note Be sure to stop all camera operations...

Страница 35: ...to export your camera s settings If you have multiple cameras of the same model and you would like to apply a set of customer settings to each one exporting the configuration file may save time Click...

Страница 36: ...AGC ON 0 028 lux F2 0 AGC ON 0 lux w ICR 0 05 lux F1 2 AGC on 0 14 lux F2 0 AGC on 0 lux w ICR Image Enhancements Saturation Brightness Contrast Saturation Brightness Contrast Backlight compensation...

Страница 37: ...i3 INTERNATIONAL INC 1 866 840 0004 www i3international com Canada 780 Birchmount Road Unit 16 Scarborough ON M1K 5H4 U S A 1967 Wehrle Drive Suite 1 PMB 034 Buffalo NY 14221...

Отзывы: