background image

i.Tech Clip VR 302 Overview

Product Specifications

Bluetooth Specification:        

v2.0 Class 2 + EDR

Bluetooth Profiles Supported:   Headset and Handsfree
Range of Frequency: 

2.4GHz spectrum

Nominal Charging Time: 

Within 3 hours

Talk Time*:  

Up to 6 hours

Standby Time*: 

Up to 120 hours

Dimensions: 

45 (L) x 18 (W) x 23 (H) mm

Weight: 

16.7 grams 

*  may vary due to the user’s habit, different modes of operation, and mobile phone settings.

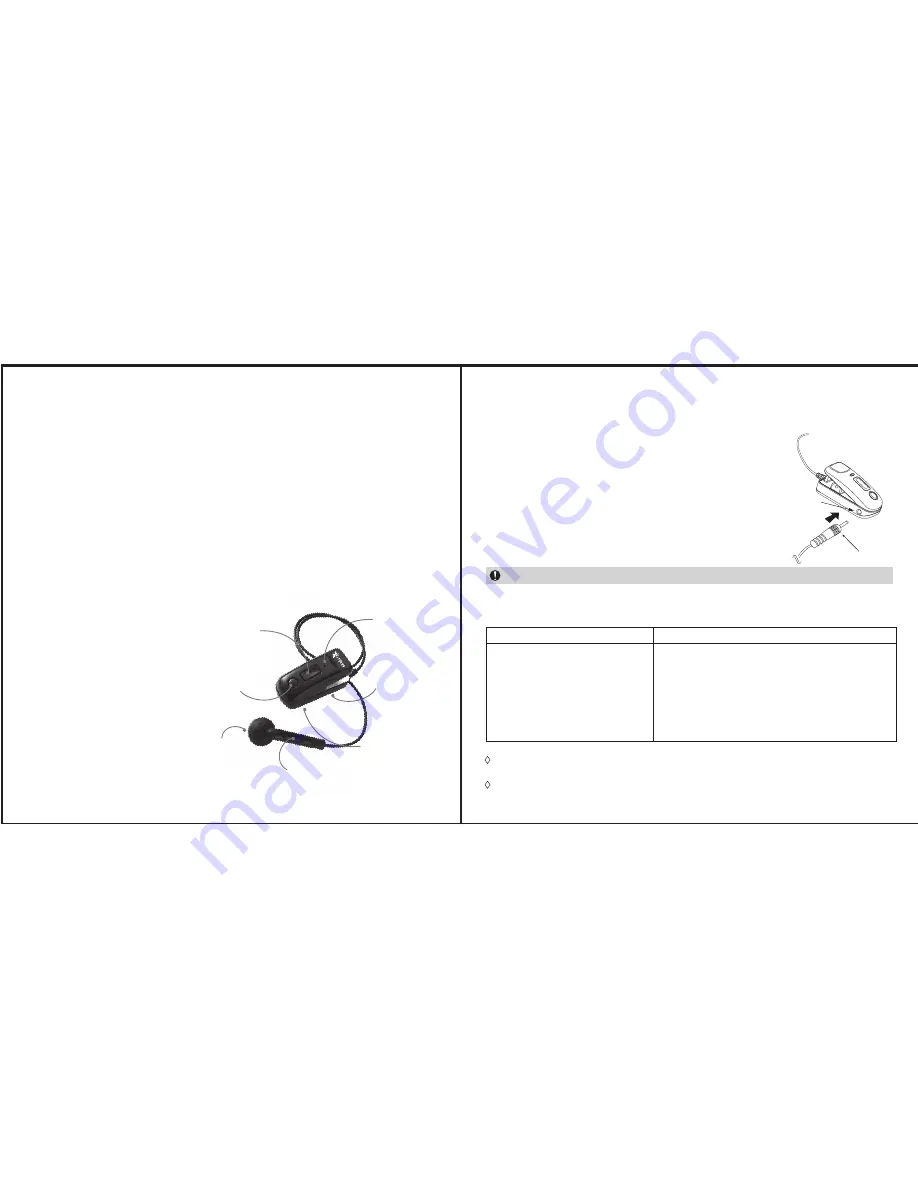
1. Multi-function Button (MFB)
  • Power On / Off
  • Pair with mobile phone
  • Answer / End a call
  • Last number redial
  • Voice dialing
2. Volume Key
  • Adjust volume
  • Reject / Transfer a call
3. Status Indicator
4. Built-in Rechargeable Battery
5. Microphone
6. Buzzer
7. Earpiece

1

2

3

7

4

5

6

3

4

Getting Started

Charging Your Headset

Indicator Light

To use your i.Tech Clip VR 302 headset (The headset), please follow these simple steps:

•   Charge your headset

•   Pair your headset with a Bluetooth-enabled mobile handset

The headset comes with a built-in rechargeable battery. 

Prior to using the headset for the first time, it is 

recommended to fully charge the battery.

Insert the charger’s plug into the headset’s charging 

socket (see fig.2) and plug the mains charger to an AC 

wall outlet or plug to the PC/notebook. 

♦ 

Charging indication will be delayed for a few seconds if the headset has not been used 

for a long time or the battery is drained.

♦ 

3 hours are required to fully charge the headset.

* Warning: Do not use the headset while it is connected to the charger.

Headset Status

•  Charging (OFF MODE)

•  Fully charged (OFF MODE)

•  Low battery

•  Out of battery

•  Charging (STANDBY MODE)*

•  Fully charged (STANDBY MODE)*

•  Out of Range

•  Solid Red

•  The light turns off

•  Flash Red and short beep every minute

•  The light turns off

•  Flash purple and solid red

•  Flash blue

•  Flash purple 3 times and then flash blue

Status Indicator Light (fig.1)

Use only the supplied charger / USB charging cable to charge the headset.

Charging 
Socket

Charger Plug

Содержание Clip VR 302

Страница 1: ...ifications Clip VR 302 Overview Getting Started Charging Your Headset Indicator Light Pairing Your Headset with a Mobile Phone Using Your Headset Factory Reset Troubleshooting Safety Information Care and Maintenance Declaration of Conformity 3 3 4 4 4 5 5 5 6 6 7 7 8 9 10 ...

Страница 2: ...ir your headset with a Bluetooth enabled mobile handset The headset comes with a built in rechargeable battery Prior to using the headset for the first time it is recommended to fully charge the battery Insert the charger s plug into the headset s charging socket see fig 2 and plug the mains charger to an AC wall outlet or plug to the PC notebook Charging indication will be delayed for a few secon...

Страница 3: ...ume key 3 The status indicator will stay red again and the headset is reset Function POWER ON Press and hold the MFB for 5 seconds Short beep Flash blue light 3 times POWER OFF Answer a call Press and hold the MFB for 2 seconds Press the MFB once Long beep Red light for two seconds and then the light goes off Flashing blue light and sounding buzzer alternately Button Audio Status indictor Using yo...

Страница 4: ...the headset while driving ensure your full attention and focus It is your responsibility to drive safely Consider to pull off the road before making or answering a call Never leave your headset above any air bag deployment area inside your car as serious injury may result when an air bag deploys Never allow children to play with the headset small parts may be of choking hazard Observe all signs an...

Страница 5: ...ecting our environment A copy of the Declaration of Conformity can be found at http www itechdynamic com Headset Turn off your headset before placing it in your pocket or bag If the MFB is accidentally depressed your mobile phone may place an unintended call Do not expose the headset to liquid moisture or humidity or rain as it is not waterproof Do not use abrasive cleaners to clean the headset Do...

Страница 6: ...ate the receiving antenna Increase the separation between the equipment and receiver Connect the equipment into an outlet on a circuit different from that to which the receiver is connected Consult the dealer or an experienced radio TV technician for help 10 2008 Printed in China http www itechdynamic com Dispose of the packaging and this product in accordance with the latest provisions 2008 Hutch...

Отзывы: