background image

14

HVAC (heating, ventilat-

ing, and air conditioning) 

Automatic Control System

CLIMATE

MODE

A/C

AUTO

OFF

1

4

3

2

6
5

7

8

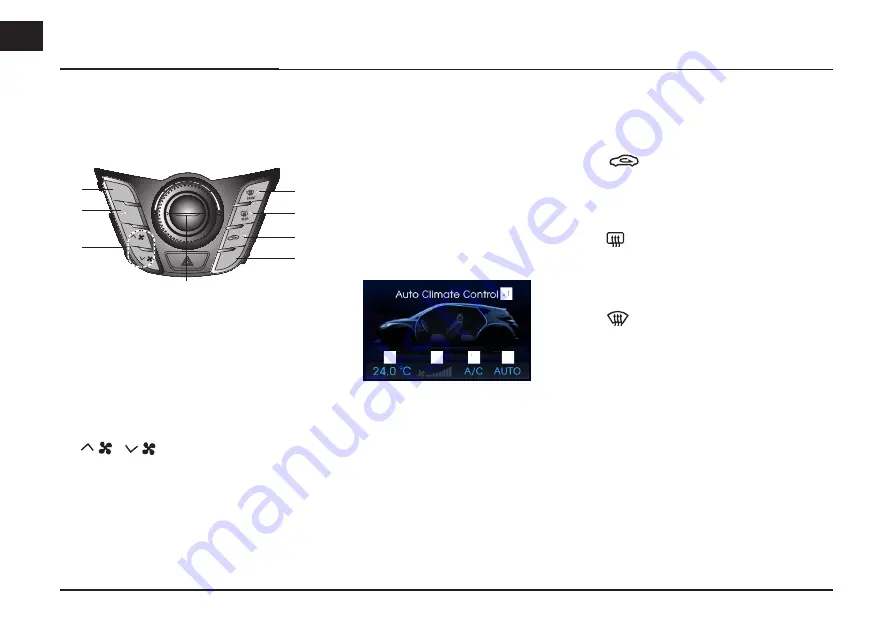
1.  MODE
  Press to set the wind blows.

2. A/C
  Press to set the air conditioner to on/

off.

3. 

/

  Press to set the airflow.

4. AUTO
  Press to set automatically the air 

conditioning and heating mode.   


OFF

  Press to turn the HVAC Automatic 

Control System off. 

5. CLIMATE
  Press to display total information of 

the HVAC Automatic Control System.

A

B

C

D

E


A


Auto Climate Control:  


Displays the current HVAC    


Automatic Control mode.


B


Temperature:  


Displays the temperature you  


set.


C


Airflow: Displays the airflow    


settings you set.


D


Air conditioner: Displays the   


status of air conditioner you   


set.


E


AUTO: Displays the HVAC    


Automatic Control System you  


set.

6. 
  Press to switch the indoor/outdoor air 

mode.

7. 

REAR

  Press to set the heat rays of the rear 

window to on/off.

8. 

FRONT

  Press to remove the moisture or frost 

of the front window.

Name of each component

Содержание LAC1420IWFS

Страница 1: ...NER S MANUAL Veloster Please read this manual carefully before operating your set and retain it for future reference Designs and specifications are subject to change without prior notice ENGLISH LAC1420IWFS LAC1430EWFS Family ...

Страница 2: ...rol Panel 11 Steering wheel remote control 13 HVAC heating ventilating and air conditioning Automatic Control System 14 Basic operation 15 Start up screen 15 Turning the unit on 15 Turning the unit off 15 Inserting a disc 15 Adjusting the volume 15 Ejecting a disc 15 Displaying the clock 15 Selecting a source 16 Rear view camera Optional 16 INFO SETUP 17 General operations of INFO SETUP menu 17 Se...

Страница 3: ...ation screen 20 Indicators of the map screen 20 How to view a map screen 20 Changing the scale of a map 21 Adjusting the navigation volume 21 Destination input menu 22 Destination menu overview 22 Name Search 22 Previous Destinations 23 Address 23 Address Book 24 Phone 24 Previous Map 25 Facilities 25 Intersection 26 Home Office User 1 4 26 ...

Страница 4: ...h wireless technology 31 Connecting your unit and bluetooth phone 31 Viewing the connected bluetooth phone 33 Disconnecting Connecting again the bluetooth phone 33 Deleting a connected phone 33 Changing the passkey 34 Making a call by entering phone number 34 Switching the sound path during a call 34 Switching the microphone on off 34 Answering calls 35 Using your Phone Book 35 Using your Calling ...

Страница 5: ...40 Random 41 Playing files by classifying into folder Album Artist 41 Locating a folder file using the list 42 Searching music 42 Setting audio book play speed 43 Radio operation 45 Listening to the radio stations 45 Storing and recalling stations 45 AS Autostore 46 To scan broadcast frequencies 46 To scan broadcast frequencies stored in preset buttons 46 Using an AUX source 47 Auxiliary device op...

Страница 6: ...e recognition system 49 Voice recognition 49 Giving voice commands 49 How to say numbers 49 Voice command examples 50 Help command 51 Voice commands 52 Troubleshooting 54 Index 56 Symbols for the display of traffic problems 57 ...

Страница 7: ...ore attempting such operations To promote safety certain functions are disabled unless the hand break is on Do not use for many hours at extremely low or high temperature 10 C to 60 C To reduce the risk of electric shock do not remove the cover or back of this product There are no user serviceable parts inside Refer servicing to qualified service personnel To reduce the risk of fire or electric sh...

Страница 8: ...the enclosure Visible laser radiation when open DO NOT STARE INTO BEAM CAUTION Do not keep the navigation system running with the engine stopped Doing so may discharge the vehicle battery When you use the navigation system always keep the engine run ning When the driver wants to operate the navigation system first park the vehicle in a safe location and set the parking brake Operating the system w...

Страница 9: ...A defective or soiled disc inserted into the unit can cause sound to drop during playback Handle the disc by holding its innerouter edges Do not touch the surface of the unlabeled side of the disc Do not stick paper or tape etc on the surface Do not expose the disc to direct sunlight or excessive heat This unit cannot play 8 cm disc use 12 cm disc only Clean the disc before playback Wipe the disc ...

Страница 10: ...sposed of separately from the municipal waste stream via designated collection facilities appointed by the government or the local authorities 3 The correct disposal of your old appliance will help prevent potential negative consequences for the envi ronment and human health 4 For more detailed information about disposal of your old appliance please contact your city office waste dis posal service...

Страница 11: ...can reset the unit when it doesn t operate normally Press the RESET hole with a sharp object 4 MEDIA Selects a source CD USB iPod BT AUX 5 FM Press to select the FM band 6 AM Press to select the AM band 7 LCD 8 Left rotary POWER VOLUME Press Power on off Turn Volume control 4 5 6 7 14 8 13 12 11 10 1 2 9 15 16 17 3 ...

Страница 12: ...arches the previous or next radio frequency Manual tuning Skips a track file up down in all list screen 13 DEST Press to enter a destination menu Various methods for entering a des tination are available 14 ROUTE Press to access the ROUTE menu screen 15 CD indicator light DISC IN When a disc is inserted the indicator is illuminated 16 MAP VOICE Press to display the current location map screen 17 C...

Страница 13: ...arch FF REW USB CD iPod BT 4 Enables Bluetooth Hands Free Phone Press this button briefly to take a call when there is an incoming call Press this button briefly to make a call from last calls Press this button lengthy to switch the sound path during a call Hands free y phone 5 Press this button briefly to reject a call during a call 6 Press this button to start the voice recognition mode Press th...

Страница 14: ...ress to display total information of the HVAC Automatic Control System A B C D E A Auto Climate Control Displays the current HVAC Automatic Control mode B Temperature Displays the temperature you set C Airflow Displays the airflow settings you set D Air conditioner Displays the status of air conditioner you set E AUTO Displays the HVAC Automatic Control System you set 6 Press to switch the indoor ...

Страница 15: ...the volume knob VOLUME on the control panel Note When you turn the unit off the current volume level is automatically memo rized Whenever you turn the unit back on it operates at the memorized volume level If you turn the unit off on below volume level 5 the volume level is changed into 5 If you turn the unit off on above volume level 20 the volume level is changed into 20 Ejecting a disc Press Z ...

Страница 16: ...E R position Rear view mode also allows you to check what is behind you while driving When the unit is booted completely the guide line is displayed on the screen Note The rear view camera function is to use this product as an aid to keep an eye on trailers or backing into a tight parking spot Do not use this function for entertainment purposes The object in rear view may appear closer or more dis...

Страница 17: ...just the sound the left and right speakers Touch v or V to adjust the sound of the front and rear speakers Bass Mid Middle Treble Default Center Touch b or B to adjust the Bass Mid Middle or Treble Variable EQ Normal Natural sound Quality optimized for driver Dynamic Strong sound with enhanced bass and stereo Concert Surround sound with con cert hall AVC Auto Volume Control When the speed of your ...

Страница 18: ...te an alterna tive route from the vehicle location to the destination Bluetooth Auto Connection You can set the Auto Connection Auto Download You can transmit phonebook and recent call list automatically when connect ing Bluetooth This function may not be supportted in some mobile phone Streaming Audio You can enable car audio system to play Phone Music through Bluetooth stream ing This function m...

Страница 19: ...sword Temperature This allows you to set the celsius and the fahrenheit Change the temperature between the C and F Theme You can set the desired theme Info There are three kinds of screen menus System Info You can check the model software version micom version and the map version Blue Max You can set the Blue Max Help You can check the Bluetooth Help INFO SETUP ...

Страница 20: ...atel lites Acquiring satellite signals Before the unit can find your current location and navigate a route you must do the following steps 1 Go outside to an area free from tall obstructions 2 Turn on the unit Acquiring satellite signals can take a few minutes Initial navigation screen After the ignition switch is placed in the ACC or ON position when you enter a navigation mode for the first time...

Страница 21: ... m n 750 m n 1 km n 2 km n 5 km n 10 km n 20 km n 50 km n 100 km n 200 km n 500 km 3 If you want to set the auto zoom touch Getting started with navigation Adjusting the navigation vol ume If you want to adjust the navigation vol ume follow the below method Method 1 Rotate the volume knob VOLUME on the control panel or press the volume VOL VOL on the steering wheel remote control during the voice ...

Страница 22: ...stination by search ing for the name 1 Press DEST Touch Name Search 2 Touch Province to change the prov ince 3 Select the desired province 4 Touch Name 5 Input the desired POI name and then touch OK 6 Select the desired list The corresponding position will be displayed on the map 6 Touch Set as Destination 7 Touch Start Guidance Drive in accordance with the screen and voice information 22 Destinat...

Страница 23: ...st 6 Touch Set as Destination 7 Touch Start Guidance Drive in accordance with the screen and voice information Address You can find the destination by search ing the address 1 Press DEST Touch Address 2 Set the preferred city 3 Input the preferred street name and then touch OK 4 Touch the preferred street in the list 5 Input the house number and then touch Done The corresponding position will be d...

Страница 24: ...erred group from the list 3 Touch the preferred destination The corresponding position will be displayed on the map 4 Touch Set as Destination 5 Touch Start Guidance Drive in accordance with the screen and voice information Phone You can find the destination by search ing for the phone number 1 Press DEST Touch Phone 2 Input the house number and then touch Done 3 Touch the preferred phone number f...

Страница 25: ...ch Facilities 2 Touch one of the main category 3 Touch the preferred category from the list Near here Sets the facilities located near the current vehicle position Near Map Sets the facilities located near the current map Near destination Sets the facilities located near the selected destina tion Near Region Sets the facilities located near the current region 4 Touch the preferred facility from th...

Страница 26: ...treet name from the list The corresponding position will be displayed on the map 6 Touch Set as Destination 7 Touch Start Guidance Drive in accordance with the screen and voice information Home Office User 1 4 1 Press NAV Touch Home Office or User 1 4 The corresponding position will be displayed on the map 6 Touch Set as Destination 7 Touch Start Guidance Drive in accordance with the screen and vo...

Страница 27: ... your destination or if you want to change your destination press ROUTE touch Stop Guidance If you continue to travel to your destina tion again touch Continue Guidance Route Overview You can check information about ther oute between your current location andyour destination 1 Press ROUTE Touch Route Overview The route overview screen appear son the screen 2 Touch the preferred overview method Edi...

Страница 28: ... selecting one of these Route Options 1 Press ROUTE Touch Route Options 2 Select the desired route search 3 Touch 1 to return to the previous menu screen Detour If you want to make a detour due to traffic conditions you can use the detour function to calculate an alterna tive route from the vehicle location to the destination 1 Press ROUTE Touch Detour 2 Select the distance of the detour you would...

Страница 29: ...oute then touch Done Blue Original route Orange Detour route Edit Waypoints This allows youto edit the waypoints when the waypoints are set 1 Press ROUTE Touch Edit Waypoints 2 Touch the waypoint from the list Then set the waypoint by touching w Move or s Move If you want to delete the waypoint Touch Delete Yes 3 Touch Done The corresponding position will be displayed on the map 4 Touch Start Guid...

Страница 30: ...ce Favorite Places and Address Book can be edited Address Book This allows you to store or edit destina tions in the Address Book Up to 100 destinations can be registered in each item folder Z Registering the destination in the Address Book 1 Press ROUTE Touch My places Address Book 2 Touch the preferred group from the list 3 Touch Add If you want to change the group name touch Rename Group change...

Страница 31: ...l operation by model is mainly resulted from fea ture of a hands free phone consult manufacturer of a phone if you have any question You can check the Bluetooth phone compatibility list on the web site http www navigation com hyundai Connecting your unit and bluetooth phone To connect using the unit settings 1 1 Press on the control panel 2 Touch Bluetooth 3 Touch Search for Bluetooth devic es If ...

Страница 32: ... want to cancel touch Cancel 3 Initiate a search for Bluetooth devices These settings might be located in a menu called Bluetooth Connections or Hands free 4 Select the your device from the list of phone 5 Input the passkey Default 0000 showed on the screen in your phone when the pop up screen is displayed on the screen When it is successfully connected the Bluetooth screen appears on the screen N...

Страница 33: ... 50 function If the mark appears you can only use the hands free function pages 46 49 Disconnecting Connecting again the bluetooth phone 1 Touch View Bluetooth device list on the Bluetooth Screen 2 Touch the connected phone And then touch Yes Your phone is disconnected and the mark disappears 3 Touch the disconnected phone again to connect your phone And then touch Yes The mark appears again Delet...

Страница 34: ...ne conversations Note If you make a mistake while dialing touch to erase one digit at a time If you want to erase all digits at a time touch and hold Touch for long to make a call from a latest call If you want to make an international telephone call touch 0 for long then input the phone number The user s recent call history applies only to the hands free connection Making a call from a recent cal...

Страница 35: ... your Phone Book You can use the phone book entries stored on the memory of phone support ing PBAP Phone Book Access Profile profile After connecting your unit and bluetooth phone via Bluetooth wireless technol ogy the numbers in your phone s phone book is transferred automatically into phone book Calling a number in the phone book After finding the entry in the phone book you want to call you can...

Страница 36: ...rofile profile After connecting your unit and bluetooth phone via Bluetooth wireless technology the numbers in your phone s Outgoing calls Missed calls and Incoming calls list is transferred automatically into calling list Calling a number in the calling list After finding the entry you want to call in the Outgoing calls Missed calls or Incoming calls list you can select the number and make a call...

Страница 37: ... to the next or previous page in the list 3 Touch one of categories you want to assign to speed dial number For example Phone book 4 Touch one of phone numbers you want to assign to speed dial number 5 Input the name by using the keypad then touch Ok The name phone number is stored in memory The next time you touch the same name the name phone number is recalled from memory Calling a number in the...

Страница 38: ...ic information song artist album is not supported on your phone the mark appears on the screen Skip to the previous next music Touch to select the previous next music Search Touch and hold the or buttons during playback and then release at the point you want Note The unit may not support the audio streaming function depending on the type of the phone If you disconnect your unit and blue tooth phon...

Страница 39: ... the iPod to the USB port by using the iPod cable Connect an iPod device to the USB port and playback starts automatically For details about iPod refer to the iPod User Guide Skip to the next track file ALL Touch SEEK TRACKD to select the next track file Skip to the previous track file ALL Touch ASEEK TRACK within 1 second of playing time Return to the beginning of the cur rent track file ALL Touc...

Страница 40: ...epeatedly 1 Touch Option during playback Example Audio CD 2 Touch Repeat repeatedly Disc Audio CD Repeat off Plays repeatedly all tracks within the disc Repeat track Plays repeatedly the current track USB Disc MP3 WMA Repeat off Plays repeatedly all files within the disc or USB Repeat track Plays repeatedly the current file Repeat folder Plays repeatedly all files within the cur rent folder iPod R...

Страница 41: ...s within the disc or USB iPod Random off Cancels Random play Random all The unit plays Randomly all files within the iPod Random album The unit plays Randomly all files within current album Playing files by classifying into folder Album Artist USB You can play files within the USB by classifying into folder album or artist 1 Touch Option during playback 2 Touch Folder Album or Artist during playba...

Страница 42: ...ou want to move to the playlist screen touch Searching music iPod You can search iPod for playlist artist names album titles Genre songs com poser audio books podcasts For details about iPod refer to the iPod User Guide 1 Touch List during playback 2 Touch the desired item Playlists Plays the songs in the Playlists Artists Plays the songs in the Artists Albums Plays the songs in the Albums Genres ...

Страница 43: ...e and USB External HDD with FAT16 or FAT32 format Do not extract the USB device during operation play etc Regular back up is recommended to prevent data loss If you use an USB extension cable or USB HUB the USB device may not be recognized Some USB devices may not work with this unit Digital camera and mobile phone are not supported This unit is not supported when the total number of files is 1000...

Страница 44: ... copyright owner iPod device requirement Compatibility with your iPod may vary depending on the type of your iPod Depending on your iPod s software ver sion it may not be possible to control your iPod from this unit We recommend installing the latest software version If you have a problem with your iPod please visit www apple com support ipod This system can receive analog sound from the following...

Страница 45: ...ouch of a button 1 Select the band FM AM you want to store a station into 2 Select the desired frequency 3 Touch and hold one of the preset buttons Preset buttons The selected preset station has been stored in memory 4 Repeat steps 1 and 3 to preset other stations Next time if you touch the preset buttons the station is recalled from the memory Note Up to 18 stations 6 for each of theFM bands and ...

Страница 46: ...can broadcast frequen cies This allows you to search automatically forward for receivable stations 1 Touch Scan on the screen 2 Touch Scan again to cancel it Note During SCAN mode each station is tuned in for 10 seconds before moving to the next available station To scan broadcast frequen cies stored in preset buttons This allows you to search broadcast fre quencies stored in preset buttons 1 Touc...

Страница 47: ...en activate the auxiliary function Note Some auxiliary devices that don t have the video source may not output the video screen In case of some iPod devices Use the iPod cable for exclusive use of iPod for video playback when connecting iPod to the AUX connector Video is not available while driving Based on the traffic regulation Aux Video is only available whenever vehicle is in stop condition wi...

Страница 48: ...en you must stop in a safe place and put on the handbrake 1 Touch the screen on the aux video mode 2 Touch Option on the screen 3 Select the item you want to adjust Brightness Touch or to adjust the brightness of screen Contrast Touch or to adjust the contrast of screen Saturation Touch or to adjust the saturation of screen Note Touch Center to return to the default settings ...

Страница 49: ...After the beep sounds say Help All commands shall be listed which are presented in active fields Note If the command is not recognized the system announces 1st time Pardon 2nd time Please repeat and 3rd time Command is not recognized If you want to cancel the voice rec ognition press one more time or press the any button or touch screen say Cancel If you want to adjust the volume of the system fee...

Страница 50: ... control 5 After the beep sounds and say Frequency one hundred two or one hundred two mega hertz 6 When the spoken frequency is recog nized the FM frequency is changed to the 102 MHz Example 2 Changing playlist of USB CD 1 Press on the steering wheel remote control 2 After the beep sounds and say List 3 When the command recognized the screen will be changed to the USB CD LIST screen 4 Press after ...

Страница 51: ...f you want to make a call the recog nized number say Call If there is unrecognized number or you want to delete the number say Clear If you want to finish it at any time say Cancel Help command If you are controlling the system by voice commands for the first time or do not know the appropriate voice com mand say the following command 1 Press on the steering wheel remote control 2 After the beep s...

Страница 52: ...s Category Radio Voice command News off News on Next station Previous station TA off TA on Preset number Presets AM FM List Option Scan start Frequency x comma yy Frequency xxxx Autostore Region auto Region off Category Phone Voice command Dial Number Incoming Missed Outgoing Phone Book Call Name Speed Dial number Call Calling lists Speed dial Mobile Private Office Clear Correction Category Blueto...

Страница 53: ...Track Number Category MP3 CD USB Voice command Directory up List Option Repeat folder Repeat off Repeat track Scan start Random all Random folder Random album Random artist Random off Track info Next track Previous Track Folder Track Number Album Artist Folder Category Audio CD Voice command List Option Repeat off Repeat track Scan start Random all Random off Track info Next track Previous track T...

Страница 54: ...ate to the map Cannot see the map Perhaps you cannot see the map even when you have executed the navigation menu This happens when the data within the memory is damaged Delete all the data in the memory and install the data again If the issue persists after installa tion contact the A S center The path guide can be different from the actual path Path guide error When the road is closely parallel W...

Страница 55: ...sing the built in microprocessor to operate incorrectly Turn the unit off and then on The unit doesn t operate normally You can reset the unit Press the RESET hole with a sharp object Playback is not possible The disc is dirty Clean disc The loaded disc is a type this unit cannot play Check what type the disc is The disc is inserted upside down Insert the disc with the label upward The files on th...

Страница 56: ...s 49 Near destination 28 Near position 27 NEWS 59 Parking 30 Phone number 28 POI category 37 POI Point of Interest 26 Random 53 Region auto Off 59 Repeat 52 Return to the beginning of the current track file 51 Route options 39 Search 51 Setup 17 21 Skip to the next track file 51 Skip to the previous track file 51 Store destination 33 Store position 33 38 Switching the microphone on off 46 Switchin...

Страница 57: ...highlighted Symbol Description Rock fall Accident Other danger Road narrow Chipping Road work Slippery road Rain Symbol Description Stationary traffic Queuing traffic Wind Storm Snow Ice Block road Closed Emergency phone not work Symbols for the display of traffic problems ...

Страница 58: ...upport Hotline Web Site http www navigation com hyundai International Toll Free Number 00800 18 23 53 22 Telephone number for all other countries or if Toll Free numbers are not supported 31 555 384 245 ...

Страница 59: ...NATEL de acordo com os procedimentos regulamentados pela Resolução 242 2000 e atende aos requisitos técnicos aplicados Para maiores informações consulte o site da ANATEL www anatel gov br Modelo LAC1430EWFS 0837 11 1925 01 07893299514272 ...

Страница 60: ...NATEL de acordo com os procedimentos regulamentados pela Resolução 242 2000 e atende aos requisitos técnicos aplicados Para maiores informações consulte o site da ANATEL www anatel gov br Modelo LAC1420IWFS 0837 11 1925 01 07893299514265 ...

Отзывы: