background image


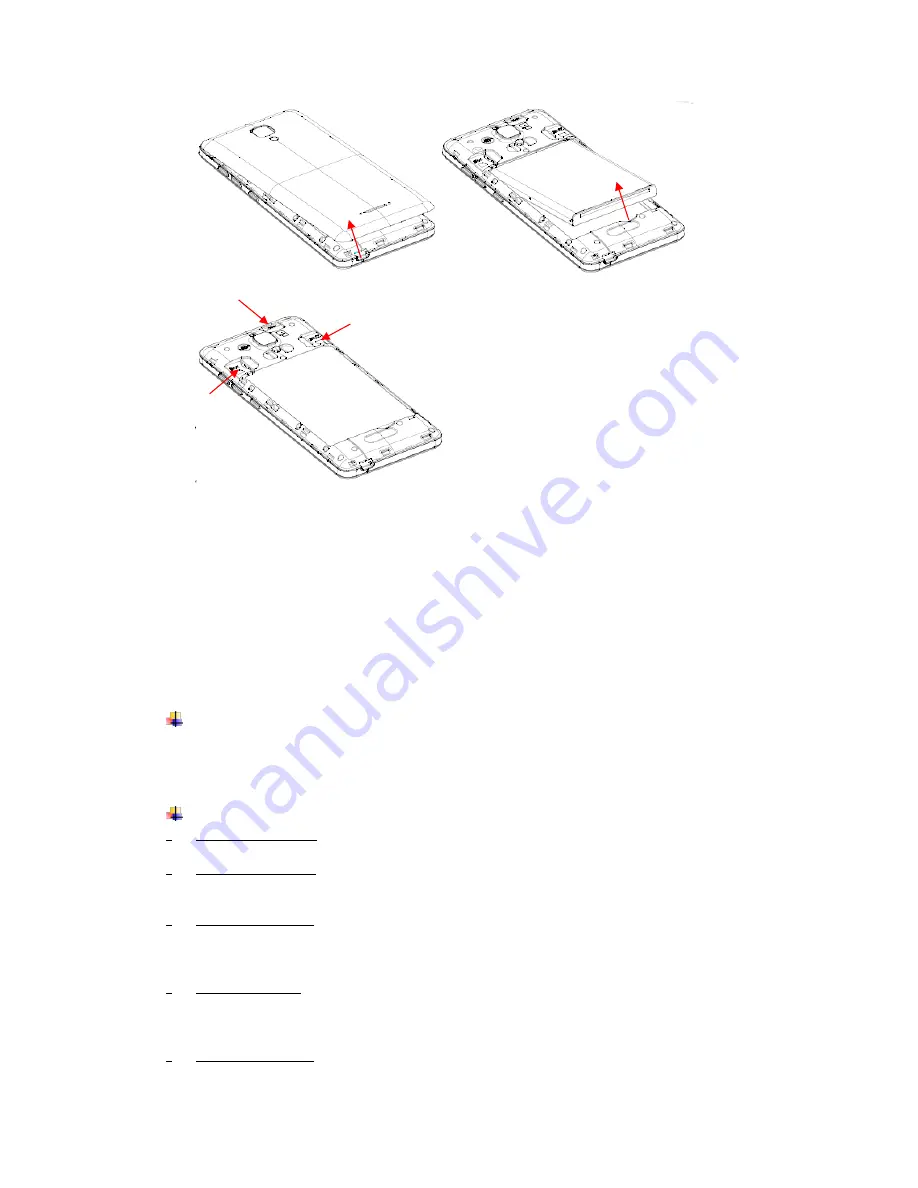
2.  Insert the Micro SIM cards and SD card to the card slots correctly. 


3. 

P

ut back the battery and cover. 


Notice:


•  Micro SIM cards are available to this device only. 
•  Micro SIM cards and SD card


doesn

’t support to hot plugging.  

•  Do not remove the Micro SIM cards and SD card while the device is transferring data. 

Doing so may cause data to be lost or damage to the cards and device. 

•  The SIM card and SD card are small parts. Please keep away from Children to avoid 

swallowing the card by accident. 

•  Do not touch the metal surface of SIM cards and SD card and keep away from elec-

tromagnetic field to avoid damage data. 


Charge the Battery 

Charge the battery before using it. Connect the USB cable to the USB power adaptor, 
and then plug the end of the USB cable into the USB Port. 
 

4.


Getting started 


Basic Function 

• 

Turn on the phone 

Press and hold a while of power key to turn on the phone. 

• 

Turn off the phone 
Long press the power key until a menu will show. Choose 

“Power off’’


to turn off the 

phone. 

• 

Restart the phone 
Option 1: Long press the power key until a menu will show. Choose 

“Reboot’’


to re-

start the phone. 
Option 2: Long press the power key till 12 seconds to auto restart the phone. 

• 

Lock the screen 

Option 1: Press the power key to turn off the screen and lock it 
Option 2: In the Home screen, double tap the screen will lock it. 
Option 3: The screen will auto lock if you don't use the phone for a while. 

• 

Unlock the screen 
Press the power key, and then slide to top for unlocking. 

Содержание HY1-5137

Страница 1: ...Mobile Phone HY1 5137 User Guide...

Страница 2: ...n battery cannot be used please dispose in safe environment Do not try to dismantle the battery If the battery or the charger is broken or old please stop using them and replace with certified genuine...

Страница 3: ...lume of device Recent task key Tap to open the list of recent used apps Home key Tap to return to Home screen Long press to access Google search Back key Tap to return to the previous screen 3 Before...

Страница 4: ...rge the battery before using it Connect the USB cable to the USB power adaptor and then plug the end of the USB cable into the USB Port 4 Getting started Basic Function Turn on the phone Press and hol...

Страница 5: ...enter Swipe down from the top edge to see more detail of the new notification such as messaging missed call Wi Fi connection Tap the notification and drag to left or right to delete it Control Center...

Страница 6: ...buttons you simply touch them with your finger Touch hold Touch hold an item on the screen by touching it and not lifting your finger until an action occurs Drag Touch hold an item for a moment and th...

Страница 7: ...sages with others The messages from the same contact will be grouped into one conversation list So you can see your entire message history with a person conveniently Touch to open contacts Touch to ma...

Страница 8: ...aser mode remove the moving objects from the photos Filter Multiple filters can choose Normal LOMO Hazy Halos Time Food Beauty Sweet Vintage B W HDR High Dynamic Range mode will improve the light and...

Страница 9: ...ou ve taken with camera You may share the pictures and videos with your friends by Messaging Email Bluetooth and so on For the private photo you can encrypt it And save it on Touch to enter the menu a...

Страница 10: ...usic and other audio files that you trans fer to your phone from your computer Touch to Change play mode of Repeat One Shuffle or Repeat List Add to my favorites or New Playlist Setting Menu Share mus...

Страница 11: ...access at distance of up to 100 meters depending on the WLAN router and your surroundings You can con figure the WLAN as follow Settings WLAN to turn it on The device scans for available WLAN network...

Страница 12: ...ther device Settings HotKnot Turn on the HotKnot Gallery Choose a Picture or Video Share HotKnot Share then use screen to touch another device and the picture or video will be sent to another device E...

Страница 13: ...mly The chosen colors will come to your phone table Smart gestures Settings Advanced settings Smart gestures to turn it on Tap to exit the extreme mode Tap to restore the system default colors Tap to...

Страница 14: ...Draw pattern to access menu quickly while phone is in sleep mode Smart bright screen Settings Advanced settings Smart gestures Select Smart bright screen When front camera detects you are viewing scr...

Страница 15: ...equipment that could be sensitive to external RF energy Product statement on handling and use You alone are responsible for how you use your phone and any consequences of its use You must always switc...

Страница 16: ...nd found to comply with the limits for a Class B digital device pursuant to part 15 of the FCC Rules These limits are designed to provide reasonable protection against harmful interference in a reside...

Отзывы: