background image

- 18 -

Protect the disc

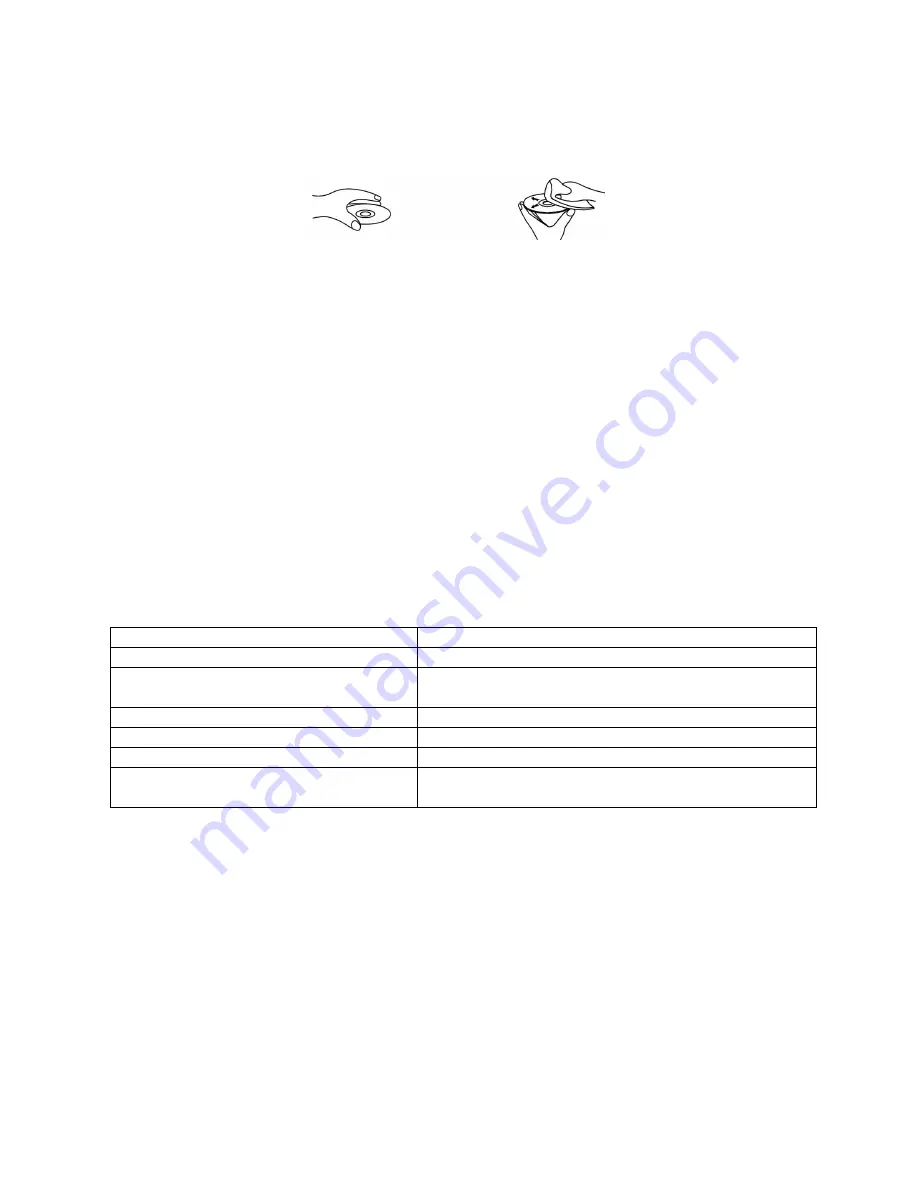
1.  To keep the disc clean, please don't touch the disc surface when you are holding it. You should hold

the edge.

2.  If the disc is dirty, it will affect the sound quality. Please use the clean and soft cloth to wipe the disc

from inside to outside. Don't wipe the disc at circumference direction.

3.  Don’t stick paper on the disc.
4.  Don’t place discs in direct sunlight or near or on heat sources.
5.  After you have finished with the disc, please place it back in its original case. To avoid warping or

damage, do not stack discs.

6.  Don’t play the disc, which has flaw or deformation, in case of damaging this unit.
7.   Clean  your  discs  using  only  a  soft  dry  cloth.  Do  not  use  any  chemicals  such  as  benzine,  thinner,

antistatic or record sprays as these can damage the disc surface.

Accessories

Main unit

1 pc

Speaker

2 pc

Stand for the main unit

1 pc

Stand for the speakers

2 pcs

Remote control

1 pc

Instruction manual

1 pc

Specification

Power supply

~220 V/50 Hz

Power output

10 W/channel

Radio frequency range:

AM = 530 – 1600  Hz
FM = 88 – 108 MHz

Gift box dimensions

433 (L) x 264.5 (W) x 467 (H) mm

Net weight of unit

6.2 kgs

Gross weight of unit

7.8 kgs

Unit Size (L) (W) (H):

Main Unit = 195 x 425 x 275 mm
Speaker = 190 x 266 x 278 mm

Specifications are subject to change without notice. Mass and dimension are approximate.

Содержание H-MS2302

Страница 1: ...H MS2302 CD MP3 MICRO SYSTEM Instruction manual CD MP3 ...

Страница 2: ...iscs 10 CD playback 10 Programming the CD player 10 File name display for MP3 discs 11 Text display mode id3 display 11 Finding MP3 tracks by track name for MP3 discs 11 Finding MP3 tracks by folder for MP3 discs USB and SD cards 11 Repeat playback function 11 USB and SD card MP3 playback 12 Encoding function Recording to MP3 file 13 Encoding from CD CD MP3 13 Encoding from Radio 13 Encoding from ...

Страница 3: ...quirement of the electric products is different in various places before you use this product make sure that the power requirement of the product is complied to the power that the native district supplies Laser Product This product is equipped with low power laser equipment inside for using safely don t take apart any covers or try to take apart the product inside Please contact the qualified pers...

Страница 4: ...t expose this equipment to hot places rain moisture or dust 8 Don t get close to the water source when using this unit such as near bathtub bath slot dish washing slot washing machine to use it also don t use this unit on damp plinth or nearby swimming pool or similar close to the water source 9 Do not place this unit close to strong magnetic field 10 Don t place this unit close to the damper or t...

Страница 5: ...10 STOP button 11 CLOCK PROGRAM button 12 SLEEP button 13 TIMER button 14 EQ button 15 REC button 16 IR sensor 17 POWER ON OFF button 18 PRESET FOLDER DOWN button 19 FIND DISPLAY button 20 PRESET FOLDER UP button 21 NEXT button 22 TUNER BAND button 23 AUX button 24 USB SD button 25 CD button 26 FM antenna wire 27 AUX IN socket 28 Subwoofer output 29 Headphone jack 30 Speaker out socket left right ...

Страница 6: ...on 6 MEMORY DOWN button 7 BAND button 8 INTRO button 9 FUNCTION button 10 REPEAT button 11 MEMORY UP button 12 Number buttons 13 MUTE button 14 PROGRAM button 15 CD PLAY PAUSE button 16 CD NEXT TUNE UP button 17 CD BACK TUNE DOWN button 18 CD STOP button 19 VOLUME UP button 20 VOLUME DOWN button ...

Страница 7: ...stand is now locked to main unit or speakers To release the stand from the main unit or speakers slide the stand downwards opposite direction until it becomes released Wall mounting installation 1 Sign the dots for the screws on the wall with a pencil 2 Drill the holes there to attach the main unit and the speakers to the wall 3 Twist the screws in the holes 4 Hang the unit and the speakers up Scr...

Страница 8: ...speaker box into the black speaker connector on the back of the main unit which has the L indication under the speaker connector Repeat the above two steps for the right speaker box but this time inserting them into the red and black connectors with the R indication When inserting each wire into a connector press downwards on the connector s plastic knob red or black part and push the exposed meta...

Страница 9: ...icate the exact frequency of the next station that is found When a desired frequency or station is reached it can be saved into one of the memory positions see Radio memory below Radio memory station preset memory storage At any time the currently displayed station or frequency can be stored into one of the memory position Press CLOCK PROGRAM button on the unit or PROGRAM button on the RC Press ME...

Страница 10: ...n before starting the programming Press CLOCK PROGRAM button on the unit or PROGRAM button on the RC the display will show the MEMORY symbol to indicate that the set is now in memory programming mode For CD audio discs Press NEXT or BACK buttons on the unit or BACK TUNE DOWN or NEXT TUNE UP buttons on the RC to select the track number you wish to be stored in the current memory program position Pr...

Страница 11: ... letter on the disc With any selected letter there might be several tracks on the disc which begin with the same alphabet To search for all tracks beginning with a particular letter press and hold for 2 seconds NEXT or BACK buttons on the unit or BACK TUNE DOWN or NEXT TUNE UP buttons on the RC until the FIND symbol stops flashing on the display When the FIND symbol stops flashing press NEXT butto...

Страница 12: ... the desired file in the selected folder Press PLAY PAUSE button to start playback All operations of USB and SD cards MP3 playback are the same as in CD MP3 mode Note Although this product is fully compatibly with USB 1 1 and 2 0 standards a small percentage about 5 of USB flash drives might not be readable due to those USB flash drive manufacturers non compliance with the full official USB 1 1 2 ...

Страница 13: ...le will be saved into the selected destination Encoding from Radio Switch to Radio mode Insert a USB SD card into the corresponding socket Select a radio channel to be recorded Press REC button REC will be shown on the display to indicate that the recording is on To stop recording press REC or STOP button When recording has been stopped the REC symbol will no longer be displayed Note If a radio st...

Страница 14: ...k 64k In any mode when ready to start recording press and hold REC button for 2 seconds REC LOW will appear on the screen Press REC button repeatedly to select one of the levels of quality from REC LOW REC MID and REC HIGH Release the button when the desired level is selected The audio will be recorded with the selected level of quality Note The command will remain for any following recording unti...

Страница 15: ...TUNE DOWN or NEXT TUNE UP buttons on the RC to adjust the hour of the desired power on time and then press TIMER button to confirm Press NEXT or BACK buttons on the unit or BACK TUNE DOWN or NEXT TUNE UP buttons on the RC to adjust the minutes of the desired power on time and then press TIMER button to confirm Now the symbol in the display changes to show TIMER OFF Press NEXT or BACK buttons on th...

Страница 16: ...ti shock memory is full the unit provides anti skip protection for 25 seconds of vibration Please note that the anti skip function only protects against normal vibration or minor movement Severe or strong shocks vibrations to the unit may still cause skipping Using the audio line in connection DVD AUX You can connect the audio output of an external device such as an MP3 player to this unit to list...

Страница 17: ...iately notice the deeper sound which can be further enhanced by switching on the super bass function on the main unit Please note that the speakers should be connected as usual to the main unit when using a subwoofer Please note that passive non powered subwoofers will not work with this unit ...

Страница 18: ... the disc which has flaw or deformation in case of damaging this unit 7 Clean your discs using only a soft dry cloth Do not use any chemicals such as benzine thinner antistatic or record sprays as these can damage the disc surface Accessories Main unit 1 pc Speaker 2 pc Stand for the main unit 1 pc Stand for the speakers 2 pcs Remote control 1 pc Instruction manual 1 pc Specification Power supply ...

Страница 19: ... 22 22 23 24 25 26 26 26 26 26 26 RDS Radio Data System 26 27 27 27 27 MP3 28 id3 28 MP3 MP3 28 MP3 MP3 USB SD 28 29 MP3 USB SD 30 3 31 CD MP3 31 31 AUX in 31 32 33 33 33 33 Sleep 34 34 34 ESP 34 DVD AUX 34 35 36 36 36 ...

Страница 20: ... 20 1 ...

Страница 21: ... 21 1 2 3 4 5 6 7 8 9 10 11 12 13 ...

Страница 22: ...ET FOLDER DOWN 4 USB SD 19 FIND DISPLAY 5 20 PRESET FOLDER UP 6 OPEN CLOSE 21 NEXT 7 VOLUME UP DOWN 22 TUNER BAND 8 PLAY PAUSE 23 AUX 9 BACK 24 USB SD 10 STOP 25 CD 11 CLOCK PROGRAM 26 FM 12 SLEEP 27 AUX IN 13 TIMER 28 14 EQ 29 15 REC 30 ...

Страница 23: ... 2 FIND M S 3 TIMER 4 EQ 5 SLEEP 6 MEMORY DOWN 7 BAND 8 INTRO 9 FUNCTION 10 REPEAT 11 MEMORY UP 12 13 MUTE 14 PROGRAM 15 CD PLAY PAUSE 16 CD NEXT TUNE UP 17 CD BACK TUNE DOWN 18 CD STOP 19 VOLUME UP 20 VOLUME DOWN ...

Страница 24: ... 24 1 2 3 1 2 3 4 ...

Страница 25: ... 25 1 2 AAA 1 2 AA L L R POWER ON OFF 1 2 3 4 ...

Страница 26: ...TUNE UP 2 NEXT BACK BACK TUNE DOWN NEXT TUNE UP CLOCK PROGRAM PROGRAM MEM DOWN MEM UP PRESET FOLDER UP PRESET FOLDER DOWN 10 30 FM CLOCK PROGRAM PROGRAM MEM DOWN MEM UP PRESET FOLDER UP PRESET FOLDER DOWN RDS Radio Data System RDS FM NEXT BACK BACK TUNE DOWN NEXT TUNE UP RDS RDS ...

Страница 27: ... PAUSE PLAY PAUSE PLAY PAUSE STOP PLAY PAUSE NEXT BACK BACK TUNE DOWN NEXT TUNE UP NEXT BACK BACK TUNE DOWN NEXT TUNE UP 64 STOP CLOCK PROGRAM PROGRAM MEMORY NEXT BACK BACK TUNE DOWN NEXT TUNE UP CLOCK PROGRAM PROGRAM 64 CLOCK PROGRAM PROGRAM MEMORY PLAY PAUSE STOP ...

Страница 28: ... MEMORY PLAY PAUSE STOP MP3 1 FIND DISPLAY FIND M S id3 3 id3 3 FIND DISPLAY FIND M S 3 FIND DISPLAY FIND M S MP3 MP3 FIND DISPLAY FIND M S FIND NEXT BACK BACK TUNE DOWN NEXT TUNE UP NEXT BACK BACK TUNE DOWN NEXT TUNE UP FIND FIND NEXT NEXT TUNE UP PLAY PAUSE FIND DISPLAY FIND M S FIND MP3 MP3 USB SD FIND DISPLAY FIND M S FOLDER NEXT BACK BACK TUNE DOWN ...

Страница 29: ... 29 NEXT TUNE UP 2 NEXT NEXT TUNE UP FOLDER NEXT NEXT TUNE UP PLAY PAUSE REPEAT ACTIVE 1 ACTIVE ALL ACTIVE ALBUM ...

Страница 30: ...1 2 0 SD 3 SD 1 USB SD USB SD USB SD FUNCTION USB CARD 5 10 3 PRESET FOLDER UP PRESET FOLDER DOWN NEXT BACK BACK TUNE DOWN NEXT TUNE UP PLAY PAUSE USB SD USB 1 1 2 0 5 USB USB 1 1 2 0 USB MP3 USB 3 USB USB USB USB USB SD 60 CD USB SD ...

Страница 31: ... REC TMCDA001 TMCDA002 USB SD TMCDA001 REC STOP MP3 REC USB SD REC REC USB 3 USB NEXT NEXT TUNE UP REC CARD 3 SD REC MP3 USB SD REC REC REC STOP REC 3 AUX in AUX USB SD REC REC REC REC STOP REC USB SD REC REC USB 3 USB NEXT NEXT TUNE UP REC CARD 3 SD ...

Страница 32: ... 32 REC MP3 USB SD MP3 FULL 3 MP3 USB SD BPS MP3 High 192k 128k Mid 128k 96k Low 64k 64k REC 2 REC LOW REC REC LOW REC MID REC HIGH ...

Страница 33: ... NEXT TUNE UP CLOCK PROGRAM PROGRAM NEXT BACK BACK TUNE DOWN NEXT TUNE UP CLOCK PROGRAM PROGRAM TIMER TIMER ON NEXT BACK BACK TUNE DOWN NEXT TUNE UP TIMER NEXT BACK BACK TUNE DOWN NEXT TUNE UP TIMER TIMER OFF NEXT BACK BACK TUNE DOWN NEXT TUNE UP TIMER NEXT BACK BACK TUNE DOWN NEXT TUNE UP TIMER CD NEXT NEXT TUNE UP TIMER NEXT BACK BACK TUNE DOWN NEXT TUNE UP TIMER ...

Страница 34: ... 34 TIMER ON TIMER OFF CD TUNER LOUDNESS TIMER TIMER TIMER POWER ON OFF ON OFF Sleep Sleep CD SLEEP OFF EQ PASS VOLUME UP VOLUME DOWN ESP MP3 25 MP3 20 25 25 DVD AUX MP3 ...

Страница 35: ... 35 RCA RCA AUX in AUX AUX RCA CD AUX super bass ...

Страница 36: ... 36 1 2 3 4 5 6 7 1 2 1 2 1 1 220 50 10 AM 530 1600 FM 88 108 433 x 264 5 x 467 6 2 7 8 195 x 425 x 275 190 x 266 x 278 ...

Отзывы: