


8
Remote control (RC)
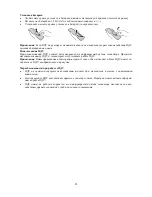
1. POWER button. Press to turn on/off the TV
set or to switch it to standby mode.
2. MUTE button. Press to turn off/on the sound.
3. Number buttons. Press to input figures.
4. LAST CHANNEL button. Press to switch to
the last watched channel.
5. SYSTEM button. Press to adjust audio pa-
rameters.
6. NICAM A2 button. Press to turn on/off the
NICAM function.
7. VOL+/VOL- button. Press to adjust the sound
volume level.
8. CH+/CH- button. Press to switch between
channels.
9. DISPLAY button. Press to display informa-
tion.
10. CURSOR (LEFT/RIGHT/UP/DOWN) but-
tons. Press for OSD navigation.
11. ENTER button. Press to confirm selection or
input data.
12. EXIT button. Press to exit from the current
menu.
13. MENU button. Press to display or hide the
OSD menu.
14. PMODE button. Press to select picture mode.
15. AV/TV button. Press to select the signal
source.
16. SMODE button. Press to select sound mode.
17. SLEEP button. Press to set shutting down
time.
18. TELETEXT buttons:
TEXT: switch between TV/Teletext
HOLD: hold or continue
PGDN: page down
PGUP: page up
INDEX: do to index
SIZE: double height rendering
REVEAL: reveal any hidden text
SUBPAGE: enter subpage
COLOR BUTTONS (RED, GREEN, YELLOW, CYAN) follow colored links in the text.
Insert the batteries in the RC
Remove the battery cover by pressing the symbol and pulling the cover space in the direction of the ar-
row.
Insert the two 1.5V (AAA size) batteries making sure the polarity (+ or -) of the batteries matches the
polarity marks inside the unit.
Replace the battery cover by sliding it in until you hear a click sound.
Содержание H-LCD3202
Страница 1: ...H LCD3202 LCD TV Instruction manual ...
Страница 16: ...16 16 17 19 19 20 24 29 29 30 LCD HYUNDAI ...
Страница 17: ...17 20 50 2 ...
Страница 18: ...18 LCD 10 LCD LCD LCD 18 2 LCD ...
Страница 19: ...19 32 81 16 9 1366 x 768 500 2000 1 170º 170º 8 PAL SECAM NICAM 2 HDMI VGA 2 SCART RF 100 240 B 50 60 ...
Страница 20: ...20 TV AV MENU CH TV VOL POWER ...
Страница 23: ...23 1 5 AAA ...
Страница 24: ...24 MENU MENU ENTER MENU CH CH ...
Страница 25: ...25 ENTER EN TER MENU ENTER MENU ENTER MENU ENTER MENU NTSC MENU ENTER ...
Страница 26: ...26 MENU MENU ENTER ENTER MENU MENU ENTER ...
Страница 28: ...28 ENTER MENU MENU ENTER PIP PIP EN TER PIP PIP YPbPr VGA HDMI1 HDMI2 PIP TV AV SCART1 SCART2 PIP ...
Страница 29: ...29 VGA CH CH ...


