
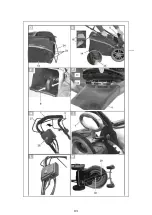


3. Insert the mulch kit (8).
Remove mulch kit
4. Lift the flap.
5.
Release the mulch kit (8) by pressing together the double grips and then remove it.
Side discharge (Fig G)
Before using the lateral grass ejection, the mulching kit and grass catcher shall be removed.
1. Unlock the side discharge protection (11) by pulling the locking element (11a) to the left and
opening the lateral impact protection (11).
2. Mount the side discharge (9) on the hook.
Adjusting the cutting height (Fig.I)
Switch o
ff
the equipment, disconnect the plug and wait for the blade to stop. There is a risk of
injury.
The equipment has 6 positions for setting the cutting height (25-75 mm):
1. Pull the lever (7) outwards and push it to the desired position.
2. Push the lever back in.
3. Also set the appropriate height on the front wheel.
The label on the wheel mounting shows the associated settings for the cutting height
associated settings.
Loosen the wing nut and fasten the wheel in the desired position.
4. The alignment of the wheel is fixed once the clamping brackets (28) snap into place. If the
wheel is desired in another running direction, lift clamping bracket to release it. Bring wheel
into new position and clamping brackets snaps into place once again.
Adjust front wheels
The lawn mower is extremely flexible and maneuverable thanks to the special construction of
the front wheels.
These are to be adjusted according to the specific situation as follows:
1. The alignment of the wheel is fixed once the clamping brackets (28) snap into place. If the
wheel is desired in another running direction, lift clamping bracket to release it. Bring wheel
into new position and clamping brackets snaps into place once again.
2. Should the front wheels remain able to move freely, lift the clamping brackets (28) and do
not place them in the opening, but rather set them on the plate beside it.
Switching On and Off
The red light above the release button will illuminate as soon as the lawn mower is connected
to a power supply.
1. Connect the mains plug (A15) to the extension cable.
2. Make a loop in the end of the extension cable and suspend this in the cable strain relief (3).
3. Connect the equipment to the power supply.
4. Before switching on, ensure that the equipment is not in contact with any objects.
5. To switch on, press and hold the release button (26) on the hand grip and pull the safety
bracket (2) towards the bow-type handle (1).
Release the release button (26).
6. Wheel drive:
On: Pull the drive catch (27) towards the handle bar. The mower moves forwards.
O
ff
: Release the drive catch (27) the equipment stops.
7. To switch o
ff
, release the safety bracket (2).
16
Содержание HTDE511RP
Страница 1: ...ELECTRIC LAWN MOWER HTDE511RP WARNING Read thoroughly the instruction manual before use ...
Страница 2: ...02 ...
Страница 3: ...03 ...
Страница 23: ......