


ASSEMBLY
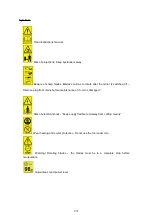
Caution! Risk of injury from rotating blades. Carry out work on the equipment only
when the blade is switched o
ff
and stationary.
Disconnect the plug before any work on the equipment.
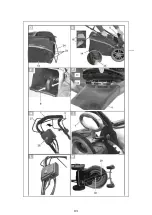
Mount the front wheel
1. From the back, insert the screws through the openings (the longer screws must be fitted into
the lower hole) and fasten the rods of the front wheel with the nuts.
2. Fasten the cladding on to the lower, still protruding screws.
Install lower bar (Fig. B)
1. Place the holes on the lower bar (5) over the screws (19) at the right and left of the device
housing.
2. Tightly screw in the bar (5) with a screw on each side (18) and a star grip nut (17).
Install curved handle (Fig. C)
1. Tilt the bow-type handle (1) into position.
2. Turn the clamping levers (20) clockwise.
3. Lock the clamping levers (20) by pushing them towards the bar (5). Clamping levers to be
tightened and contacting the bar such that they clamp at average force.
Otherwise you may have to tighten (turn clockwise) or loosen them (turn anticlockwise).
Clip on the cable hook:
Clip the cable holders (4) onto the bar (5) and bow-type handle (1) in order to secure the
device cable (21) and Bowden cable (22).
I
nstall/empty grass catcher (Fig D&E)
Caution: Use the equipment when the grass catcher is completely and properly
installed.
The mulching kit and side discharge should not be installed on the machine when the
grass catcher is to be installed.
Assemble grass catchment basket (14):
Pull plastic loops (23) over basket rods (24).
Fixing the grass catcher
The mulch kit and lateral discharge must be removed prior to using the collection bag.
1. Lift up shock protection (6).
2. Hook the grass collection box (14) into the mounting provided for this (25) on the rear of the
equipment.
3. Release the flap (6).
Dismantling/Empty out the Grass Collection Box
4. Lift the impact protection (6) and remove the grass collection box (14)
5. Empty catchment basket and re-install it.
Level gauge (fig. E)
The level gauge (E 16) is located on the side of the grass catcher (
E
14). The aerodynamic air
guidance provided by the flap also optimizes the filling.
GO
Flap open: grass catcher empty
STOP Flap closed: grass catcher full
Attaching mulching kit (fig. F)
Prior to using the mulch kit, the lateral ejection canal has to be removed.
1.
Remove the grass catcher, if installed.
2.
Lift the flap.
15
Содержание HTDE511RP
Страница 1: ...ELECTRIC LAWN MOWER HTDE511RP WARNING Read thoroughly the instruction manual before use ...
Страница 2: ...02 ...
Страница 3: ...03 ...
Страница 23: ......