background image


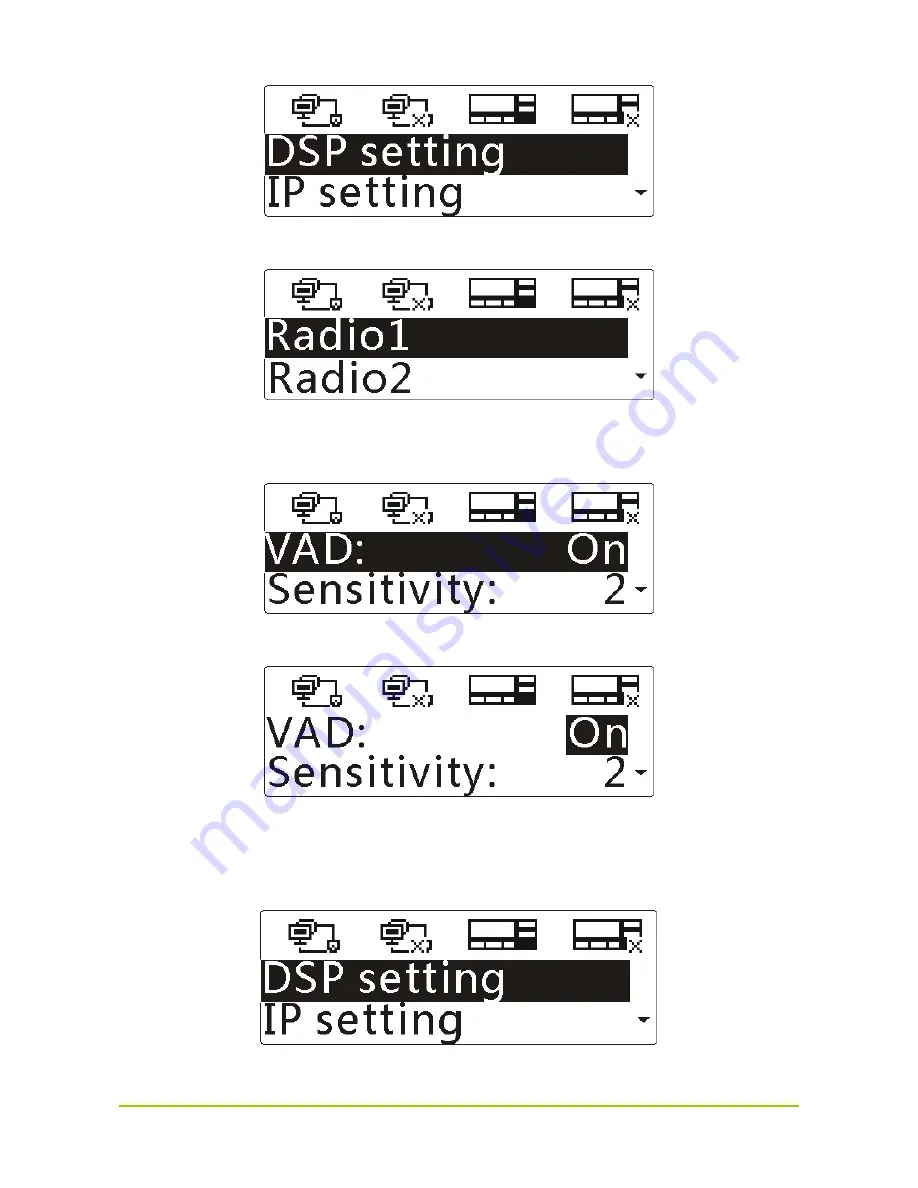
Step 2 

Press the 

OK

 key to enter the menu, as shown below.   


Step 3 

Press the 

Up/Down

 key to highlight “Radio1” or “Radio2”, and then press the 

OK

 key to enter 

the menu.   


Step 4 

Press the 

OK

 key to select “VAD”, and then press the 

Up/Down

 key to highlight “On” or “Off”.   


Step 5 

Press the 

OK

 key to finish.   

Setting the Sensitivity 

Step 1 

Press the 

Up

 key to highlight “DSP setting” in the main menu, as shown below.   


Step 2 

Press the 

OK

 key to enter the menu, as shown below.   

Содержание DS-6610 VPUC

Страница 1: ...Preface Thanks for your favor in our product To derive optimum performance from the product please read this manual carefully before use This manual is applicable to the following product DS 6610 VPUC...

Страница 2: ...nt of the Company Disclaimer The Company endeavors to achieve the accuracy and completeness of this manual but no warranty of accuracy or reliability is given All the specifications and designs are su...

Страница 3: ...with the limits for a Class A digital device pursuant to part 15 of the FCC Rules These limits are designed to provide reasonable protection against harmful interference when the equipment is operated...

Страница 4: ...ols 4 3 2 LED Indicator 4 3 3 LCD Display 5 4 Basic Operations 6 4 1 Turning the Gateway On Off 6 4 2 Resetting the Gateway 6 4 3 Making the Basic Settings 6 5 3 1 DSP Settings 6 5 3 2 IP Settings 10...

Страница 5: ...Warning Indicates situations that could cause minor personal injury Danger Indicates situations that could cause major personal injury or even death Notation Conventions Item Description The quotatio...

Страница 6: ...the product carefully before use z This product shall be serviced by qualified technicians only z Use the accessories specified by the Company only in order not to damage the product z Keep the produc...

Страница 7: ...east 2 meters away from each sucker antenna and also keep the sucker antennas at least 2 meters away from each other The frequencies of the two mobile radios must be different so as to avoid frequency...

Страница 8: ...Indicator 12 Serial Port RS232 5 LCD Display 13 Ethernet Port 0 RJ45 6 Function Keys Menu OK Up Down Key 14 Ethernet Port 1 RJ45 7 Reset Key 15 Ground Screw 8 Power Switch 3 2 LED Indicator LED Indica...

Страница 9: ...eiving voice from Radio 2 3 3 LCD Display The display information on the LCD display is shown below No Name Description 1 Status Bar Displays the connection status of the Ethernet ports and the radios...

Страница 10: ...key 5 3 1 DSP Settings You can set the DSP for voice calls The DSP settings include the settings of voice activity detection VAD sensitivity call hang time and RX audio delay time The VAD feature is...

Страница 11: ...n press the OK key to enter the menu Step 4 Press the OK key to select VAD and then press the Up Down key to highlight On or Off Step 5 Press the OK key to finish Setting the Sensitivity Step 1 Press...

Страница 12: ...y to highlight Sensitivity as shown below Step 5 Press the OK key and then press the Up Down key to set the sensitivity level as shown below The smaller value indicates higher sensitivity Step 6 Press...

Страница 13: ...ess the OK key to enter the menu Step 4 Press the Down key to highlight Hang Time as shown below Step 5 Press the OK key and then press the Up Down key to set the time as shown below Step 6 Press the...

Страница 14: ...ss the OK key to enter the menu Step 4 Press the Down key to highlight Delay Time as shown below Step 5 Press the OK key and then press the Up Down key to set the time as shown below Step 6 Press the...

Страница 15: ...Press the Up Down key to highlight IP settings in the main menu as shown below Step 2 Press the OK key to enter the menu as shown below Step 3 Press the Up Down key to highlight Network0 or Network1 a...

Страница 16: ...as shown below Step 3 Press the Up Down key to highlight Network0 or Network1 and then press the OK key to enter the menu Step 4 Press the Down key to highlight Mode as shown below Step 5 Press the O...

Страница 17: ...highlighted Repeat above mentioned steps until you finish setting the IP address Note Upon wrong settings of the IP address the corresponding prompt will appear and then you need to set it again Step...

Страница 18: ...Down key to highlight Mode as shown below Step 5 Press the OK key and then press the Up Down key to highlight Dhcp as shown below Step 6 Press the OK key to finish 5 3 3 Language Settings You can set...

Страница 19: ...shown below Step 4 Press the OK key to finish 5 3 4 Gateway Information Check You can view the gateway information such as the software and hardware versions network and the storage Viewing the Versi...

Страница 20: ...of software and hardware Viewing the Network Information Step 1 Press the Down key to highlight About in the main menu as shown below Step 2 Press the OK key to enter the menu as shown below Step 3 P...

Страница 21: ...Step 1 Press the Down key to highlight About in the main menu as shown below Step 2 Press the OK key to enter the menu as shown below Step 3 Press the Down key to highlight Storage Info and then press...

Страница 22: ...18 5 Product Configuration Before using the gateway you need to configure it and the server For detailed configuration see the DS 6610 VPUC Configuration Guide in the disc...

Страница 23: ...z Keep the product away from extreme cold otherwise the circuit board may be damaged by vapor generated when the product is used at normal temperature Product Cleaning Caution Turn off the product an...

Отзывы: