background image

HYT WATCHES - KAIROS TECHNOLOGY SWITZERLAND (KTS) SA - RUE DE PRÉBARREAU 17 - 2000 NEUCHÂTEL - SWITZERLAND - WWW.HYTWATCHES.COM

8

SETTING THE TIME

Pos 2.

2

1

INTRODUCTION

This function allows the time shown on your watch to be set using the crown.

IMPORTANT

• 

The microfluids in the capillary move with the gentle rotation of the crown.

• 

It is recommended that the fluid is moved by only 15 minutes by touching the 

crown.

HOW TO USE

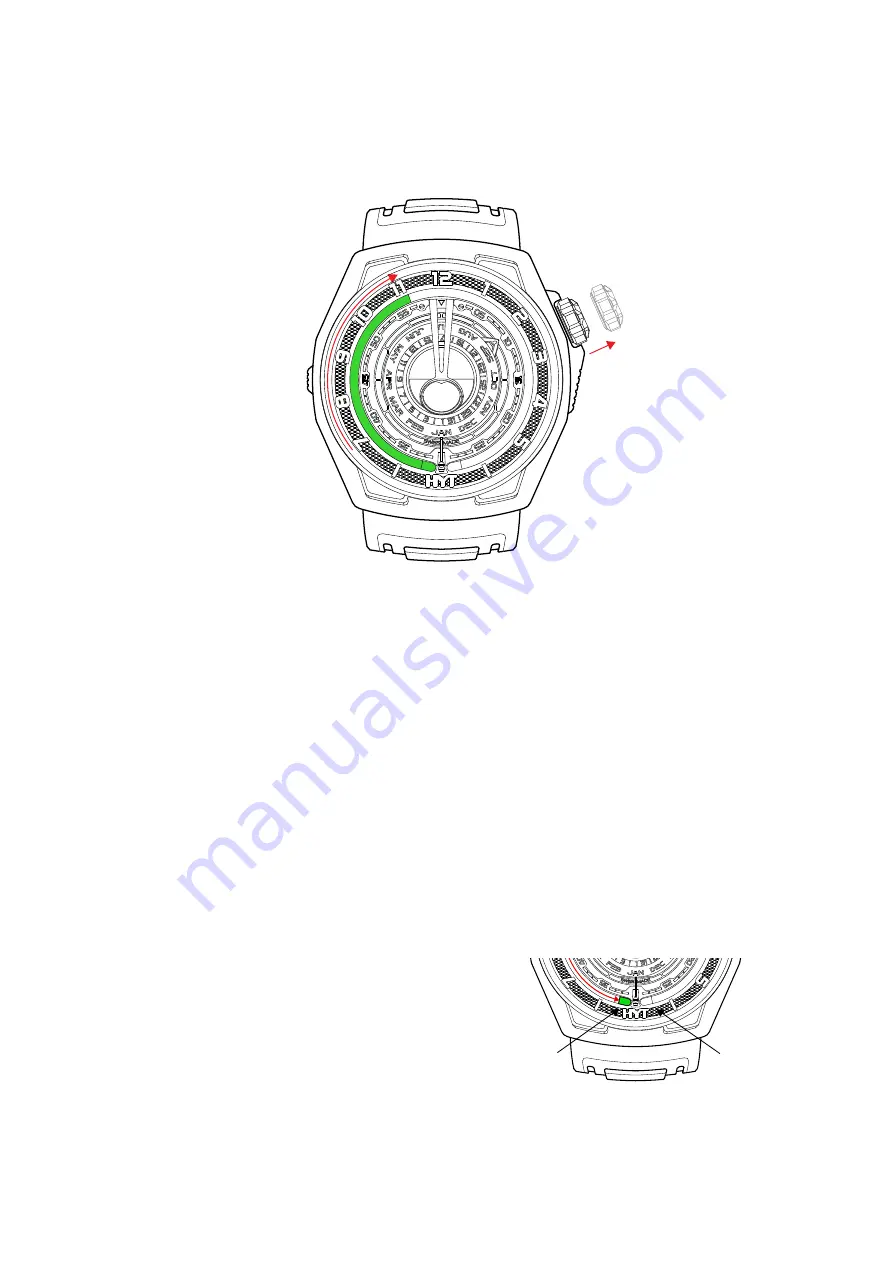
•  Pull the crown out to position «B».

•  Then turn the crown in either direction until the coloured liquid (hour display) 

Turning the crown 

once is the equiva-

lent of a change of 

around 15 minutes.

REWIND

• 

The automatic return of the coloured liquid 

(rewind)  is  allowed  by  the  pressure  of  the 

two bellows. It can take up to 1 minute for it 

to return to zone 1. It is strongly advised that 

you  wait  for  the  coloured  liquid  to  return 

completely to zone 1 before you continue to 

set the time.

A

B

Zone I

Zone II

Содержание MOON RUNNER

Страница 1: ...INSTRUCTION MANUAL AND WARRANTY MOON RUNNER ...

Страница 2: ...TS SA RUE DE PRÉBARREAU 17 2000 NEUCHÂTEL SWITZERLAND WWW HYTWATCHES COM 2 GLOSSARY QUICK GUIDE WINDING SETTING THE TIME SETTING THE TIME COUNTER CLOCKWISE QUANTIEME MOONPHASE SETTING DISPLAY TIME EXAMPLES p 3 p 6 p 7 p 8 p 9 p 9 p 10 11 1 2 3 4 ...

Страница 3: ...separation surface of the liquids in the tube showing the time 3 Bellows The bellows are the two reservoirs located at 6 o clock They are made of a highly resistant and flexible alloy which is four times finer than a human hair The move ment compresses the left bellow which is emptied of its coloured liquid The other bellow then fills up and vice versa moving the liquid in the capillary and with i...

Страница 4: ...eived when you purchased your watch is a QR code that gives you access to this document which serves as a warranty certificate for your HYT watch The warranty is activated when you purchase from our network of HYT approved dealers You must show your warranty card to be eligible to use the warranty for any repairs or checks Your HYT watch is guaranteed against any manufacturing defect for five year...

Страница 5: ...aterproof casing your HYT watch is completely washable It must be cleaned regularly using warm soapy water rinsed and then carefully dried with a soft cloth Following exposure to sea water rinse your HYT watch in fresh water Make sure you do not expose your watch to temperatures above 50 C 122 F for too long Important if you do not intend to wear the watch for some time the coloured liquid must be...

Страница 6: ...SWITZERLAND WWW HYTWATCHES COM 6 QUICK GUIDE 1 2 A B C A Time display hours Capillary B Minutes hand C Crown setting Pos 1 winding Pos 2 setting the time pulled out F D E D Day setting push button with finger E Month setting with correction tool F Moon phase setting with correction tool ...

Страница 7: ... DE PRÉBARREAU 17 2000 NEUCHÂTEL SWITZERLAND WWW HYTWATCHES COM 7 WINDING Pos 1 1 INTRODUCTION This function ensures that the power necessary to operate your watch is stored by the movement HOW TO USE Wind the watch by turning the crown clockwise as in 1 ...

Страница 8: ... is moved by only 15 minutes by touching the crown HOW TO USE Pull the crown out to position B Then turn the crown in either direction until the coloured liquid hour display Turning the crown once is the equiva lent of a change of around 15 minutes REWIND The automatic return of the coloured liquid rewind is allowed by the pressure of the two bellows It can take up to 1 minute for it to return to ...

Страница 9: ...U 17 2000 NEUCHÂTEL SWITZERLAND WWW HYTWATCHES COM 9 SETTING THE TIME COUNTER CLOCKWISE IMPORTANT When the coloured liquid is in zone 1 do not correct the time in the direction opposite to the watch hands A B Zone I Zone II DISPLAY TIME EXAMPLES 1 6 09 2 10 35 3 5 50 ...

Страница 10: ...ERLAND KTS SA RUE DE PRÉBARREAU 17 2000 NEUCHÂTEL SWITZERLAND WWW HYTWATCHES COM 10 QUANTIEME MOONPHASE 1 INTRODUCTION The setting of the date and the moon phase begins with the setting of the day then the month and then the moon phase A ...

Страница 11: ...ired day SETTING THE MONTH 2 Using the tool provided press the thinnest part of the corrector M to move to the next month Repeat the action as many times as necessary to reach the desired month SETTING THE MOON PHASE 3 Using the tool provided press the thinnest part of the corrector to move to the next day of the lunar cycle Repeat the action as many times as necessary to reach the desired day of ...

Отзывы: