background image

PINION REPAIR

  CAUTION

Steering functions will not operate properly if pin-
ions  are  not  aligned  properly  with  steer  swivel
(control handle) and drive tire.

Remove and repair the pinion assemblies as necessary.

Upper Pinion

After removing the articulating shaft, the upper pinion can
be removed from the support base for repair.

1. 

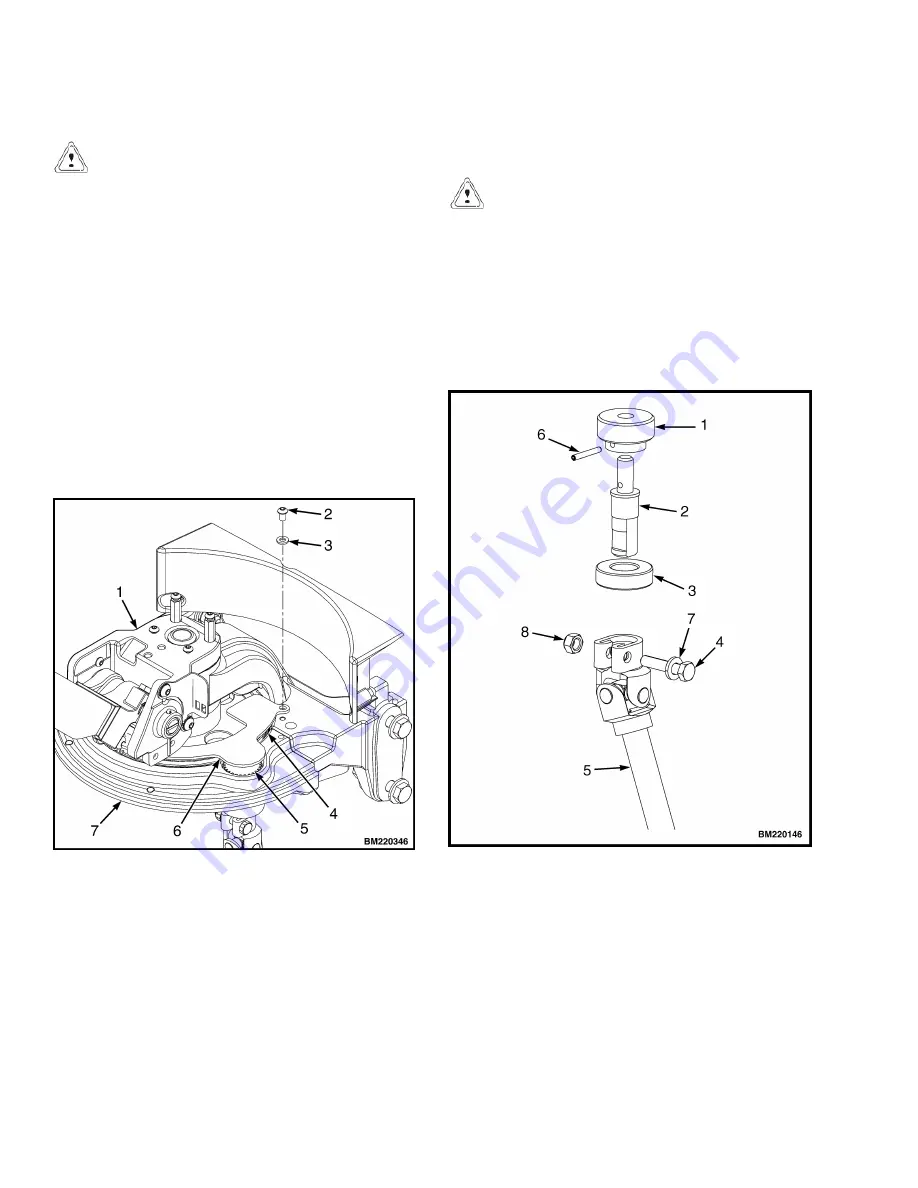
Remove two screws, two washers and gear cover plate
from the steer support. See Figure 10.

NOTE:   

Disassemble  only  as  necessary  for  repair.  Pinion

assembly  parts  are  not  individually  repairable,  but  the  as-
sembly may be replaced as a whole.

1. STEER SWIVEL

2. WASHER

3. SCREW

4. STEER SUPPORT GEAR

5. PINION GEAR

6. GEAR COVER PLATE

7. SUPPORT BASE

Figure 10. Gear Cover

2. 

Lift the upper pinion assembly from the support base.
Remove  bearing  from  shaft.  Drive  pin  from  gear  and
remove gear from shaft as necessary. See Figure 11.

3. 

Install  gear  to  shaft  as  removed.  Align  hole  in  gear
with hole in shaft and install retaining pin. Install bear-
ing onto shaft.

  CAUTION

Ensure  that  pinion  shaft  notch  and  steer  swivel
(control  handle)  are  aligned  in  the  "straight
ahead" position before continuing.

4. 

Install the pinion into the support base with the notch
aligned  with  the  steer  swivel  (control  handle)  in  the
straight  ahead  position.  Position  the  gear  cover  to  the
support base and install two screws and washers to se-
cure.

1. PINION GEAR

2. PINION SHAFT

3. BEARING

4. CAPSCREW

5. ARTICULATING

SHAFT

6. RETAINING PIN

7. WASHER

8. LOCK NUT

Figure 11. Upper Pinion Assembly

Articulating Shaft and Pinions (EPAS)

1600 SRM 1637

12

Содержание B257

Страница 1: ...Hyster B257 B60ZHD B80ZHD Forklift...

Страница 2: ...STEERING MECHANISM B60ZAC C230 B60ZHD B262 B80ZHD B257 PART NO 4096087 1600 SRM 1637...

Страница 3: ...iodic Maintenance section Keep the unit clean and the working area clean and orderly Use the correct tools for the job Keep the tools clean and in good condition Always use HYSTER APPROVED parts when...

Страница 4: ...inion Repair 12 Upper Pinion 12 Lower Pinion 13 Install 14 Steer Motor Assembly 14 Repair 14 Steer Motor Replace 14 Steer Motor Gear Replace 14 Gearbox Complete Assembly Replace 15 Steer Support Assem...

Страница 5: ...ore information Please click here Then get the complete manual NOTE If there is no response to click on the link above please download the PDF document first and then click on it Have any questions pl...

Страница 6: ...This section is for the following models B60ZAC C230 B60ZHD B262 B80ZHD B257 Table of Contents Steering Mechanism ii...

Страница 7: ...tment is concealed behind a molded cover which fits securely around the steer support assembly and into the frame The floor mat fits snugly in the operator platform after the drive unit cover has been...

Страница 8: ...ting or disconnecting a handset or PC CAUTION To avoid controller damage always disconnect the battery Discharge the capacitor and never put power to the controller with any power wire dis connected N...

Страница 9: ...to be performed Power assist steering calibration should be performed if ei ther the torque sensor or power assist steering unit is serv iced or replaced or anytime the drive tire is replaced 1 Posit...

Страница 10: ...handle head refer to the section Electrical System 2200SRM1640 CONTROL HANDLE The following procedures describe the removal and disas sembly of parts of the control handle and dash assembly for repai...

Страница 11: ...ecover shims for later installation Remove the control handle arm from the swivel 9 Carefully pull the wiring harnesses through the center of the support 10 Remove bushings from the control handle arm...

Страница 12: ...d full down positions Turn the control handle fully to the left and right to check for restrictions 9 With the control handle in the upright position pull the harness and check for binding Position th...

Страница 13: ...ecial Precautions in this section CAUTION DO NOT cut the wiring harnesses when removing the wire ties NOTE It is not necessary to remove the main wiring har ness unless harness is damaged and is being...

Страница 14: ...sition control handle to swivel Install pivot pin into control arm and swivel 3 Install cotter pin into pivot pin Install grease fitting if removed 4 Reconnect control handle wiring as removed Refer t...

Страница 15: ...lease with enough force to cause personal injury or property damage Review the following procedures before removing the gas spring DISCHARGING THE GAS SPRING WARNING Goggles and a face shield must be...

Страница 16: ...punch and hammer Re move the gas spring See Figure 8 INSTALL 1 Install ball stud and nut into control arm if removed Tighten to 27 N m 20 lbf ft 2 Lubricate both connection points with multipurpose l...

Страница 17: ...ws and remove the dash assembly Secure dash out of the way or tag identify and discon nect all wiring from the BDI display and key switch if necessary to remove the dash Refer to Electrical Sys tem 22...

Страница 18: ...SE Figure 10 Gear Cover 2 Lift the upper pinion assembly from the support base Remove bearing from shaft Drive pin from gear and remove gear from shaft as necessary See Figure 11 3 Install gear to sha...

Страница 19: ...aft and bearing from mounting bracket Remove bearing from shaft See Figure 13 1 LOWER PINION MOUNTING BRACKET 2 WASHER 3 LOCKWASHER 4 CAPSCREW 5 RETAINING WASHER 6 GEAR 7 BEARING 8 WOODRUFF KEY 9 PINI...

Страница 20: ...y sec tions the electric motor the gearbox and the steer motor gear Repair procedures vary greatly depending on what components are being serviced If only the electric motor or the steer motor gear is...

Страница 21: ...ring systems from operating properly 1 Mark the articulating shaft lower pinion gear and the steer gear so it can be reassembled in the exact same place Refer to Articulating Shaft and Pinions Power A...

Страница 22: ...Install the Woodruff key into the groove in the motor shaft and install the steer gear onto the shaft and key 9 Install cover and floor mat as removed See General General Connect the battery and turn...

Страница 23: ...washers and nuts securing stand off to steer plate b Lower stand off and bearing assembly from the support c Remove the lower bearing from stand off using a standard bearing puller then remove spacer...

Страница 24: ...ect wiring to the BDI display and key switch if removed Align the slots in the dash with the retaining screws and position the dash to the steering support and frame Tighten the two screws to secure t...

Страница 25: ...position and discon nect battery Remove the drive unit compartment cov ers 2 Discharge the capacitor See Special Precautions in this section 3 Remove the two capscrews securing the cover to the steer...

Страница 26: ...ort base See Figure 19 Lower the support base from the center support 4 Remove the snap ring and bearing from the support base using an appropriate sized driver 5 Remove the pin from the bottom of the...

Отзывы: