background image

HyQuest Solutions Pty Ltd 

WS200/WS300/WS500

Page 

4 of 28

©  

Copyright

OPERATION


The current meter can be fitted with a stabiliser tail fin which is attached to a hanger bar and 
Colombus gauging weight in sizes of 7, 15, 23, 34, 45 and 68 Kg.  This assembly is suspended from 
the WS250/400/500 gauging winch with armoured signal cable. 

HyQuest Solutions provides a range of counters to operate with the WS250/400/500 winch. The 
models available are CMC20A, CMCsp, PVD100

, PVD200

 and the Hydro

Tab/CMCbt android 

device.


Initial


set


up:


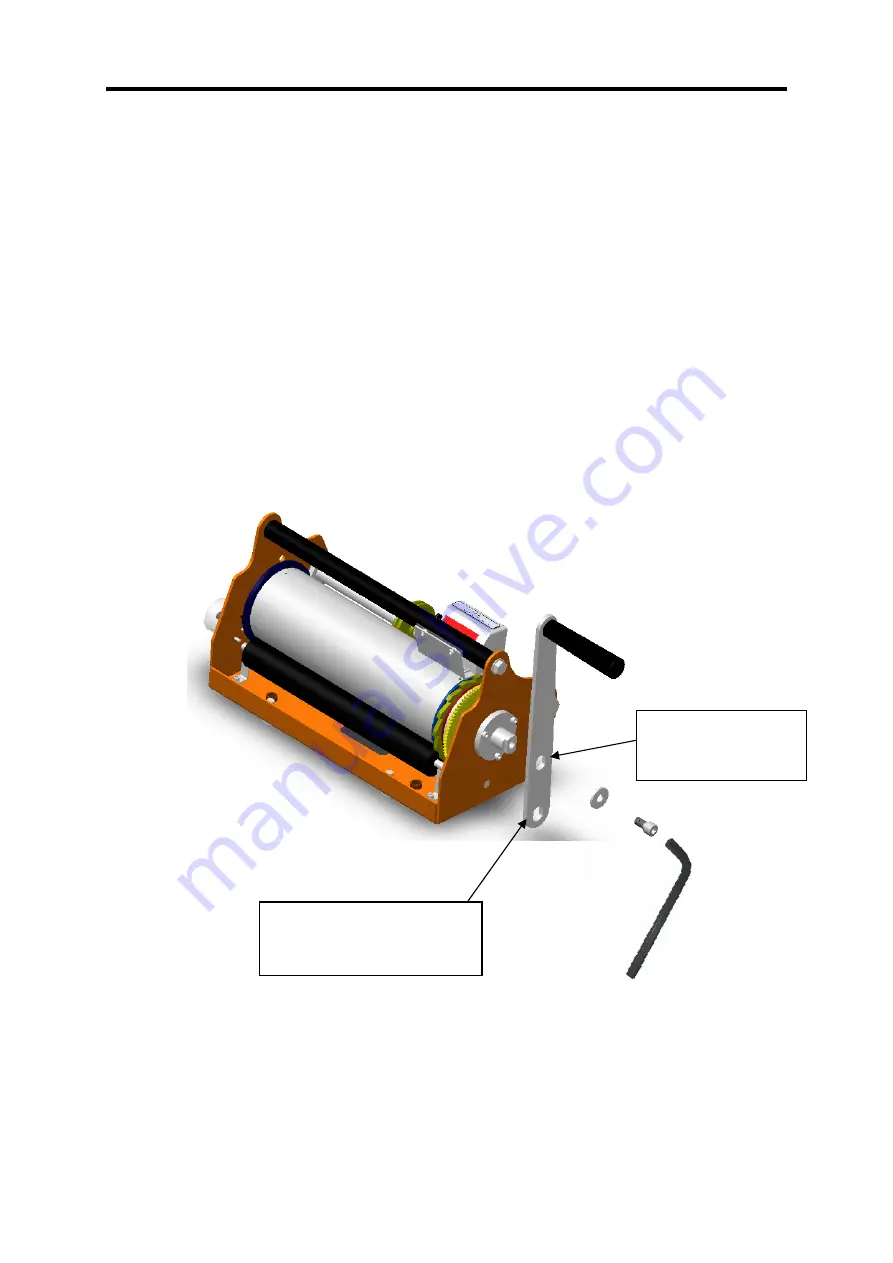
Remove the winch from the carry case.

Fit handle, washer and M10 retaining screw onto the shaft of the winch. Use the supplied

Allen Key” 

to tightly lock the retaining screw.

For light gauging 
weights use this 
position on the handle 

For heavy gauging weights, 
use this position on the handle 
to gain more torque 

ISSUE 3:11/6/19

Содержание WS250

Страница 1: ...6 19 Copyright HYQUEST SOLUTIONS PTY LTD 48 50 Scrivener St Warwick Farm NSW 2170 AUSTRALIA Phone 61 2 9601 2022 Fax 61 2 9602 6971 Email sales hyquestsolutions com au Web www hyquestsolutions com au QUALITY SYSTEM ISO 9001 CERTIFIED WS250 WS400 WS500 INSTRUCTION MANUAL ...

Страница 2: ...ENTS 2 INTRODUCTION 3 OPERATION 4 Initial set up 4 MAINTENANCE 7 SPECIFICATIONS 8 FAULT FINDING 9 Mechanical 9 Electrical 9 FITTING AMERGRAPH CABLE TO SLIPRING 11 FITTING C1 CONNECTOR TO AMERGRAPH CABLE 14 FITTING ANGLE PLUG TO AMERGRAPH CABLE 15 FITTING TEE PLUG TO AMERGRAPH CABLE 17 PART LIST 18 ...

Страница 3: ... task hence measurement is performed from a boat or a bridge All models are fitted with an automatic Weston brake assembly that will hold the load in position once the crank handle is stopped Hence to operate the winch and lower the suspended current meter gauging weight it is necessary to rotate the handle in a counter clockwise position They are also fitted with amergraph cable and a C1 connecto...

Страница 4: ... cable HyQuest Solutions provides a range of counters to operate with the WS250 400 500 winch The models available are CMC20A CMCsp PVD100 PVD200 and the HydroTab CMCbt android device Initial set up Remove the winch from the carry case Fit handle washer and M10 retaining screw onto the shaft of the winch Use the supplied Allen Key to tightly lock the retaining screw For light gauging weights use t...

Страница 5: ...nt meter Using the Winch Board All models can be used with the HyQuest Solutions Winch board model SAN22SS Due to the wide drum width on the Model WS500 it is not suitable for the 3WBC or 4WBC Bridge Crane products Note The Winch Board is light weight and is easily handled for performing boat or bridge gauging The WS250 400 500 is mounted to the winch board using the 4 mounting holes on the bottom...

Страница 6: ...28 Copyright Using the A Reel Trolley Note The WS250 400 is mounted to the 3WBC Bridge Crane using the 4 mounting holes on the bottom of the frame and the 4 bolts supplied with the winch A Reel Trolley used to perform gauging from a bridge ISSUE 3 11 6 19 ...

Страница 7: ...e rotating as it may cause the number reels to momentarily jam If this happens stop rotating the handle and then press the reset button again Lower the current meter and weight to 0 2m 0 6m or 0 8m of the water level and measure the velocity MAINTENANCE The only maintenance required is to lightly oil or grease the Layer winding screw periodically This usually is required if the lead screw appears ...

Страница 8: ...est WS250 25m 84ft 20m 65ft WS400 40m 131ft 30m 99ft WS500 50m 164ft 40m 131ft 4 x M10 mounting holes for winch board with outrigger model SAN22SS 4 x M10 mounting holes for A reel trolley Manual Winch Model Length mm inch Width mm inch Height mm inch Weight Kg lb WS250 341mm 13 4 210mm 8 3 230mm 9 15Kg 30 lb WS400 460mm 18 210mm 8 3 230mm 9 17Kg 38 lb WS500 540mm 21 210mm 8 3 230mm 9 23Kg 50 lb L...

Страница 9: ...and down several times with Weston brake engaged If no improvement dismantle and check for grease on friction surfaces Layer winding sheave not freely running emitting squealing noise or lead screw dry Shaft dirty Remove from winch and clean sheave and shaft separately Lightly oil or grease after re installing Thread damaged Repair damaged thread with file Lightly oil or grease after re installing...

Страница 10: ...e wire on the slipring if loose or broken If broken see section fitting amergraph cable to slipring Fault Symptom Possible Cause Action Current meter counter registering continuously Faulty lead Fit lead to counter only Signal shows internal short circuit in lead Inspect for break or damage Current meter or angle plug are faulty Disconnect meter If signal still emitting continuously Check the eart...

Страница 11: ...ep1 Step2 Step3 Remove 95 mm 3 7 of the outer layer of the amergraph cable Remove 80 mm 3 of the inner layer of the amergraph cable cut 65mm 2 5 neatly Twist the other 15mm to the edge of the cable as shown Add Heat shrink to the inner layer as shown Feed the cable through drum end as shown ISSUE 3 11 6 19 ...

Страница 12: ... 28 Copyright Step4 Step5 Solder the ring terminal to the end of the contact wire and slide the Heat shrink over and shown Apply heat to Heat shrink Slide 105mm 4 of Heat shrink above the cable end as shown This is how the cable should look ISSUE 3 11 6 19 ...

Страница 13: ...Quest Solutions Pty Ltd WS200 WS300 WS500 Page 13 of 28 Copyright Step6 Screw the ring terminal to slipring using the existing screw and tighten the cable clamp and test signal Cable clamp ISSUE 3 11 6 19 ...

Страница 14: ...gh the connector body C101 01 Connector Body C101 01 2 Loop the cable and push back through the connector for approximately 400MM Wedge C101 02 3 Fit Wedge inside cable loop 4 Pull cable back until wedge is held and then pull cable again tightly to lock Wedge in position Pin C101 03 R Clip SC019 01 Pull FITTING C1 CONNECTOR TO AMERGRAPH CABLE ISSUE 3 11 6 19 ...

Страница 15: ... outer layer of cable and cut off at tape 4 Unwind inner cable layer back to tape one strand at a time and cut off 3mm 1 8 in front of the insulation tape 5 Slide flanged bush forward and bend the short inner layer strands onto the bush 6 Strip conductor insulation back to 8mm 5 16 in front of the flanged bush 7 Coat copper conductor wire with resin cored solder BE CAREFUL not to heat wire insulat...

Страница 16: ...ther end of the plug and check that the conductor wire is in the centre of the plug hole 9 Screw nut onto plug and tighten with a spanner 10 Screw pin into plug and tighten using a 1 16 Allen key as a lever 11 Slide rubber insulator onto pin 12 Check circuit Angle Plug Assembly AP02 Plug Rubber Seal Check Location of Conductor Wire ISSUE 3 11 6 19 ...

Страница 17: ...f 28 Copyright FITTING TEE PLUG TO AMERGRAPH CABLE 1 Proceed steps 1 9 on both sides of plug 2 Screw pin into plug and tighten using 1 16 hexagon wrench as a lever 3 Slide rubber insulator onto pin 4 Check circuit Angle Plug Assembly TP02 ISSUE 3 11 6 19 ...

Страница 18: ... of 28 Copyright PART LIST ITEM NO PART NUMBER DESCRIPTION QTY 1 WS401 FRAME 1 2 SC008 78 M10 NUTSERT 8 3 SC017 35 M10 HEX BOLT 6 4 SC004 34 M10 FLAT WASHER 6 5 SC045 21 M5x12 SOC HD SCREW 3 6 SC045 88 M5x8 SOC HD SCREW 3 Frame Assembly ISSUE 3 11 6 19 ...

Страница 19: ...HyQuest Solutions Pty Ltd WS200 WS300 WS500 Page 19 of 28 Copyright Drum Assembly ISSUE 3 11 6 19 ...

Страница 20: ...S402 04 BRAKE PAD 2 11 WS402 05 RATCHET 1 12 WS402 06 BRAKE SPACER 1 13 WS402 07 GEAR SPACER 1 14 WS402 08 DRUM GEAR 1 15 SC045 88 M5 x 8 SOC HD SCREW 3 16 LAT10 02 MYLAR DISK 1 17 LAT10 03 SLIP RING 1 18 LAT10 04 INSULATING BUSH 4 19 SC016 02 1 8W x 1 4 CHEESE HD SLOT SCREW 4 20 SC006 166 CABLE CLAMP 1 21 SC048 30 BUSH 1 22 SC042 08 1 8 ROLL PIN 6 Drum Assembly ISSUE 3 11 6 19 ...

Страница 21: ...opyright ITEM NO PART NUMBER DESCRIPTION QTY 23 WS403 03 PAWL BUSH 1 24 WS403 02 PAWL 1 25 WS403 01 PAWL SHAFT 1 26 WS403 05 PAWL SPRING 1 27 WS403 04 PAWL RETAINER RING 1 28 SC004 34 M10 FLAT WASHER 1 29 SC050 06 M2 5 SPLIT PIN 1 Pawl Assembly ISSUE 3 11 6 19 ...

Страница 22: ...ty Ltd WS200 WS300 WS500 Page 22 of 28 Copyright ITEM NO PART NUMBER DESCRIPTION QTY 30 WS404 01 BEARING HOUSING 1 31 SC058 36 BEARING 25ID x 42OD x 9W 1 32 WS404 02 BEARING RETAINER 1 RHS Bearing Assembly ISSUE 3 11 6 19 ...

Страница 23: ...CRIPTION QTY 33 WS405 01 SIGNAL ADAPTOR HOUSING 1 34 SC044 18 BANANA PLUG BLACK 1 35 SC044 17 BANANA PLUG RED 1 36 WS405 02 SIGNAL ADAPTOR PROTECTOR 1 37 SC016 22 M4x25L CHEESE HD SCREW SLOT 1 38 SC039 20 M5x20L GRUB SCREW 1 39 SC077 01 CONTACT BRUSH 1 Signal Adaptor Assembly ISSUE 3 11 6 19 ...

Страница 24: ...LE 1 41 SC047 27 DEPTH COUNTER 1 42 WS406 03 COUNTER GEAR 1 43 WS406 04 COUNTER GEAR HUB 1 44 WS406 02 COUNTER BRACKET 1 45 SC045 88 M5x8 SOC HD SCREW 2 46 SC004 14 M5 FLAT WASHER 2 47 SC016 15 M4x8L CHEESE HD SCREW SLOT 4 48 SC039 07 M5x 6L GRUB SCREW 1 49 WS406 05 COUNTER LABEL 1 50 SC022 03 6 32UNC PAN HD SCREW 2 ISSUE 3 11 6 19 ...

Страница 25: ... QTY 52 WS408 01 LAYER WINDING SCREW 1 53 WS408 02 1 8 CABLE SHEAVE 1 54 HOR18 03 LAYER WINDING NUT 4 Depth Counter Assembly ITEM NO PART NUMBER DESCRIPTION QTY 50 WS407 01 BEARING SHAFT RETAINER 1 51 SC058 35 BEARING 17ID x 40OD x 12W 1 LHS Bearing Assembly ISSUE 3 11 6 19 Page 25 of 28 ...

Страница 26: ...t ITEM NO PART NUMBER DESCRIPTION QTY 55 WS409 02 PRESSURE ROLLER 1 56 WS409 01 A PRESSURE ROLLER PIN 2 57 WS409 01 B PREESURE ROLLER BRACKET 2 58 SC045 89 M5x6 SOC HD SCREW 4 59 SC004 14 M5 FLAT WASHER 4 Layer Winding Assembly Pressure Roller Assembly ISSUE 3 11 6 19 ...

Страница 27: ...Solutions Pty Ltd WS200 WS300 WS500 Page 27 of 28 Copyright ITEM NO PART NUMBER DESCRIPTION QTY 60 WS410 01 WINCH HANDLE 1 61 SC040 53 HANDLE GRIP 1 62 SC008 69 M10 NYLOCK NUT 1 Handle Assembly ISSUE 3 11 6 19 ...

Страница 28: ...y Cable Assembly ITEM NO PART NUMBER DESCRIPTION QTY 63 WS410 01 WINCH HANDLE 1 64 SC040 53 HANDLE GRIP 1 65 SC045 19 M10 NYLOCK NUT 1 ITEM NO PART NUMBER DESCRIPTION QTY 66 C1 C1 CONNECTOR 1 67 AP01 ANGLE PLUG 1 68 SC099 06 AMERGRAPH CABLE 2 5 MM 1 10 DIA 40m 130ft ISSUE 3 11 6 19 ...

Отзывы: