


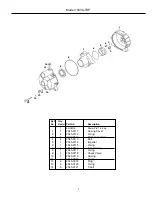


Repair Instructions
4
Note that these bolts have seal washers on them and
must not be damaged. From the backside of the casing
cover, press the mechanical seal out and discard it.
Clean-up of Pump Housing
If necessary, clean the pump casing, volute, and casing cover
using a solvent to remove debris and corrosion particles. Use
a wire brush to further remove buildup of debris if it doesn’t
soak loose.
Seal Replacement and
Pump Housing Assembly
1. Apply a light bead of RTV sealant to the top edge of the
seal cavity on the casing cover.
2. Insert the stationary portion of the new mechanical seal
by carefully pushing only on the outer metal ring as you
press it into the casing cover. Use a tool with 1 1/2" ID,
such as a 1 1/2" PVC pipe, 4" long, that fits over the
carbon face of the seal, but pushes only on the metal ring
to insert the seal. Be careful to avoid scratching the seal’s
carbon surface.
3. Bolt casing cover on engine. Note the arrow and word UP
to indicate orientation of the casing cover. Use bolts with
washers on them. Install o-ring on casing cover; replace
with a new o-ring if necessary.
4. Lubricate the seal cavity of the impeller with WD-40,
LPS, or equivalent, and carefully press the seal’s
mating ceramic ring in place, seating it squarely on the
bottom of the cavity.
IMPORTANT: MAKE SURE
BOTH OF THE SEAL’S SURFACES ARE CLEAN
AND LUBRICATED. NEVER RUN THE SEAL
SURFACES DRY.
5. Place the impeller on the shaft and spin it clockwise to
tighten it on the shaft. Secure the impeller using a
socket and wrench (see step 3 in Disassembly
Instructions for socket size).
6. It is now necessary to check the clearance between the
impeller and volute. As shown in the sketch below,
measure the inside depth of the volute case (distance A).
Then measure the distance from the casing cover to the
front edge of the impeller (distance B). The difference
between the two measurements should be between 0.024
and 0.036" or about 1/32" clearance. If the value is out
of range, remove the impeller and adjust by adding or
removing brass shims to achieve the correct amount of
clearance.
7. Place a new o-ring in the groove of the volute’s inlet if
necessary. Place the volute in place with the notch pointing
up so that it mates with the casing cover at the inlet port. It
may be necessary to tip the engine on its side for this
assembly.
8. Carefully set casing over volute and bolt casing onto casing
cover and frame. It may be necessary to tip the engine on
its side for this assembly.
9. Once assembly is complete, pull on engine recoil starter
with engine switch in OFF position to verify that the impeller
rotates smoothly without catching. Connect spark plug
wire. Assembly and inspection is now complete.
(Repair Instructions Continued)
A
B
Casing
Cover
Impeller
Volute
(A) – (B) = within 0.024 - 0.036 inches.