


Operation and Maintenance
(Operation and Maintenance Continued)
Always flush pump with water or neutralizing agent
before servicing.
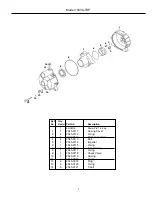
Pump Housing Disassembly
For this pump model, seal replacement requires that the
pump be fully removed from the engine. Observe carefully
the disassembly process, (orientation and order of part
assembly) to ensure an easy assembly process.
1.
Pull spark plug wire off spark plug for safety
considerations.
Remove the four bolts holding the
casing to the casing cover and frame using a 14mm
socket wrench. Tap pump casing on the discharge port
with a rubber hammer, if necessary, to break it loose
from the casing cover. Check inside pump casing. If
badly eroded or damaged, pump casing should be
replaced. Remove O-rings from casing cover and volute.
2. Remove volute and inspect for wear. Replace if eroded.
3. Remove impeller by turning it counterclockwise using a
socket and impact wrench. If an impact wrench is not
available, it may be necessary to hold the crankshaft
from turning. To keep the crankshaft from turning during
disassembly, remove the three bolts holding the recoil
starter using a 10mm socket wrench. Then, using a
pipe wrench or another tool, hold the starter hub and
spin the impeller off. Look for shims that may be
present between the impeller and shaft. This shim is for
obtaining the proper clearance between the impeller
and volute. Be careful not to damage the starter hub
while gripping it with the wrench.
4. Between the impeller and casing cover is the
mechanical seal. On the backside of the impeller is the
seal’s ceramic seat. If either part of the seal is
damaged, with cracked or scuffed surfaces, the seal
will fail to perform satisfactory and will leak. To remove
the seal seat from the impeller, use a small blade
screwdriver and wedge the seal seat out and discard.
To remove the mechanical seal, it is necessary to first
remove the casing cover by removing the four bolts
holding it to the engine, using 13mm socket wrench.
Stopping the Pump
1. Stop pump for a short time:
Run engine throttled all the way down (fully to the right).
Turn engine switch to OFF position.
2. Stopping pump for storage:
Turn fuel cock to OFF position instead of turning the
engine switch off.
Let the engine idle for 2 to 3 minutes until fuel in
carburetor is depleted and engine stops. If a valve is
installed on the discharge hose, you may run pump
with valve closed during this procedure.
Note: Pump must not be run dry. Make sure there is
water in the priming chamber.
Storage
1. Drain pump. Flush Pump after Use.
One of the most common causes for faulty pump
performance is gumming or corrosion inside the pump.
Flush the pump and entire system with a solution that
will chemically neutralize the liquid pumped. Mix
according to the manufacturer’s directions. This will
dissolve most residues remaining in the pump, leaving
the inside of the pump clean and ready for use.
To Prevent Corrosion:
After cleaning the pump as directed above, flush it with
permanent-type automotive antifreeze (Prestone,
Zerex, etc.) containing a rust inhibitor. Use a 50%
solution; half antifreeze and half water, or fill the pump
with FLUID FILM and drain it. A protective coating of
FLUID FILM will remain on the inner pump surfaces.
Save the excess FLUID FILM for the next application.
Plug ports to keep out air during storage. For short
periods of idleness, noncorrosive liquids may be left in
the pump, BUT AIR MUST BE KEPT OUT. Plug the
ports or seal port connections.
2. Drain all the fuel from the fuel tank, fuel lines, and filter.
3. Store pump in a clean, dry environment.
3
Repair Instructions