ORBIT
®
SPRINKLER SySTEm DESIGNER™
InstallatIon GuIde
set the Pattern Before Installation:
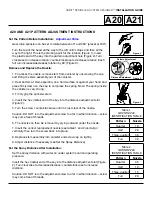
gear drive sprinkler can be set to rotate between 40° and 360° (preset at 180°)
Turn the top of the head all the way to the left until it stops and then all the
way to the right. This is the starting point for the rotation (Figure 1). Insert
the plastic end of the key into the pattern adjustment hole (Figure 2). Turn
clockwise to increase rotation; counterclockwise to decrease rotation. each
full turn increases/decreases rotation by 90˚ (Figure 3).
Remove and Replace the nozzle:
1. To access the nozzle, remove stem from canister by unscrewing the cap
and lifting the stem assembly out of the canister.
2. rest bottom of stem assembly on a hard surface or against your hand and
press firmly down on the cap to compress the spring. Note: The spring inside
the canister is very strong.
3. Firmly grip the sprinkler stem.
4. Insert the hex (metal) end of the key into the distance adjustment slot
(Figure 2).
5. Turn the screw counterclockwise until it is just clear of the nozzle.
Caution: DO NOT turn the adjustment screw too far in either direction—screw
may come free of threads.
6. The nozzle can then be removed by prying outward under the nozzle.
7. Insert the correct replacement nozzle (see tables 1 and 2) and align
vertically, then turn the screw back into place.
8. replace stem assembly into canister and screw cap on tightly.
9. Adjust distance if necessary (see Set the Spray Distance).
set the spray distance after Installation:
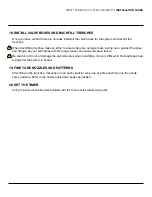
Set the spray distance with water on under system’s normal operating
pressure.
Insert the hex (metal) end of the key into the distance adjustment slot (Figure
2). Turn clockwise to decrease distance; counterclockwise to increase
distance.
Caution: DO NOT turn the adjustment screw too far in either direction—screw
may come free of threads.
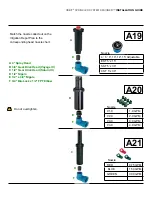
A21
A20
Table 1.
gDV nOZZle
IDenTIFICATIOn TAble
Pattern
nozzle
Quarter
1.0
Half
2.0
Three-quarter
3.0
Full
4.0
Table 2.
gDS nOZZle
IDenTIFICATIOn TAble
Pattern
nozzle
Quarter
0.5
Half
1.0
Three-quarter
1.5
Full
2.0
figure 1
figure 2
or
figure 3
distance adjustment
Pattern adjustment
A20 AND A21 PATTERN ADJUSTMENT INSTRUCTIONS

