


6
P/N 21166904 10/04
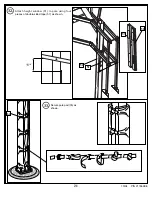
8.
Insert caps (8) into end of each support arm (9)
as shown. Tap firmly in position.
Apply logo label (11) to lower support arms (9) as
shown. Repeat for opposite side.
Beginning with upper support arms (9) secure
support arms to pole. Continue by securing lower
support arms (9) as shown.
9.
10.
TWO PERSON MINIMUM REQUIRED
FOR THIS PROCEDURE. NOT
FOLLOWING RECOMMENDATION
MAY RESULT IN SERIOUS BODILY
INJURY AND/OR PROPERTY
DAMAGE.
WARNING
7
8
8
8
8
8
8
14
4
9
11
9
12
12
7
4
4
4


