background image

CONTENTS TABLE

INSTALLATION .............................................................................................................................. 5

SOUND MODULE .......................................................................................................................... 9

CONTROL PANEL .................................................................................................................. 9

BOTTOM PANEL ................................................................................................................... 10

PLAY PAD .................................................................................................................................... 11

TURN ON THE POWER ....................................................................................................... 11

PLAYING PADS .................................................................................................................... 11

MASTER VOLUME ................................................................................................................ 11

DRUM  KIT ................................................................................................................................... 12

KIT SELECT .......................................................................................................................... 12

KIT EDIT ................................................................................................................................ 12

CHANGE THE VOICE AND VOLUME OF THE PAD ....................................................... 12

EXIT FROM THE EDIT MODE .......................................................................................... 13

PATTERN .................................................................................................................................... 14

PLAY THE PATTERN ............................................................................................................ 14

EXERCISE WITH THE PATTERN ........................................................................................ 14

METRONOME ............................................................................................................................. 15

RECORD ..................................................................................................................................... 16

RECORD STANDBY ............................................................................................................. 16

RECORDING ........................................................................................................................ 16

STOP AND SAVE .................................................................................................................. 17

PLAYBACK ............................................................................................................................ 17

USB & MIDI .................................................................................................................................. 18

VOICE LIST ................................................................................................................................. 19

SPECIFICATIONS ....................................................................................................................... 21

Содержание HD-005

Страница 1: ...HD 005 DIGITAL DRUM USER S MANUAL ...

Страница 2: ...o provide reasonable protection against harmful interference in a residential installation This equipment generates uses and can radiate radio frequency energy and if not installed and used in accordance with the instructions may cause harmful interference to radio communications However there is no guarantee that interference will not occur in a particular installation If this equipment does caus...

Страница 3: ... AC adaptor into the same AC outlet as appliances with high power consumption such as electric heaters or ovens SERVICE AND MODIFICATION This product should be serviced by qualified service personnel when the power supply cord or the plug of the adaptor has been damaged liquid has been spattered into the unit or it has been exposed to rain the instrument does not appear to operate normally or exhi...

Страница 4: ... PADS 11 MASTER VOLUME 11 DRUM KIT 12 KIT SELECT 12 KIT EDIT 12 CHANGE THE VOICE AND VOLUME OF THE PAD 12 EXIT FROM THE EDIT MODE 13 PATTERN 14 PLAY THE PATTERN 14 EXERCISE WITH THE PATTERN 14 METRONOME 15 RECORD 16 RECORD STANDBY 16 RECORDING 16 STOP AND SAVE 17 PLAYBACK 17 USB MIDI 18 VOICE LIST 19 SPECIFICATIONS 21 ...

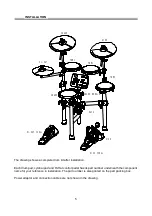
Страница 5: ... has its part number underneath the component name for your reference in installation The part number is also printed on the part packing box Power adaptor and connection cables are not shown in the drawing INSTALLATION 5 CRASH RACK KICK HI HAT PEDAL SNARE SOUND MODULE TOM1 RIDE HI HAT TOM3 TOM2 KICK PEDAL ...

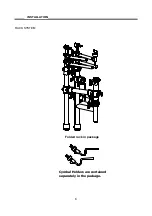
Страница 6: ...RACK SYSTEM Folded rack in package INSTALLATION 6 Cymbal Holders are contained separately in the package ...

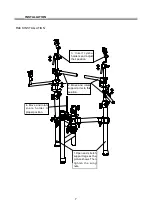
Страница 7: ...N 7 3 Insert cymbal holders and adjust their position 2 Move and rotate support arms to this position 4 Move and rotate snare holder to proper position 1 Open and stretch support legs as the picture shows Then tighten the wing nuts ...

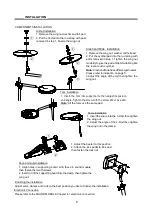
Страница 8: ... the clamp Hi Hat Installation Crash and Ride Installation Snare Installation 1 Insert the tom into support arm then adjust its position and angle Tighten the screw with the screw driver included Note All the toms use the same pad Tom Installation COMPONENTS INSTALLATION 1 Align holes in supporting board with these in sound module then fasten them with screws 2 Insert rod of the supporting board i...

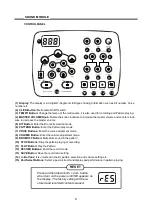
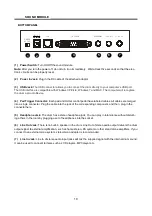
Страница 9: ... mode 8 VOLUME Button Enter the volume adjustment mode 9 DRUM OFF Button Mute drum sound in the pattern 10 STOP Buttons Stop the pattern playing or recording 11 PLAY Button Play the Pattern 12 RECOED Buttons Enter the record mode 13 SAVE Button Save the record and setting 14 Buttons It is universal in the kit pattern selection and volume setting etc 15 Pad Select Buttons Select a pad in kit edit a...

Страница 10: ...g the cable into the jack of the corresponding component and then plug in the connector here 5 Headphone Jack The drum has a stereo headphone jack You can play in total silence without disturb ing others in the room by plugging a set of headphones into the socket 6 Line Out Jack There is no built in speaker in the drum Line Out of stereo audio output delivers the drum output signal to external amp...

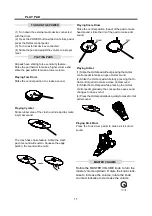
Страница 11: ...ure Strike the pad harder to make a higher volume and strike the pad softer to make a lower volume Playing Tom Drum Strike the central position to create a sound Playing Hi Hat 1 Strike the Hi Hat pad without pressing the Hi Hat control pedal to make an open Hi Hat sound 2 Strike the Hi Hat pad while fully pressing the Hi Hat control pedal to make a close Hi Hat sound 3 Strike the Hi Hat pad while...

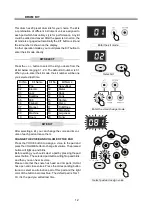
Страница 12: ... of each pad and save them Enter the kit mode Enter the voice change mode Select pad and assign voice CHANGE THE VOICE AND VOLUME OF THE PAD Press the VOICE button to assign a voice to the pad and press the VOLUME button to change its volume The pressed button will light up and blink Before editing you should select a pad by pressing the pad select button The selected pad button will light up and ...

Страница 13: ...ice of another pad by pressing an other button Or you can adjust the volume of this pad by pressing the VOLUME button and the VOLUME button will light up and blink The display shows current volume Then use the button to change the volume ranging 0 127 An easy way to select a part is to hit the pad or press the Hi Hat pedal directly The corresponding but ton will light up and blink Please note that...

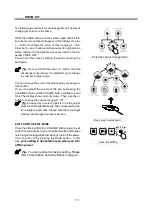
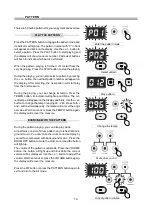
Страница 14: ...d blink The cur rent tempo will appear on the display and blink Use the or button to change the tempo ranging 40 240 Press both and button simultaneously the tempo will recover the origi nal value Wait 3 seconds or press the TEMPO button again the display will recover the measure EXERCISE WITH THE PATTERN During the pattern playing you can also play pads All patterns consist of drum pattern and or...

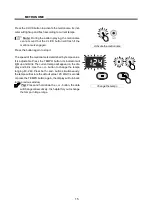
Страница 15: ...table Press the TEMPO button Its indicator will light up and blink The current tempo will appear on the dis play and blink Use the or button to change the tempo ranging 40 240 Press both and button simultaneously the tempo will restore the default value 120 Wait 3 seconds or press the TEMPO button again the display will turn back to the previous window Change the tempo Activate the metronome 15 ME...

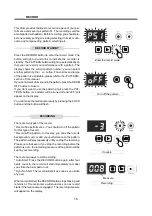
Страница 16: ...l appear on the display You can make the metronome ready by pressing the CLICK button and the button will flash RECORDING There are two types of the record Record free performance You should turn off the pattern for this type of record Record with a pattern In this way you can either use its background music or add your performance to the pattern The pattern will play repeatedly until you stop the...

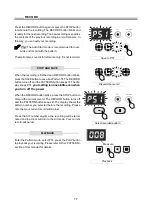
Страница 17: ...lit The dis play shows P51 your setting is nonvolatile even when you turn off the power When the RECORD button blinks press the STOP button to discard the current record The RECORD button turns off and the PATTERN button keeps lit The display shows the pattern number you selected before the recording Please note that your current record will be lost Press the KIT number anytime the recording will ...

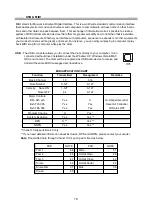
Страница 18: ...ect the drum directly to your computer It can connected without driver installation under the Windows XP Windows Vista MAC OSX environment The drum will be recognized as USB Audio device to receive and transmit the same MIDI messages described above Function Transmitted Recognized Remarks Basic Channel 10 1 16 Note Number 0 127 0 127 Velocity Note ON Note OFF 1 127 64 0 127 0 127 Major Controls B9...

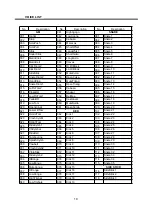
Страница 19: ...m1 058 Belltree 097 Snare 17 018 PedalHH 059 Castanets 098 Snare 18 019 LowTom 060 MuteSurdo 099 Snare 19 020 OpenHi hat 061 OpenSurdo 100 Snare 20 021 Low midTom 101 Snare 21 022 Hi midTom 062 Kick 1 102 Snare 22 023 CrashCymb1 063 Kick 2 103 Snare 23 024 RHighTom 064 Kick 3 104 Snare 24 025 RideCymb1 065 Kick 4 105 Snare 25 026 ChCymbal 066 Kick 5 106 Snare 26 027 RideBell 067 Kick 6 107 Snare 2...

Страница 20: ...om 8 172 Ride 2 129 Closed Hi Hat 11 173 Ride 3 130 Closed Hi Hat 12 152 Mid Tom 1 174 Ride 4 153 Mid Tom 2 175 Ride 5 131 Open Hi Hat 1 154 Mid Tom 3 176 Ride 6 132 Open Hi Hat 2 155 Mid Tom 4 133 Open Hi Hat 3 156 Mid Tom 5 177 Percussion 1 134 Open Hi Hat 4 157 Mid Tom 6 178 Percussion 2 135 Open Hi Hat 5 158 Mid Tom 7 179 Percussion 3 136 Open Hi Hat 6 159 Mid Tom 8 180 Percussion 4 137 Open H...

Страница 21: ...k pad Hi Hat pedal Voice 184 Drum Kit 20 preset kits Pattern 50 Full and Mute drum mode Pad Button play drum sound with led blink Pad Edit Voice Volume Tempo default 120 range 40 240 Metro On Off Record 1 editable song in overwrite mode Easy Reset holding button and button when power on Display 3x8LED Power 9V DC Aux Socket Headphone Line In Out USB Power In DC9V SPECIFICATIONS 21 ...

Отзывы: