71
1
2
3
4
5
A
C
B
E
MBROIDERY
M
ODE
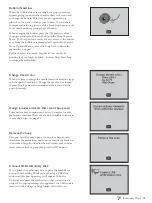
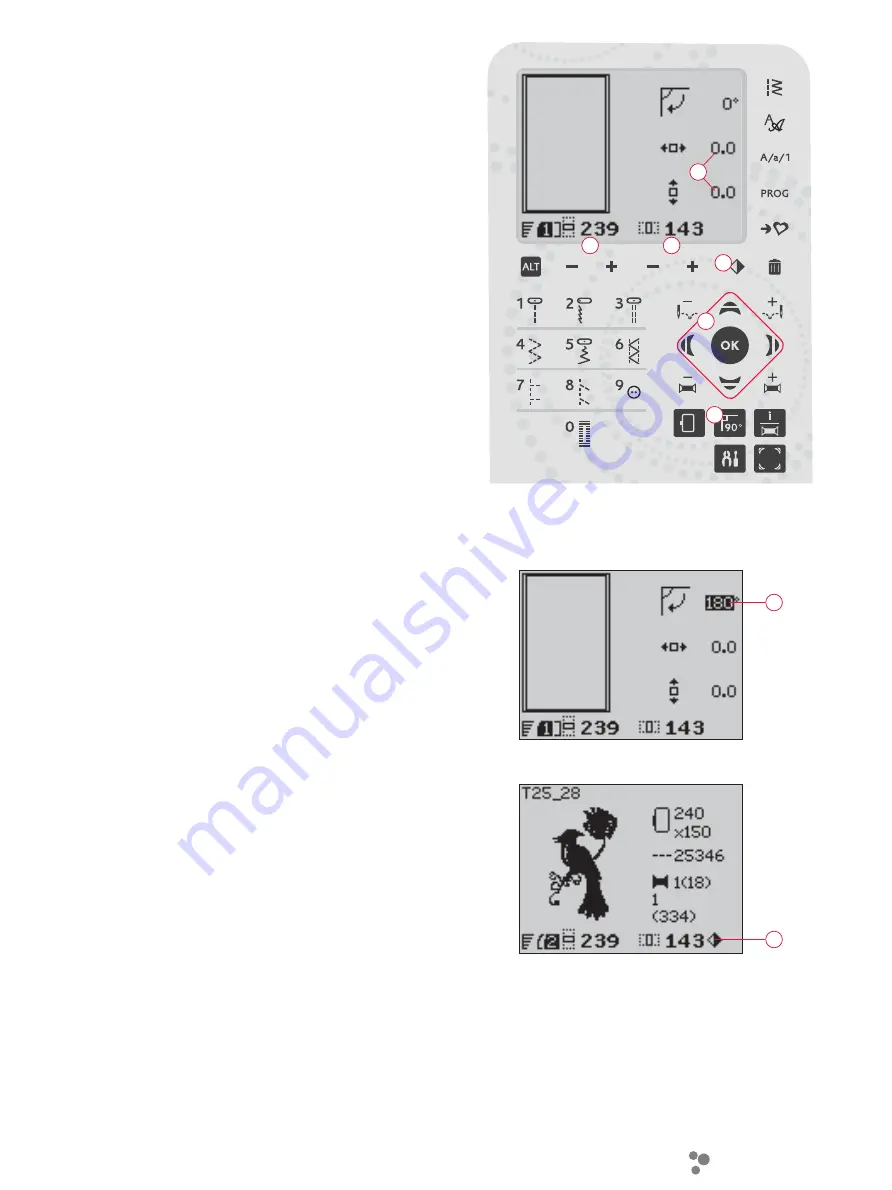
ADJUST DESIGNS
7KHUHDUHPDQ\RSWLRQVWRDGMXVW\RXUGHVLJQV$OZD\VDGMXVW
before starting to stitch-out. The settings are shown on the
*UDSKLF'LVSOD\,I \RXFKDQJHWKHQXPEHUVIRUZLGWKDQG
KHLJKWWKHÀJXUHVZLOOEHLQYHUWHGRQDEODFNEDFNJURXQG7KH
FKDQJHVDUHDOVRYLVLEOHRQWKH*UDSKLF'LVSOD\
DESIGN HEIGHT (1)
You can increase or decrease the size of the design up to
20%. Increase or decrease the design height using the
+
and
–
EXWWRQVEHORZWKHVHWWLQJGLVSOD\HGRQWKH*UDSKLF'LVSOD\
The design height is scaled 5% each time you press the button.
The stitch count remains the same.
DESIGN WIDTH (2)
You can increase or decrease the size of the design up to
20%. Increase or decrease the design width using the
+
and
–
EXWWRQVEHORZWKHVHWWLQJGLVSOD\HGRQWKH*UDSKLF'LVSOD\
The design width is scaled 5% each time you press the button.
The stitch count remains the same.
Note: You can Resize the design in the Embroidery Software (sold
separately).
MOVING DESIGNS TO POSITION (3)
Place your design anywhere in the embroidery area using the
DUURZEXWWRQV$7KHQXPEHUVWRWKHULJKWRI WKH'HVLJQ
SRVLWLRQLFRQVRQWKH*UDSKLF'LVSOD\VKRZLQPLOOLPHWHUVKRZ
PXFKWKHGHVLJQKDVEHHQPRYHGYHUWLFDOO\DQGKRUL]RQWDOO\
from its original center position.
ROTATE (4)
You can rotate the design around its center point. Each
WLPH\RXSUHVVWKH5RWDWHEXWWRQ%WKHGHVLJQZLOOURWDWH
90 degrees clockwise. To the right of the rotate icon on the
*UDSKLF'LVSOD\\RXFDQVHHKRZPDQ\GHJUHHVWKHGHVLJQKDV
rotated from its original position.
Note: Some designs are too large to rotate 90 degrees. Each press of the
button will then rotate the design 180 degrees.
MIRROR SIDE TO SIDE (5)
3UHVVWKH0LUURU6LGHWR6LGHEXWWRQ&WRPLUURUWKHORDGHG
GHVLJQVLGHWRVLGH$QLFRQLVVKRZQRQWKH*UDSKLF'LVSOD\
LQGLFDWLQJWKDW0LUURU6LGHWR6LGHLVVHOHFWHG
Embroidery Mode, Stitch-out view


