background image

15

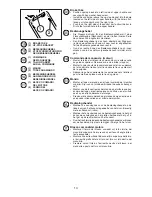
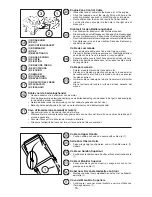
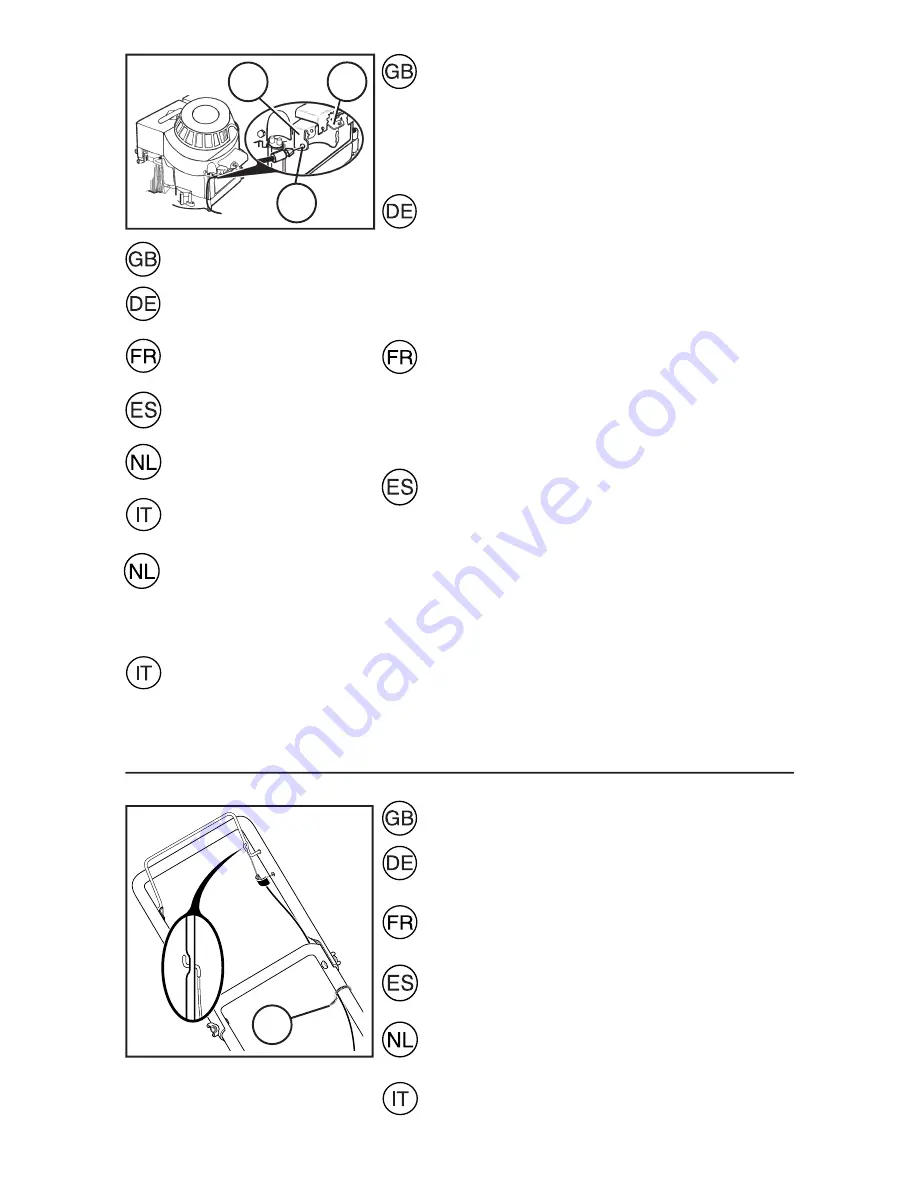
Engine Zone Control Cable

•    Hook offset end of cable into the brake arm of the engine.
•   Align the tapered end of the plastic fi tting with hole in the 

mounting bracket and push in until fi tting snaps into place.

•    Route cable under the cross bar portion of lower handle.
•    Put the offset end of cable into the hole in the right side of 

brake yoke.

Drahtseil für den Bedienungshebel

•    Das Drahtseil im Bremsarm des Motors einhaken.
•    Die konische Kunststoffkappe am Ende des Drahtseils gegen 

das Loch im Bremsarm drücken, bis das Seil fest eingehakt ist.

•     Das Drahtseil unter die Querstange des unteren Holmes führen.
•    Das Seilende im Loch in der rechten Seite des Bedienung-

shebels befestigen.

Cable de commande

•    Fixer en place le câble dans le bras de frein du moteur.
•    Presser la fi xation plastique conique sur l’habillage extérieur 

du câble contre le trou de la fi xation, jusqu’au déclic.

•    Passer le câble sous le tirant transversal du guidon inférieur.
•    Mettez l’extrémité de câble dans le trou dans le côté à droite 

du joug de frein.

Cable para mando

•    Sujetar el cable al brazo de freno del motor.
•   Presionar la fi jación de plástico cónica de la funda exterior 

del cable contra el orifi cio de la fi jación, hasta que encajen 
las piezas entre sí.

•    Guiar el cable por debajo de la barra transversal del manillar 

inferior.

•   Fijar el extremo del cable al orifi cio del lado derecho del 

mando.

(1) BRAKE ARM
(2) SLOT
(3) MOUNTING BRACKET

(1) BREMSARM
(2) ÖSE
(3) BEFESTIGUNG

(1) BRAS DE FREIN
(2) SORTIE
(3) FIXATION

(1) BRAZO DE FRENO
(2) ESCOTADURA
(3) FIJACION

(1) REMARM
(2) UITHOLLING
(3) BEVESTIGING

(1) BRACCIO DEL FRENO
(2) PASSACAVO 
(3) FISSAGGIO

3

1

2

Kable voor de bedeningshendel

•    Haak de kabel vast in de remarm van de motor.
•    Druk de kegelvormige plastic bevestiging op de buitenbekleding van de kabel, in het gat in de bevestiging 

tot de delen in elkaar vastklikken.

•    Geleid de kabel onder de dwarsstang van het onderste gedeelte van het stuur.
•    Bevestig het kabeluiteinde in het gat op de rechterkant van de bedieningshendel.

Cavo di trasmissione comandi al motore

•    Agganciare il cavo al braccio del freno del motore.
•    Premere il fermo conico presente sulla guaina del cavo, nel foro del fermo, fi no a sentire che le due parti 

si sono agganciate.

•    Passare il cavo sotto la traversa del manubrio inferiore.
•    Attaccare l’estremità del cavo nel foro sul lato destro del blocco comandi.

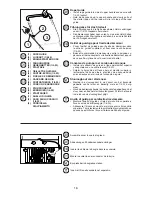
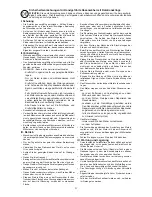
Cable to Upper Handle

•    Position cable as shown and secure with cable clip (1).

Seile Zum Oberen Holm

•   Seile wie gezeigt positionieren und mit Seil-Klammern (1) 

sichern.

Cable au Guidon Supérieur

•     Positionnez le câble comme illustrés et fi xez à le attache-câble 

(1).

Cable al Manillar Superior

•    Poner el cable según se muestra y asegurarlos con un las 

grampa para cable (1).

Kabel naar Bovenste Gedeelte van Stuur

•    Monteer de kabel zoals afgebeeld en zet ze met de kabelkl-

emmetje (1).

Cavo del Manubrio Superiore

•   Posizionare i cavo nel modo illustrato e serrare utilizzando 

l’fermagli del cavo (1).

1

Содержание Rally RE35N20S

Страница 1: ...ons carefully and make sure you understand them before using this machine Anleitungshandbuch Bitte lesen Sie diese Anleitungen sorg fältig durch und vergewissern Sie sich daß Sie diese verstehen bevor Sie die Maschine in Betrieb nehmen Instructieboekje Lees deze instructies aandachtig en zorg dat u ze begrijpt voordat u deze machine gebruikt Manuale di istruzioni Prima di utilizzare la macchina le...

Страница 2: ...ONTAGGIO 11 17 REGOLAZIONE 18 AVVIAMENTO ED ARRESTO 19 20 USO DELLA FALCIATRICE 21 MANUTENZIONE 22 24 INFORMAZIONI GENERICHE 24 CONTENTS SAFETY RULES PAGE 3 8 TECHNICAL DATA 9 OVERVIEW 10 ASSEMBLY 11 17 ADJUSTMENTS 18 START AND STOP 19 20 USE 21 MAINTENANCE 22 24 GENERAL INFORMATION 24 INHALTSVERZEICHNIS SICHERHEITSREGELN SEITE 3 8 TECHNISCHE DATEN 9 ÜBERSICHT 10 MONTIEREN 11 17 EINSTELLUNG 18 STA...

Страница 3: ...nd from the area to be mowed Neveroperatethelawnmowerwithdefectiveguards or without safety devices for example deflectors and or grass catchers in place Do not change the engine governor settings or over speed the engine Operating the engine at excessive speed may increase the hazard of personal injury Disengage all blade and drive clutches before starting the engine Start the engine or switch on ...

Страница 4: ...nRasenmäherniemitdefektenSchutzab deckungen oder nicht in Position befindlichen Schutz vorrichtungen wie beispielsweise Leitblechen und oder Grasfänger Die Einstellung des Drehzahlreglers nicht ändern und die Drehzahl des Motors nicht über die Werkspezifikationen heraufsetzen Der Betrieb des Motors bei zu hohen Drehzahlen kann die Gefahr von Körperverletzungen vergrößern Vor dem Starten der Maschi...

Страница 5: ...r la lame immobile si la tondeuse à gazon doit être inclinée pour le transport lorsqu elle traverse des surfaces autres que le gazon et lorsque vous transportez la tondeuse à gazon d un endroit à l autre N utilisez jamais la tondeuse à gazon avec des pro tections défectueuses ou sans dispositif de sécurité comme par exemple des déflecteurs ou bacs à herbe en place Conserverlerégimederotationdumote...

Страница 6: ...arde el motor el silenciador el comportamiento de la batería limpios de césped hojas y de demasiado grasa Verifiquefrecuentementeelrecogedordelcéspedpara ver si hay uso o deterioración Para la seguridad reemplace las partes que estén usadas o dañadas Si el tanque del combustible debe ser vaciado hágalo afuera I Instrucción Lea todas las instrucciones cuidadosamente Famil iarícese completamente con...

Страница 7: ...andstoftank afgetapt moet worden moet dit buiten worden gedaan I Training Lees de instructies aandachtig Zorg dat u vertrouwd bentmetdebedieningselementenenhetjuistegebruik van de machine Laat kinderen of mensen die niet bekend zijn met de instructies de maaimachine niet gebruiken Het is mogelijk dat plaatselijke voorschriften een beperking stellen aan de leeftijd van de bestuurder Maainooitterwij...

Страница 8: ...a da falciare Non utilizzare mai la macchina con protezioni difet tose oppure in assenza di dispositivi di sicurezza ad esempio deflettori e o separatori di erba Non modificare le impostazioni del regolatore del motore né far operare il motore a velocità eccessive Le velocità eccessive possono aumentare il pericolo di infortuni Disinnestare tutte le lame e le frizioni prima di avviare il motore Av...

Страница 9: ...e trouver sur votre machine ou dans les publications fournies avec le produit Ap prenez à comprendre la signification de ces symboles Estos símbolos pueden aparecer sobre su unidad o en la literatura proporcionada con el producto Aprenda y comprenda sus significados Deze symbolen kunnen op uw machine of in de bij het produkt geleverde documentatie aanwezig zijn Lees en begrijp de betekenis Simboli...

Страница 10: ...10 2 1 4 6 3 5 ...
Страница 11: ...direction de la flèche Une fois le manche déployé serrez les écrous à oreilles MONTAJE Empuñadura Levantar le empuãdura en el sentido de la flecha Cuando la empuãdura esté levantada apretar las palomillas MONTAGE Hendel Klap de hendel om in de richting van de pijl Wanneer de hendel omgeklapt is worden de veugelmoeren aangedraaid MONTAGGIO Impugnatura Sollevare l impugnatura nel senso dell afreccia...

Страница 12: ...pretar todos los pernos y tubercas en forma segura Instalarelmanillarsuperiorenelmanillarinferiorconelagujero de montaje del cáncamo de guía al lado derecho Armar el manillar superior y el inferior con los dos tornillos y asegurar con los dos contratuercas MONTAGE Hendel Monteer het onderste gedeelte van het stuur zodanig op de maaier dat het platte uiteinde naar voren is zoals afgebeeld Breng de ...

Страница 13: ... PANS 3 CONTRE ÉCROUS 4 TALON D ARRÊT DE LA COMMANDE MOTEUR 5 VIS À BRIDE TÊTE À SIX PANS 1 AGUJERO DEL CANCAMO DE GUIA 2 TORNILLOS CABEZA HEAGONAL 3 CONTRATUERCAS 4 TOPE PARA MANDO 5 TORNILLOS EMBRIDADOS CABEZA HEXAGONAL 1 STUUROOGBOUT 2 SCHROEVEN INBUS 3 BORGMOEREN 4 AANSLAGNOK VOOR DE BEDIENINGSHENDEL 5 FLENSBOUTEN INBUS 1 FORO DELL ANELLO DI GUIDA 2 VITI A TESTA ESAGONALE 3 DADI 4 FERMO PER IL...

Страница 14: ...o del manillar superior Fijar con un tornillo embridado de cabeza hexago nal Montar uno de los extremos del mando en el orificio que hay encima del tope y el extremo plano con orificios en el orificio que hay en el lado derecho del mango Presionar el extremo derecho del mando hacia adentro para que pueda introducirse en el orificio del manillar Bedieningshendel Monteer de aanslagnok voor de bedien...

Страница 15: ...echo del mando 1 BRAKE ARM 2 SLOT 3 MOUNTING BRACKET 1 BREMSARM 2 ÖSE 3 BEFESTIGUNG 1 BRAS DE FREIN 2 SORTIE 3 FIXATION 1 BRAZO DE FRENO 2 ESCOTADURA 3 FIJACION 1 REMARM 2 UITHOLLING 3 BEVESTIGING 1 BRACCIO DEL FRENO 2 PASSACAVO 3 FISSAGGIO 3 1 2 Kable voor de bedeningshendel Haak de kabel vast in de remarm van de motor Druk de kegelvormige plastic bevestiging op de buitenbekleding van de kabel in...

Страница 16: ...sta que se deslice en el circulo del cáncamo de guía Stuuroogbout voor startsnoer Monteer de stuuroogbout in de zijkant van het bovenste gedeelte van het stuur en bevestig met een 1 4 20 borg moer Houd de bedieningshendel op het bovenste gedeelte van het stuur neer en trek het startkoord langzaam uit totat het koord in de lus van de stuuroogbout glijdt Anello di guida per cordicella di avviamento ...

Страница 17: ...r and secure with bolts and nuts supplied Frontgehäuse Den Auswurfschirm über der Auswurföffnung am Gehäuse anbringen Die Konsoleauf die Oberseite des Austrittschutzes legen Konsole und Schutz am Mäher positionieren und mit den beigefügten Schrauben und Mutterm befestigen Couvercle frontal Placer l écran éjecteur au dessus de l ouverture de vidage du couvercle de coupe Placez le support dessus la ...

Страница 18: ... corte diferentes La altura de 50mm se recomienda como el ajuste normal Las ruedas tienen que estar todas ajusta das a la misma altura pues si no el corte es desigual Afstellen De maaihoogte kan worden ingesteld door de wielen van de grasmaaier te verhogen of te verlagen Deze grasmaaier heeft vierverschillendemaaihoogtes Standaardwordteenmaaihoogte van 50mm aanbevolen Alle wielen moeten op dezelfd...

Страница 19: ...Motor angelassen wird der vorher schon einge Minuten gelaufen hat Den Bedienungshebel gegen den Holm drücken und kräftig amStarthandgriffziehen DasStartseilnichteinfachloslassen sondern sich langsam wieder aufrollen lassen Der Motor wird durch Loslassen des Bedienungshebels abgestellt HINWEIS BeikaltemWetter müssen die Bedienungsschritte für dieVorpumpe mögliicherweise wiederholt werden Bei warmem...

Страница 20: ...essayer de le remettre en marche et NE répétez PAS les étapes d amorçage Arranque y Parada Colocar el cortacésped en una superficie llana sin gravilla gui jarros etc Rellenar el tanque de gasolina pura sin aceite Se peude usar gasloina sin plomo o con plomo No rellenar el tanque mientras está funcionando el motor Para arrancar un motor frio empuje el cebador 3 veces antes de tratar de arrancar Emp...

Страница 21: ...n einem Gelände benützt werden das eine Neigung von mehr als 15 Grad hat In solchen Fällen können Schmierungsprobleme im Motor auftreten Utilisation La tondeuse ne doit pas être utilisée sur un terrain dont la pente dépasse 15 Il pourrait se produire des problèmes avec le graissage du moteur Aplicacion Para evitar problemas de engrase se recomienda no usar el cor tacésped en terrenos de inclinacio...

Страница 22: ...iriparazioni pulizieolavoridimenutenzione Dopo 5 ore di funzionamento stringere viti e dadi Controllare l olio Piegando la falciatrice sul fiancolare attenzione che la candela sia il punto più alto Regularly Stop the engine and unscrew the dipstick The level should be between FULL and ADD NOTE the dipstick must be screwed all the way down in order to indicate correct oil level Avoid filling with t...

Страница 23: ...cavo di accensione Inserire e rimuovere la lama solamente indossando guanti di protezione Smontare la lama e consegnarla ad una officina di servizio per la rettifica ed il bilanciamento Stringere bene le viti nel rimontaggio 1 OIL DRAIN PLUG 1 ÖLABLAßSCHRAUBE 1 BOUCHON DE VIDANGE D HUILE 1 TAPON DE DRENAJE PARA ACEITE 1 AFTAPPLUG OLIE 1 TAPPO DI SCARICO DELL OLIO Change oil after each season or af...

Страница 24: ...Y 1 SCHRAUBE 2 FILTER 3 GEHÄUSE 1 VIS 2 FILTRE 3 CORPS 1 TORNILLO 2 FILTRO 3 CUERPO Cleaning of air filter Slacken the screw remove the lid and remove the filter cartridge Cleanse the filter in kerosene Add 2 3 spoonfuls of oil and spread it evenly throughout the filter Reinigung des Luftfilters Schrauben lösen Deckel abnehmen und Filtereinsatz herausnehmen Nettoyagedufiltreàair Desserezlavis enle...

Отзывы: