background image

9

Connecting Cable Wires

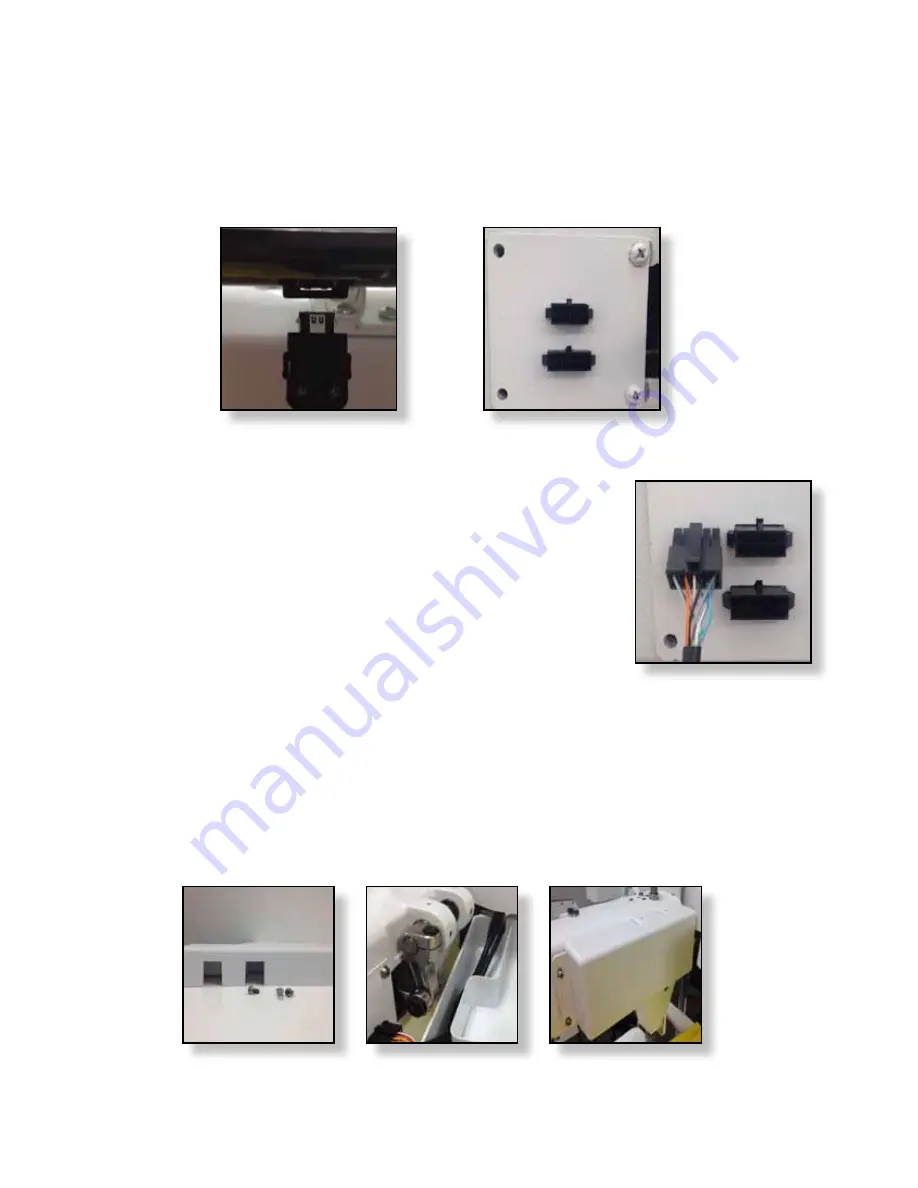
Attaching Screen Display Cables

1.  Plug the USB end of cable into the port on the bottom of the screen display (fig. 12).

2.  Route the other end of the cable wire under the handlebar and connect by lining up the               

connector with the port located at the side of machine (fig. 13).

.

Attaching Handle Bar Cables

1.  Route the handle bar cable and connect by lining up the connector 

with the port located at the side of machine (fig. 14).

Attaching the Cable Cover

1.  Locate cable cover (fig. 15).

2.  Run the cable wires into lower channel of cover (fig. 16).

3.  Carefully tilt the cover into place, ensuring wires remain in the channel and secure with screws 

provided (fig. 17).

Fig. 12

Fig. 13

Fig. 14

Fig. 15

Fig. 16

Fig. 17

Содержание Platinum 3000

Страница 1: ...1 Owner s manual Innovations in Quilting ...

Страница 2: ...he sewing machine to the nearest authorized dealer for examination repair electrical or mechanical adjustment Never operate the sewing machine with any air openings blocked Keep ventilation openings of the sewing machine free from the accumulation of lint dust and loose cloth Keep fingers away from all moving parts Special care is required around the sewing machine needle Always use the proper nee...

Страница 3: ...l and transform all your creative ideas into reality though the myriad features of the HUSQVARNA VIKING Platinum 3000 Before you start please spend some time reading this owner s manual You will soon discover how to maximize the use of your machine Our authorized HUSQVARNA VIKING dealers will of course also be pleased to advise you at any time Your HUSQVARNA VIKING Platinum 3000 long arm quilting ...

Страница 4: ...een 8 Connecting Cable Wires 9 Attaching Thread Stand 10 Getting Started Touch Screen Overview 11 Home Menu 12 Stitch Modes 12 Lights Menu 15 File Menu 15 Calculator 15 Advanced 15 Save Settings 16 Diagnostics 16 Sewing Parameters 18 Measure 19 Automated Quilter 19 TABLE OF CONTENTS ...

Страница 5: ...num 3000 20 Machine Operations 21 Cleaning Oiling 22 Bobbin Winder Bobbins 22 Threading the Machine 26 Changing the Needle 27 Calibrating the Screen 28 Tips Troubleshooting 29 Warranty 33 IMPORTANT SAFETY INSTRUCTIONS ...

Страница 6: ...area 2 Handle bar and screen plug in 3 LED light panel 4 Left handlebar controls 5 LCD touch screen 6 Thread stand 7 Bobbin winder 8 Hand wheel 9 Power supply 10 Thread guide 11 Right handlebar controls 12 Tension release lever 12 MACHINE OVERVIEW ...

Страница 7: ...illed hole in the middle of the lower carriage wheel bar fig 3 3 When attaching encoder to carriage ensure that the spring action tab is pulled back so that it is in line with the encoder arm fig 4 tighten bolt to secure encoder to carriage 4 Place upper carriage on top of lower carriage 5 On second encoder insert bolt into encoder slide on the spacer Attach encoder into the pre drilled hole in th...

Страница 8: ...7 Insert and hand tighten the remaining three screws Using a phillips head screw driver tighten handles securely to machine Attaching LCD Touch Screen The Display Screen is your access to running and controlling the functions of your PlatinumTM 3000 The touch screen connects to the bracket on top of the handle bar 1 Attach the display screen fig 8 to the top center brackets on the handle bars fig ...

Страница 9: ...t located at the side of machine fig 13 Attaching Handle Bar Cables 1 Route the handle bar cable and connect by lining up the connector with the port located at the side of machine fig 14 Attaching the Cable Cover 1 Locate cable cover fig 15 2 Run the cable wires into lower channel of cover fig 16 3 Carefully tilt the cover into place ensuring wires remain in the channel and secure with screws pro...

Страница 10: ...move so that thread stand can slide over screws fig 18 2 Slide thread stand over the screws and tighten screws to hold stand in place 3 Place the telescoping thread tree into the hole in the center of the thread stand Use the supplied screw and washer to secure the thread tree to the underside of the thread stand 4 Extend the telescoping thread tree to its highest position fig 19 Connect to Power ...

Страница 11: ...Menu 4 Sewing Parameters 5 Ruler Menu 6 Automated Quilter this feature needs to be purchased 7 Needle Up Down 8 Right Handle Bar Control 9 Left Handle Bar Control 10 Stitch Modes 11 Stitch Counter 12 Timer 13 Speed 14 Stitches Per Inch Stitch Length Metric Mode 11 12 13 14 GETTING STARTED ...

Страница 12: ...ically speed up or slow down based on the movement When you come to a stop the motor comes to a stop and will wait for you to start to move again If you wait past a set amount of time the machine will turn the stitch mode off Press and release the start stop on the handles or touch the start stop icon to begin sewing again Idle Stitch Mode Idle stitch mode is another stitch regulated mode that wil...

Страница 13: ... screen You will have the best results with this stitch mode if you move the machine at a consistent speed Ruler Mode Ruler mode works the same as regulated mode but gives a longer time without moving the machine before it turns the stitch mode off This gives you time to move or reposition your ruler without the stitch mode turning off Stitches Per Inch When stitches per inch is activated you can ...

Страница 14: ...dle when the start stop button is pressed to stop the machine Handle Bar Controls All of the functions listed below can be controlled on the screen or on the handle bars Left Start Stop Press to start the machine and press again to stop the machine Left Tie off Makes a tie off stitch The number of tie off stitches can be adjusted in the Sewing Parameters Menu Right Full Stitch Moves the needle one...

Страница 15: ...is will adjust how long the machine will wait for you to move before it turns the motor off The range is 5 to 120 seconds and adjust when you touch the or icons System Information Displays what software version you are using Update Software When you have new software loaded onto your USB stick you can use this feature to update your system Frequently check www husqvarnaviking com for software or m...

Страница 16: ...hen you see a check the demo has been activated Once checked toggle to the Quilt Sew CleverTM II screen and you can see the features of the Quilt Sew CleverTM II This is a demo version only Full version is available through purchase contact your authorized dealer for more information Metric Select the Metric function to change the Stitches Per Inch to Stitch Length on the stitch mode screens This ...

Страница 17: ...hen you touch this button it brings up a key pad so that a password can be entered to make changes to the Motor settings This will be under the direction of a service technician Temperature Indicates the temperature of the motor Top Encoder When you touch this button it changes to green and shows you where the encoder is positioned When you move your machine front to back the number should change ...

Страница 18: ...ine can stop when you press the stop button on the handle bars or the stop icon on the screen Needle Position When this button is selected the machine will position the needle up or down depending on which icon you have selected on the Home screen Quick When this button is selected the machine will stop and the needle will stay where it was located when you pressed the stop on the handlebar or the...

Страница 19: ... what you want to measure and touch stop Your distance will be displayed To display the measurements in metric change the settings in the File Menu Advanced Quilt SewCleverTM II If you have checked the Robot Demo Interface in the File Menu this will toggle to the Quilt SewCleverTM demo screen only If you have purchased and installed the optional Quilt Sew Clever automation system this will toggle ...

Страница 20: ...into the USB port on your 7 Display screen fig 22 3 On your screen you need to touch the file menu icon 4 Touch the Advanced button 5 Touch the Update Software button Your system will now search the USB stick and update your software for operation of the machine Be patient while the machine is working Note If the file is not found you will get an error Check your USB stick on your computer to ensu...

Страница 21: ...hopping foot where you want it and tighten the screw back down To return to the factory setting place the needle and the foot in the down position Place a dime under the foot Loosen the screw on the side of the foot and slide the foot down until it rests on top of the dime Retighten the screw fig 24 Adjusting the Stroke of the Hopping Foot Factory setting is in the down position 1 Remove the four ...

Страница 22: ...ct the dust on the brush Keep your table clean of dust and oil Clean the track and carriage wheels regularly with a soft cloth to ensure smooth movement Oiling is extremely important to the longevity of your quilting machine Failure to oil your machine regularly can void your warranty Recommended oiling After every finished quilt place 3 to 4 drops of oil in the hole on the top of the machine indi...

Страница 23: ... step 7 if you plan to quilt while your bobbin is winding or use step 8 if you are winding bobbins without quilting 7 The bobbin winder will start winding the bobbin once you press the start stop key You can quilt while your bobbin is winding once it is full it will stop 8 To wind your bobbin without quilting remove the thread from the needle Remove your bobbin and bobbin case from the ma chine Se...

Страница 24: ...it is very small and difficult to find if lost 4 Remember right clockwise tight left counter clockwise loose Place Bobbin into Machine 1 Insert the bobbin into the bobbin case The bobbin can be placed into the bobbin case in either direction but you should be consistent 2 Holding the bobbin case pull the thread through the slot and under the tension spring 3 Place the bobbin case in the machine Al...

Страница 25: ...er Thread Guide 2 Three Hole Thread Guide 3 Tension assembly disc 4 Check Spring 5 Silver Angle Bracket 6 Thread Guide 7 Take Up Lever 8 Thread Guide 9 Thread Guide 10 Thread Eyelet above the needle 11 Needle 1 4 3 5 2 7 6 8 9 10 11 ...

Страница 26: ...o tension discs from back to front all the way around 5 While holding the thread up over the top of the tension assembly hook the check spring The tension spring should come down as you pull thread downward fig 40 6 Place thread under the silver angle bracket fig 41 7 Bring the thread up to thread guide 6 above the tension assembly You will be able to slide the thread into this thread guide fig 42...

Страница 27: ...le eye is facing you Tighten the screw on the needle bar while holding the needle in place 3 Before you turn your machine on go to the back of the ma chine and turn the hand wheel a complete turn making sure the needle goes down in the center of the throat plate and rotates thru a full stitch smoothly TIP Use the old needle to hold the new needle in place while you tighten the screw By placing the...

Страница 28: ...e USB stick from your computer after the file has downloaded 7 Power on the quilting machine 8 Plug the USB stick into the USB port located on the left side of the LCD screen fig 51 9 The quilting machine will begin to read the file and it will start the calibration 10 Follow the instructions on your screen to calibrate your screen 11 The quilting machine will restart once the machine has booted b...

Страница 29: ...e pokies are objectionable to you use the same color thread on both top and bottom TIP A general rule of thumb is that if the stitch looks bad on the top it is the bottom tension If the stitch looks bad on the bottom it is the upper tension The upper and lower threads play tug of war with each other Tension You need correct tension on the top and bottom threads but you must also have correct tensi...

Страница 30: ...orrectly with the scarf facing the back of the machine Have you recently changed the needle Is it as high as it will go in the needle bar Eyelashes Eyelashes on the back of the quilt can be caused by too little top tension Turn the thread ten sion disk clockwise 1 2 turn Repeat until stitch quality is good Remember the upper and lower thread play tug of war with each other Loose Top Stitch Is the ...

Страница 31: ...g too far before the needle goes down again forming a stitch In regulated mode this is almost always a problem with the encoders Check both encoders to make sure they are rolling smoothly on the track and are free of dust lint or threads Make sure they are securely plugged into the back of the machine Check that your track is clean and free of dust lint or threads Make sure you have oiled your mac...

Страница 32: ...ught in the bobbin area 1 Turn the power off 2 Remove the bobbin case 3 Standing behind the machine facing the hand wheel rotate the hand wheel clockwise to back the jam out of the bobbin race This may take some work to get it worked free 4 Normally when the thread is dislodged you will be able to make a full rotation with the hand wheel 5 Clean the bobbin area with a soft brush ...

Страница 33: ...er the date of purchase the HUSQVARNA VIKING Platinum 3000 should be returned with this warranty to the nearest authorized HUSQVARNA VIKING dealer This warranty does not apply to any product that has been damaged through electrical power surges alteration mishandling misuse neglect or acts of nature The extent of SVP Worldwide liability under this warranty is limited to the repair or replacement p...

Страница 34: ...34 HUSQVARNA VIKING PLATINUM QUILT SEWCLEVER and 5D are trademarks of KSIN Luxembourg II S ar l 2012 KSIN Luxembourg II S ar l ...

Отзывы: