background image

Sommaire

Introduction................................................................... 39

Sécurité.........................................................................41

Utilisation...................................................................... 45

Entretien....................................................................... 51

Dépannage................................................................... 52

Transport et stockage................................................... 53

Caractéristiques techniques......................................... 55

Déclaration de conformité CE.......................................57

Introduction

Description du produit

Le produit est une meuleuse électrique pour les

surfaces en béton de différentes duretés. La gamme de

meuleuses peut être utilisée sur des surfaces dures,

mais également pour une finition lisse.
Par exemple, le produit est équipé des fonctions

suivantes :
• Un cadre qui peut être plié pour faciliter le transport.
• Un capot de tête de meulage qui adapte le

mouvement à la couche de la surface.

• La tête de meulage est équipée de 3 disques à

meuler. Le kit complet se compose de 6 segments

sur chaque disque à meuler.

• Support résine, support pour outils diamantés à liant

plastique.

• Disponible en version monophasée ou triphasée.
• Une largeur de meulage de 515 mm.

Utilisation prévue

Utilisez le produit pour meuler les surfaces en béton de

différentes duretés, comme le terrazo et les dalles en

pierre.
Le produit est conçu pour un usage commercial léger au

sein de propriétés privées ou de petits commerces.

AVERTISSEMENT: N'utilisez pas ce produit

pour d'autres travaux.

1146 - 001 - 29.04.2019

39

Содержание PG 510

Страница 1: ...PG 510 EN Operator s manual 2 19 DE Bedienungsanweisung 20 38 FR Manuel d utilisation 39 57 NL Gebruiksaanwijzing 58 76 ...

Страница 2: ... that can be folded for easier transport A grinding head cover that adjusts the movement to the surface layer The grinding head has 3 grinding discs Full set is with 6 segments on each grinding disc Resin holder a holder for plastic bonded diamond tools Available in 1 or 3 phase A grind width of 515 mm Intended use Use the product to grind concrete surfaces with different hardness such as terazzo ...

Страница 3: ...t handle motor 17 Electric motor 18 Lifting eye 19 Brush strip 20 Tool plate 3 grinding discs 21 Bottom lower plate grinding head 22 Connection vacuum hose Symbols on the product WARNING Not careful or incorrect use can result in injury or death to the operator or others Read the manual carefully and make sure that you understand the instructions before you use the product Always put on hearing pr...

Страница 4: ...decrease the risk of accidents Safety instructions for operation WARNING Read the warning instructions that follow before you use the product Save all warnings and instructions for future operations WARNING Overexposure to vibration can cause circulatory damage or nerve damage to persons with decreased blood circulation Get medical aid if you have symptoms of overexposure to vibration These sympto...

Страница 5: ...vents skin irritation from wet concrete Use an approved protective helmet Always use approved hearing protection while you operate the product Noise for a long period can cause noise induced hearing loss The product makes dust and fumes that contain dangerous chemicals Use an approved breathing protection Use boots with steel toe caps and non slip soles Make sure that you have a first aid kit near...

Страница 6: ...eep the connection to the extension cable dry and off the ground Keep cable away from heat oil sharp edges or moving parts Damaged or too large cable increases the risk of electrical shock Check that the cables are not damaged and in good condition Do not use the product if a cable is damaged Let an approved service center repair the product To prevent overheating do not use the extension cable wh...

Страница 7: ...od condition and make sure that all fixtures are correctly tightened Do not use a product that is defective Do the safety checks maintenance and the servicing as given in this manual All other maintenance work must be done by an approved service agent Stop the product when you replace the diamond tools Turn the ON OFF switch to 0 and push the emergency stop button Do the inspection and or maintena...

Страница 8: ...ckwise or put in idle position 1 Loosen the lock knobs A and adjust the handle B to idle position A B A 2 Tighten the lock knobs to set the position 3 When the handle position is set pull the handle lock knobs up A and put them into idle position B A B A B To adjust the frame height The angle of the frame can be changed to divide the weight of the chassis This is to decrease or increase the grindi...

Страница 9: ... center or go to www husqvarnacp com to select correct diamond tool Installation of the diamond tools The installation of the diamond tools on the tool plate has effect on the performance of the product The diamond tool type together with the number of segments on the diamond tool is important Use metal bond diamond tools with 2 segments for usual grind operations to make the surface level or ligh...

Страница 10: ...duct 1 Read the operator s manual carefully and make sure that you understand the instructions 2 Do daily maintenance Refer to Maintenance on page 13 3 Make sure that the product is assembled correctly and is not damaged 4 Put the product on the work area 5 Make sure that there are diamond tools on the tool plate and that they are tightly attached 6 Connect the dust extractor to the product Refer ...

Страница 11: ...ion the motor rotates 2 Turn the 2 pins in the power plug in the opposite direction to change in which direction the motor rotates This is only applicable for 3 phase To start the product 1 Push down the handle lightly to lift the grinding head from the surface approximately 1 mm This decreases the pressure against the surface Do not lift the grinding head fully from the surface 2 Turn the ON OFF ...

Страница 12: ... attach to the adhesive surface if not lifted 1 Turn the ON OFF switch to 0 to stop the motor 2 Keep the tool plate against the surface Make sure that the tool plate does not rotate before you lift up the front 3 Pull out the power plug To replace the diamond tools WARNING Disconnect the power plug WARNING Use protective gloves as diamond tools can become very hot 1 Turn the ON OFF switch to 0 and...

Страница 13: ...aler is not a service agent speak to them for information about the nearest service agent Daily maintenance Daily maintenance means that you clean the product Also that you do a check of the electrical supply the brush strip and the grind holder To clean the product CAUTION A blocked air intake decreases the performance of the product and can cause the motor to become too hot Always pull out the p...

Страница 14: ...rs C 3 Replace the rubber cylinders if it is necessary Troubleshooting The product does not start Make sure that the power supply and the power cords are not damaged Examine the emergency stop button turn the button clockwise to release the emergency stop Examine the overload lamp If the overload lamp is on let the motor cool down for some minutes until the product is automatically reset The produ...

Страница 15: ... performance Too long extension cables and or a too small gauge decreases the power of the motor during operation If the motor overloads the overload lamp comes on Wait 2 minutes and try again When this does not help speak to an approved service workshop Make sure that the extension cables are not too short Transportation and storage To set the product in transport position Put some type of protec...

Страница 16: ...duct is in the lift position 5 Remove the lock knobs A to loosen the support foot B A B 6 Hold the handlebar to keep the frame stable and lift the support foot out and up 7 Hold the handlebar with one hand and push the handle on the central hinge This folds the product into the folded position 8 Fold the product carefully 16 1146 001 29 04 2019 ...

Страница 17: ...ee phase 220 240V Single phase 220 240V Motor frequency Hz 50 60 60 50 60 Motor power kW hp 4 0 5 4 4 0 5 4 4 0 5 4 2 2 3 0 3 0 4 0 Rated current A 9 7 15 13 18 Rated voltage V 380 420 440 480 220 240 220 240 220 240 Weight kg lbs 133 293 133 293 133 293 120 265 133 293 Grinding width mm in 515 20 3 515 20 3 515 20 3 515 20 3 515 20 3 Grinding disc diameter mm in 230 9 230 9 230 9 230 9 230 9 Grin...

Страница 18: ...s3m s Right handle 1 3 1 3 1 3 1 3 1 3 Left handle 1 2 1 2 1 2 1 2 1 2 1 Noise emission in the environment measured as sound power according to EN 60335 2 72 Expected meas urement uncertainty 2 5 dB A 2 Sound pressure level according to EN 60335 2 72 Expected measurement uncertainty 4 dB A 3 Vibration level according to EN 60335 2 72 Reported data for vibration level has a typical statistical disp...

Страница 19: ... from 2019 and onwards complies fully with the following EU directives and regulations Directive Regulation Description 2006 42 EC relating to machinery 2011 65EU relating to restriction of hazardous substances and that the following standards and or technical specifications are applied EN ISO 12100 2010 EN 60335 1 2012 A11 2014 A13 2017 EN 60335 2 72 2012 Partille 10 April 2019 Martin Huber Globa...

Страница 20: ...ine Schleifkopfabdeckung die Bewegungen der Oberflächenschicht anpasst Der Schleifkopf ist mit drei Schleifscheiben ausgestattet Ein vollständiger Satz besteht aus sechs Segmenten pro Schleifscheibe Harzgebundener Halter ein Halter für kunststoffgebundene Diamantwerkzeuge Erhältlich als Ein oder Dreiphasenausführung Schleifbreite von 515 mm Verwendungszweck Verwenden Sie das Gerät zum Abschleifen ...

Страница 21: ... Hubgriff Motor 17 Elektromotor 18 Hebeöse 19 Bürstenstreifen 20 Werkzeugplatte drei Schleifscheiben 21 Bodenplatte untere Platte Schleifkopf 22 Anschluss Vakuumschlauch Symbole auf dem Gerät WARNUNG Bei unvorsichtiger oder nicht ordnungsgemäßer Bedienung kann es zu Verletzungen oder zum Tode des Benutzers oder anderer Personen kommen Lesen Sie die Bedienungsanleitung und machen Sie sich mit den A...

Страница 22: ...nde Anweisungen zur korrekten Verwendung des Geräts Diese Informationen können natürlich in keiner Weise die Ausbildung und langjährige Erfahrung eines Fachmanns ersetzen Wenn Sie sich in einer Situation befinden in der Sie sich nicht sicher fühlen brechen Sie die Arbeiten ab und holen professionelle Rat ein Wenden Sie sich an Ihren Händler den Kundendienst oder einen erfahrenen Anwender Gehen Sie...

Страница 23: ...e mit dem Gerät immer vorsichtig und seien Sie jederzeit darauf vorbereitet es anzuhalten wenn es nötig sein sollte Erlauben Sie niemals Kindern dass Gerät zu benutzen oder sich ihm zu nähern Stellen Sie sicher dass immer eine weitere Person in der Nähe ist wenn Sie das Gerät verwenden So können Sie bei einem Unfall gegebenenfalls Hilfe erhalten Arbeiten Sie nicht mit dem Gerät wenn Sie müde oder ...

Страница 24: ... des elektrischen Gehäuses ein oder ausstecken Anweisungen für geerdete Geräte WARNUNG Eine falsche Anschluss kann zu einem Stromschlag führen Wenden Sie sich an einen qualifizierten Elektriker wenn Sie Zweifel daran haben ob das Gerät richtig geerdet ist Modifizieren Sie den Netzstecker nicht Er muss den Herstellerspezifikationen entsprechen Beauftragen Sie einen qualifizierten Elektriker mit dem...

Страница 25: ...tsvorrichtungen vor EIN AUS Schalter Der EIN AUS Schalter wird zum Ein und Ausschalten des Geräts verwendet So prüfen Sie den EIN AUS Schalter 1 Drehen Sie die Notaus Taste im Uhrzeigersinn um sicherzustellen dass sie deaktiviert ist 2 Drücken Sie den Griff nach unten um den Schleifkopf vom Boden anzuheben 3 Schalten Sie den EIN AUS Schalter auf 1 um das Gerät einzuschalten 4 Warten Sie 5 Sekunden...

Страница 26: ...ren Wartungsarbeiten müssen von einer autorisierten Servicewerkstatt durchgeführt werden Halten Sie das Gerät an wenn Sie die Diamantwerkzeuge ersetzen Schalten Sie den EIN AUS Schalter auf 0 und drücken Sie die Notaus Taste Führen Sie die Inspektion und oder Wartung bei stehendem Motor und gezogenem Netzstecker aus Warten Sie das Gerät um sicherzustellen dass es ordnungsgemäß funktioniert Siehe T...

Страница 27: ...n A B A 2 Ziehen Sie die Sperrhebel fest um die Position einzustellen 3 Wenn die Lenkerposition eingestellt ist ziehen Sie die Lenkersperrhebel A nach oben A und bringen diese in die Leerlaufstellung B A B A B So stellen Sie die Rahmenhöhe ein Der Winkel des Rahmens kann geändert werden um das Gewicht des Chassis zu teilen Dadurch wird der Schleifdruck gegen die Oberfläche verringert oder erhöht P...

Страница 28: ...t des Diamantwerkzeugs in Kombination mit der Anzahl der Segmente auf dem Diamantwerkzeug ist wichtig Verwenden Sie metallgebundene Diamantwerkzeuge mit zwei Segmenten für die üblichen Schleifarbeiten um die Oberfläche zu ebnen oder für leichteres Abtragen Verwenden Sie metallgebundene Diamantwerkzeuge mit einem Diamantsegment um den Druck des Diamantwerkzeugs zu erhöhen Diese Installation eignet ...

Страница 29: ...digt ist 4 Stellen Sie das Gerät im Arbeitsbereich ab 5 Stellen Sie sicher dass Diamantwerkzeuge auf der Werkzeugplatte vorhanden sind und fest sitzen 6 Schließen Sie den Staubabsauger an das Gerät an Siehe So schließen Sie einen Staubabsauger an auf Seite 32 7 Stellen Sie den Lenker auf die gewünschte Arbeitshöhe ein 8 Stellen Sie sicher dass das Motorkabel an den Schaltkasten angeschlossen ist b...

Страница 30: ...b 2 Schalten Sie den EIN AUS Schalter auf 1 um das Gerät einzuschalten In weniger als fünf Sekunden arbeitet das Gerät mit der Leerlaufdrehzahl Gerät stoppen ACHTUNG Heben Sie die Werkzeugplatte nicht von der Oberfläche ab wenn Sie den Motor stoppen Die Werkzeugplatte dreht sich nach dem Stoppen des Motors eine Weile lang weiter Ein großer Teil des Staubs kann in die Luft geblasen werden und die O...

Страница 31: ...amantwerkzeuge WARNUNG Ziehen Sie den Netzstecker aus der Steckdose WARNUNG Verwenden Sie Schutzhandschuhe da Diamantwerkzeuge sehr heiß werden können 1 Drehen Sie den EIN AUS Schalter auf 0 und ziehen Sie den Netzstecker um das Gerät auszuschalten 2 Drücken Sie die Notaus Taste 3 Bringen Sie das Gerät in die Wartungsposition 4 Entfernen Sie die Diamantsegmente mit einem Hammer 5 Befestigen Sie ne...

Страница 32: ...NG Bevor Sie eine Wartung durchführen müssen Sie das Kapitel über die Sicherheit lesen und verstehen Für alle Wartungs und Reparaturarbeiten am Produkt ist eine spezielle Schulung erforderlich Wir garantieren die Verfügbarkeit von professionellen Reparaturen und Wartungsarbeiten Wenn Ihr Händler keine Servicewerkstatt ist sprechen Sie mit ihm um Informationen über die nächste Servicewerkstatt zu e...

Страница 33: ...eibenhalters ist wichtig für die Leistung und die Sicherheit 1 Entfernen Sie die Schleifscheiben A und die Werkzeugplatten B A B C 2 Überprüfen Sie den Schleifscheibenhalter auf Beschädigungen und die Gummizylinder C auf Verschleiß 3 Tauschen Sie die Gummizylinder bei Bedarf aus Fehlerbehebung Das Gerät springt nicht an Stellen Sie sicher dass das Netzteil und die Stromkabel nicht beschädigt sind ...

Страница 34: ...eit Wenn der Motor überlastet wird leuchtet die Überlastlampe auf Warten Sie zwei Minuten und versuchen Sie es erneut Wenden Sie sich an eine autorisierte Servicewerkstatt wenn dies nicht hilft Stellen Sie sicher dass das Verlängerungskabel nicht beschädigt ist Transport und Lagerung So bringen Sie das Gerät in Transportposition Schützen Sie das Gerät während des Transports Durch diesen Schutz wer...

Страница 35: ...5 Entfernen Sie die Sperrhebel A um den Stützfuß B zu lösen A B 6 Halten Sie den Lenker so dass der Rahmen stabil bleibt und heben Sie den Stützfuß nach außen und oben 7 Halten Sie den Lenker mit einer Hand fest und drücken Sie den Griff auf dem mittleren Scharnier Dadurch wird das Gerät in der zusammengeklappten Position gehalten 8 Klappen Sie das Gerät sorgfältig zusammen 1146 001 29 04 2019 35 ...

Страница 36: ... Technische Daten Dreiphasig 380 420 V Dreiphasig 440 480V Dreiphasig 220 240V Einphasig 220 240 V Motorfrequenz Hz 50 60 60 50 60 Maximale Leistung in kW 4 0 4 0 5 4 4 0 5 4 2 2 3 0 3 0 Nennstrom A 9 7 15 13 18 Nennspannung V 380 420 440 480 220 240 220 240 220 240 Gewicht kg 133 293 133 293 133 293 120 265 133 293 Schleifbreite mm in 515 20 3 515 20 3 515 20 3 515 20 3 515 20 3 Schleifscheibendu...

Страница 37: ...te6m s Rechter Griff 1 3 1 3 1 3 1 3 1 3 Linker Griff 1 2 1 2 1 2 1 2 1 2 4 Umweltbelastende Geräuschemissionen gemessen als Schallleistung gemäß EN 60335 2 72 Erwartete Mes sunsicherheit 2 5 dB A 5 Schalldruckpegel gemäß EN 60335 2 72 Erwartete Messunsicherheit 4 dB A 6 Vibrationspegel gemäß EN 60335 2 72 Berichten zufolge liegt der Vibrationspegel normalerweise bei einer Ausbreitungsklasse Stand...

Страница 38: ...b 2019 die folgenden EU Richtlinien und Vorschriften erfüllt Richtlinie Vorschrift Beschreibung 2006 42 EC Maschinenrichtlinie 2011 65EU zur Beschränkung der Verwendung bestimmter gefährlicher Stoffe und dass die folgenden Normen und oder technischen Daten angewendet werden EN ISO 12100 2010 EN 60335 1 2012 A11 2014 A13 2017 EN 60335 2 72 2012 Partille 10 April 2019 Martin Huber Global R D Directo...

Страница 39: ...aciliter le transport Un capot de tête de meulage qui adapte le mouvement à la couche de la surface La tête de meulage est équipée de 3 disques à meuler Le kit complet se compose de 6 segments sur chaque disque à meuler Support résine support pour outils diamantés à liant plastique Disponible en version monophasée ou triphasée Une largeur de meulage de 515 mm Utilisation prévue Utilisez le produit...

Страница 40: ...teur électrique 18 Anneau de levage 19 Brosse 20 Plaque de l outil 3 disques à meuler 21 Plaque arrière inférieure tête de meulage 22 Raccordement tuyau d aspiration Symboles concernant le produit AVERTISSEMENT Une utilisation négligente ou inadaptée peut provoquer des blessures voire la mort pour l opérateur ou les personnes à proximité Lisez avec attention le manuel d utilisation et assurez vous...

Страница 41: ...sur la sécurité fournie des instructions de base d utilisation correcte du produit Ces informations ne remplacent pas l expérience et les connaissances d un professionnel Si vous ne vous sentez pas en sécurité dans une situation arrêtez et demandez l aide d un professionnel Parlez en à votre revendeur à votre agent d entretien ou à un opérateur expérimenté Ne tentez pas d effectuer une tâche si vo...

Страница 42: ...nts et ne les laissez pas l utiliser Assurez vous qu il y a toujours une personne supplémentaire à proximité lorsque vous utilisez le produit En cas d accident vous pourrez obtenir de l aide si nécessaire N utilisez pas le produit si vous êtes fatigué ou malade ou si vous êtes sous l emprise d alcool de drogues ou de médicaments Cela peut diminuer votre acuité visuelle votre jugement ou la coordin...

Страница 43: ...mis à la terre Ne modifiez pas les spécifications d usine de la prise de courant Si la prise de courant n est pas adaptée à la prise secteur laissez un électricien homologué installer une prise de courant secteur appropriée Respectez la législation et les réglementations locales Si vous n avez pas bien compris les instructions de mise à la terre du produit consultez un électricien homologué Le pro...

Страница 44: ...rrupteur marche arrêt sur 1 pour faire démarrer le produit 4 Patientez 5 secondes pour laisser le produit atteindre le régime de ralenti 5 Placez l interrupteur marche arrêt sur 0 pour arrêter le produit Arrêt d urgence L arrêt d urgence permet d arrêter rapidement le moteur L arrêt d urgence du produit coupe l alimentation électrique du secteur Pour contrôler l arrêt d urgence 1 Appuyez sur le bo...

Страница 45: ...nchée Effectuez l entretien pour vous assurer que le produit fonctionne correctement Reportez vous à Entretien quotidien à la page 51 Utilisation Introduction AVERTISSEMENT Avant d utiliser le produit vous devez lire et comprendre le chapitre sur la sécurité Positions du produit Position de fonctionnement Position d entretien REMARQUE placez le produit en position d entretien uniquement sur une su...

Страница 46: ...tre B A B A B Pour régler la hauteur du cadre L angle du cadre peut être modifié pour répartir le poids du cadre Cela permet de réduire ou d augmenter la pression de meulage sur la surface Réglez l angle pour configurer une position de travail agréable pour différents opérateurs 1 Retirez les boutons de verrouillage A pour desserrer le pied d appui B A B 2 Maintenez le guidon pour assurer la stabi...

Страница 47: ...s de meulage habituelles pour mettre la surface à niveau ou pour un enlèvement léger de matière Utilisez les outils diamantés à liant métallique à 1 segment en diamant pour augmenter la pression de l outil diamanté Cette installation convient aux travaux d enlèvement intensif avec une force importante Pour l enlèvement le plus intensif nous vous recommandons d utiliser des outils qui fonctionnent ...

Страница 48: ...ixés 6 Branchez l extracteur de poussière sur le produit Reportez vous à Pour brancher un extracteur de poussière à la page 50 7 Réglez le guidon pour définir la hauteur de travail nécessaire 8 Assurez vous que le câble du moteur est connecté au boîtier électrique avant de brancher le produit sur une prise électrique 9 Branchez la prise de courant sur la prise secteur 10 Tournez le bouton d arrêt ...

Страница 49: ...ent après l arrêt du moteur La majeure partie de la poussière peut être soufflée dans l air et la surface risque d être endommagée REMARQUE Si vous meulez un matériau adhésif de l asphalte de la peinture ou un matériau équivalent soulevez légèrement l avant du produit lorsque la plaque de l outil s arrête Le produit peut coller à la surface adhésive s il n est pas soulevé 1 Placez l interrupteur m...

Страница 50: ...u pour retirer les outils diamantés 5 Fixez les outils diamantés neufs sur la plaque de l outil 6 Lorsque les outils diamantés sont remplacés placez le produit en position de fonctionnement Pour brancher un extracteur de poussière Utilisez un système extracteur de poussière Husqvarna 50 1146 001 29 04 2019 ...

Страница 51: ...ne prise d air obstruée diminue les performances du produit et peut entraîner une surchauffe du moteur Débranchez toujours la prise de la prise secteur avant de nettoyer de procéder à l entretien ou de monter le produit Nettoyez toujours la totalité de l équipement à la fin de la journée de travail N utilisez pas de nettoyeur haute pression pour le nettoyage du produit Éliminez toute obstruction d...

Страница 52: ...urer le fonctionnement Utilisez le nombre d outils diamantés recommandé pour diminuer la force exercée sur le produit et l opérateur Reportez vous à la section Outils diamantés à la page 47 Mouvements brutaux du produit Assurez vous que tous les outils diamantés sont correctement installés et que tous sont à la même hauteur Arrêt du produit après un court instant En cas de surcharge du produit la ...

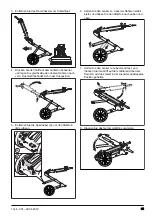
Страница 53: ...ant le transport La protection permet que le produit n entre pas en contact avec des éléments naturels comme la pluie et la neige Le produit peut être divisé en 2 composants Cela facilite le transport Déplacez toujours le produit avec l anneau de levage et le guidon 1 Débranchez le câble du moteur du boîtier électrique A A 2 Tirez sur les goupilles de verrouillage A pour les extraire et retirez le...

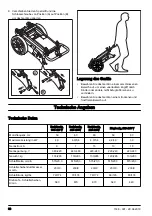
Страница 54: ...le guidon pour assurer la stabilité du cadre et soulevez le pied d appui vers l extérieur et vers le haut 7 Tenez le guidon avec une main et poussez la poignée sur la charnière centrale Cela permet de placer le produit en position repliée 8 Pliez le produit avec précaution 9 Déplacez la goupille de blocage et le boulon de verrouillage de la position A à la position B afin de verrouiller le produit...

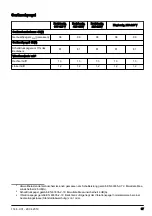
Страница 55: ...nt monophasé 220 240 V Fréquence du moteur Hz 50 60 60 50 60 Puissance maximale kW hp 4 0 5 4 4 0 5 4 4 0 5 4 2 2 3 0 3 0 4 0 Intensité nominale A 9 7 15 13 18 Tension nominale V 380 420 440 480 220 240 220 240 220 240 Poids kg lb 133 293 133 293 133 293 120 265 133 293 Largeur de meulage mm po 515 20 3 515 20 3 515 20 3 515 20 3 515 20 3 Diamètre du disque à meuler mm po 230 9 230 9 230 9 230 9 2...

Страница 56: ... 1 3 1 3 1 3 Poignée gauche 1 2 1 2 1 2 1 2 1 2 7 Émissions sonores dans l environnement mesurées en tant que puissance acoustique conformément à la norme EN 60335 2 72 Mesure d incertitude attendue 2 5 dB A 8 Niveau de pression sonore conformément à la norme EN 60335 2 72 Mesure d incertitude attendue 4 dB A 9 Niveau de vibrations conformément à la norme EN 60335 2 72 Les données reportées pour l...

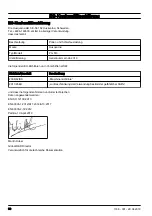
Страница 57: ...érieurs est entièrement conforme à la réglementation et aux directives de l UE suivantes Directive Réglementation Description 2006 42 EC relative aux machines 2011 65EU relative à la limitation de l utilisation de certaines substances dangereuses et que les normes et ou les spécifications techniques suivantes sont appliquées EN ISO 12100 2010 EN 60335 1 2012 A11 2014 A13 2017 EN 60335 2 72 2012 Pa...

Страница 58: ... transport Een afdekking voor de slijpkop die wordt aangepast aan de beweging over de oppervlaktelaag De slijpkop beschikt over 3 slijpschijven De volledige set bestaat uit 6 segmenten op elke slijpschijf Houder voor hars houder voor kunststofgebonden diamantschijven Beschikbaar met 1 of 3 fasen Een slijpbreedte van 515 mm Gebruik Gebruik het product om betonnen oppervlakken van verschillende hard...

Страница 59: ...opafdekking 16 Handgreepstang motor 17 Elektromotor 18 Hijsoog 19 Borstelstrook 20 Schijfplaat 3 slijpschijven 21 Bodem onderste plaat slijpkop 22 Aansluiting vacuümslang Symbolen op het product WAARSCHUWING Onzorgvuldig of onjuist gebruik kan leiden tot letsel of de dood van de gebruiker of anderen Lees de handleiding goed door en zorg dat u de instructies hebt begrepen voordat u het product gebr...

Страница 60: ...is en ervaring Als u zich niet veilig voelt in een situatie moet u de werkzaamheden stoppen en om professionele ondersteuning vragen Neem contact op met uw dealer een servicewerkplaats of een ervaren gebruiker Voer geen werkzaamheden uit waarvoor u zich onvoldoende gekwalificeerd acht Zorg dat het werkgebied schoon en goed verlicht is Dit zal het risico op ongevallen verminderen Veiligheidsinstruc...

Страница 61: ...elingsvermogen en coördinatie verminderen Gebruik geen product dat is gewijzigd ten opzichte van de fabrieksspecificaties Gebruik altijd goedgekeurde accessoires Neem voor meer informatie contact op met uw dealer Persoonlijke beschermingsuitrusting WAARSCHUWING Lees de volgende waarschuwingen voordat u het product gaat gebruiken Gebruik altijd de juiste persoonlijke beschermingsmiddelen wanneer u ...

Страница 62: ...e elektricien als u de instructies over het geaarde product niet volledig begrijpt Het product heeft een geaard snoer en een geaarde stekker Sluit het product altijd aan op een geaard stopcontact Dit vermindert het risico op elektrische schokken in geval van een storing Gebruik geen adapters met het product Verlengkabels De markering op de verlengkabel moet gelijk zijn aan of hoger zijn dan de waa...

Страница 63: ... UIT schakelaar op 1 om het product te starten 4 Wacht 5 seconden om het product met stationair toerental te laten werken 5 Zet de AAN UIT schakelaar op 0 om het product te stoppen Noodstop De noodstopknop wordt gebruikt om de motor snel te stoppen De noodstop op het product schakelt de netvoeding uit De noodstop controleren 1 Druk op de noodstopknop A en controleer of de motor stopt A B 2 Draai d...

Страница 64: ...de motor is gestopt en de stekker is verwijderd Controleer het product regelmatig om een goede werking te waarborgen Zie Dagelijks onderhoud op pagina 70 Werking Inleiding WAARSCHUWING Voordat u het product gaat gebruiken dient u het hoofdstuk over veiligheid te lezen en hebben begrepen Productstanden Werkstand Onderhoudsstand OPGELET Zet het product alleen op een horizontaal oppervlak in de onder...

Страница 65: ...A B De framehoogte aanpassen De hoek van het frame kan worden veranderd om het gewicht van het chassis te verdelen Hierdoor wordt de slijpdruk tegen het oppervlak verkleind of vergroot Stel de hoek zodanig af dat een goede werkstand voor verschillende gebruikers kan worden ingesteld 1 Verwijder de vergrendelknoppen A om de steunvoet B los te maken A B 2 Houd het stuur vast om het frame stabiel te ...

Страница 66: ...et 2 segmenten voor gebruikelijke slijpwerkzaamheden om het oppervlak egaal te maken of voor lichte verwijdertaken Gebruik metaalgebonden diamantschijven met 1 diamantsegment om de diamantschijfdruk te verhogen Deze installatie is bestemd voor zware verwijdertaken met veel kracht Voor de zwaarste verwijdertaken raden wij u aan om gereedschappen te gebruiken die slechts in één richting met PCD diam...

Страница 67: ... 6 Sluit de stofzuiger aan op het product Zie Stofzuiger aansluiten op pagina 69 7 Stel het stuur af om de vereiste werkhoogte in te stellen 8 Zorg ervoor dat de motorkabel is aangesloten op de controlekast voordat u de stekker van de voedingskabel aansluit op het stopcontact 9 Sluit de stekker van het product aan op het stopcontact 10 Draai de noodstopknop rechtsom om ervoor te zorgen dat de nood...

Страница 68: ... Het stof kan zich grotendeels in de lucht verspreiden en het oppervlak kan worden beschadigd OPGELET Als u klevend asfalt verf of vergelijkbaar materiaal slijpt tilt u de voorzijde van het product enigszins omhoog wanneer de schijfplaat stopt Het product kan aan het klevende oppervlak blijven plakken indien het niet wordt opgetild 1 Zet de AAN UIT schakelaar op 0 om de motor te stoppen 2 Houd de ...

Страница 69: ...ruik een hamer om de diamantschijven te verwijderen 5 Bevestig de nieuwe diamantschijven op de schijfplaat 6 Zet het product in de bedrijfsstand wanneer de diamantschijven worden vervangen Stofzuiger aansluiten Gebruik een Husqvarna stofzuigersysteem 1146 001 29 04 2019 69 ...

Страница 70: ... tot verminderde prestaties van het product en kan leiden tot oververhitting van de motor Trek altijd de stekker uit het stopcontact voordat u het product reinigt onderhoudt of monteert Reinig altijd alle apparatuur aan het einde van de werkdag Reinig het product niet met een hogedrukspuit Verwijder blokkades van alle luchtopeningen Het product moet altijd koel genoeg zijn De elektrische voeding c...

Страница 71: ...cht op het product en de gebruiker te verminderen Zie Diamantgereedschappen op pagina 66 Het product maakt plotselinge bewegingen Controleer of alle diamantschijven correct zijn geïnstalleerd en dezelfde hoogte hebben De machine stopt na korte tijd Als het product wordt overbelast wordt de overbelastingsbeveiliging ingeschakeld en stopt de motor Verminder de belasting De onderste opening is voor e...

Страница 72: ...wijze wordt het product niet blootgesteld aan natuurverschijnselen zoals regen en sneeuw Het product kan worden opgesplitst in 2 onderdelen Hierdoor is het product eenvoudiger te transporteren Beweeg het product altijd met het hijsoog en het stuur 1 Koppel de motorkabel los van de controlekast A A 2 Trek de borgpennen A eruit en verwijder de borgbouten B aan elke zijde van de slijpkop B A 3 Verwij...

Страница 73: ... B 6 Houd het stuur vast om het frame stabiel te houden en de steunvoet omhoog en eruit te tillen 7 Houd het stuur met één hand vast en duw de hendel op het centrale scharnier Hierdoor wordt het product in de ingeklapte stand geplaatst 8 Klap het product in 9 Verplaats de borgpen en de borgbout van positie A naar positie B om het product te vergrendelen A B 1146 001 29 04 2019 73 ...

Страница 74: ...9 7 15 13 18 Nominale spanning V 380 420 440 480 220 240 220 240 220 240 Gewicht kg lbs 133 293 133 293 133 293 120 265 133 293 Slijpbreedte mm in 515 20 3 515 20 3 515 20 3 515 20 3 515 20 3 Diameter slijpschijf mm inch 230 9 230 9 230 9 230 9 230 9 Slijpdruk kg lbs 79 174 79 174 79 174 66 145 80 176 Rotatiesnelheid slijpschijven tpm 560 670 670 540 440 Geluidsniveau Driefasig 380 420 V Driefasig...

Страница 75: ...gebruiker 81 81 81 81 81 Trillingsniveau12m s Rechter handgreep 1 3 1 3 1 3 1 3 1 3 Linker handgreep 1 2 1 2 1 2 1 2 1 2 11 Geluidsdrukniveau volgens EN 60335 2 72 Verwachte onzekerheidsmarge 4 dB A 12 Trillingsniveau volgens EN 60335 2 72 De gerapporteerde gegevens voor een trillingsniveau vertonen een typische statistische spreiding standaardafwijking van 1 m s2 1146 001 29 04 2019 75 ...

Страница 76: ...mers vanaf 2019 en verder volledig voldoet aan de volgende EU richtlijnen en regelgeving Richtlijn Verordening Beschrijving 2006 42 EC betreffende machines 2011 65EU betreffende beperking van gevaarlijke stoffen en dat de volgende normen en of technische specificaties zijn toegepast EN ISO 12100 2010 EN 60335 1 2012 A11 2014 A13 2017 EN 60335 2 72 2012 Partille 10 April 2019 Martin Huber Global R ...

Страница 77: ...1146 001 29 04 2019 77 ...

Страница 78: ...78 1146 001 29 04 2019 ...

Страница 79: ...1146 001 29 04 2019 79 ...

Страница 80: ...www husqvarnacp com Original instructions Originalanweisungen Instructions d origine Originele instructies 1141234 20 2019 05 13 ...

Отзывы: