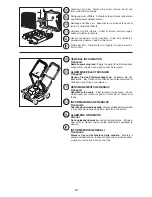
Husqvarna J 55S L Скачать руководство пользователя страница 17

17

Maintenance

Always remove the spark plug lead

 before repair, cleaning or 

main te nance work.  After 5 hours running time, tighten screws 

and nuts.  Check the oil.  The 

spark plug

 must be 

at the highest 

point

 on the mower when it is tilted up.

Wartung

Ziehen Sie immer das Zündkerzenkabel ab

, bevor Sie mit 

der Reparatur, Reinigung oder mit Wartungsarbeiten beginnen.  

Nach den ersten 5 Betreibstunden alle Schrauben und Muttern 

überprüfen.  Ölstand kontrollieren.  Wenn der Rasenmäher 

gekippt wird, müssen sich 

die Zündkerze an der höchsten 

Stelle 

befinden. 

Entretien

Toujours debrancher la bougie 

avant réparation nettoyage 

entretien.  Après 5 heures d'utilisation, resserrer vis et écrous.  

Vérifier l'huile.  Lorsque la tondeuse est inclinée sur le côtc, il 

faut que la 

bougie

 occupent la position 

la plus élevée

.

Inspeccion

Desconéctese siempre el cable del encendido de la bujía 

antes 

de hacer una reparación, limpieza o trabajo de mantenimiento.  

Vovler a apretar tuercas y tornillos después de cinco horas de 

trabajo.  Contrólose el aceite.  Si se coloca el cortacésped de 

lado, el punto más alto debe ser 

la bujía.

Onderhoud

Voordag u begint met schoonmaken, reparaties of afstellen, 

altijd eerst de bougiekabel losmaken.  

Bouten en moeren 

kontroleren ma vijf draaiuren.  Oliepeil kontroleren en zonodig 

bijvullen.  Als de maaier op de zijkant wordt gelegd, zorg dan 

dat 

de bougie 

naar 

boven

 zign gericht.

Mateniméto

Manutenzione: Staccare sempre il cavo di accensione


prima di riparazioni, pulizie o lavori di menutenzione.  Dopo 

5 ore di funzionamento stringere viti e dadi.  Controllare l'olio.  

Piegando la falciatrice sul fiancolare attenzione che 

la candela 

sia il punto più alto.

Regularly

Stop the engine and unscrew the dipstick.  The level should be 

between FULL and ADD.  

NOTE:

 the dipstick must be screwed 

all the way down in order to indicate correct oil level.  Avoid 

filling with too much oil.

Regelmässig

Stellen Sie den Motor ab und schrauben Sie den Ölpeilstab 

heraus.  De Ölstand soll swischen FULL and ADD liegen.  

ACH-

TUNG: 

der Ölpeilstab muss vollständig hineingeschraubt sein, 

damit der richtige Ölstand angezeigt werden kann.  Vermeiden 

Sie zu viel Öl einzufüllen. 

Régulièrement

Arrêter le moteur et vérifier la jauge à julie.  Le niveau doit être 

situé entre FULL (plein) et ADD (ajoutez).  

ATTENTION:

 il faut 

que la jauge soit vissé à fond pour obtenir un résultat correct.  

Evitez de mettre trop d'huile.

Periódicamente

Parar el motor para controlar el nivel de aceite del motor.  Debe 

estar entre FULL y ADD.  

ATENCIÓN:

 la tapa tiene que estar 

bien puesta para que la indicación del nivel de aceite de la varilla 

sea correcta.  Evitar relleno excesivo de aceite.

Regelmatig

Kontroleer het oliepeil bij voorkeur bij een koude motor.  Het niveau 

moet tussen FULL en ADD staan.  Nooit beneden de ADD mar 

ook nooit boven FULL.  

N.B.

 De peilstok moet geheel ingedraaid 

worden voor dejuiste meting.  Niet teveel olie bijvullen.

Periodicamente

Arrestare il more e controllare l'asta dell'olio.  Ll livello deve 

trovarsi fra FULL e ADD.  

ATTENZIONE:

  l'asta dell'olio deve 

essere avvitata fino in fondo per vedere il livello correctto dell'olio.  

Evitare di versare troppo olio.

Содержание J 55S L

Страница 1: ...instructions carefully and make sure you understand them before using this machine Anleitungshandbuch Bitte lesen Sie diese Anleitungen sorg fältig durch und vergewissern Sie sich daß Sie diese verstehen bevor Sie die Maschine in Betrieb nehmen Instructieboekje Lees deze instructies aandachtig en zorg dat u ze begrijpt voordat u deze machine gebruikt Manuale di istruzioni Prima di utilizzare la ma...

Страница 2: ...AGGIO 11 12 REGOLAZIONE 12 13 AVVIAMENTO ED ARRESTO 14 15 USO DELLA FALCIATRICE 16 MANUTENZIONE 17 19 INFORMAZIONE GENERICHE 19 CONTENTS SAFETY RULES PAGE 3 8 TECHNICAL DATA 9 OVERVIEW 10 ASSEMBLY 11 12 ADJUSTMENTS 12 13 START AND STOP 14 15 USE 16 MAINTENANCE 17 19 GENERAL INFORMATION 19 INHALTSVERZEICHNIS SICHERHEITSREGELN SEITE 3 8 TECHNISCHE DATEN 9 ÜBERSICHT 10 MONTIEREN 11 12 EINSTELLUNG 12 ...

Страница 3: ... to and from the area to be mowed Neveroperatethelawnmowerwithdefectiveguards or without safety devices for example deflectors and or grass catchers in place Do not change the engine governor settings or over speed the engine Operating the engine at excessive speed may increase the hazard of personal injury Disengage all blade and drive clutches before starting the engine Start the engine or switc...

Страница 4: ...mitdefektenSchutzab deckungen oder nicht in Position befindlichen Schutz vorrichtungen wie beispielsweise Leitblechen und oder Grasfänger Die Einstellung des Drehzahlreglers nicht ändern und die Drehzahl des Motors nicht über die Werkspezifikationen heraufsetzen Der Betrieb des Motors bei zu hohen Drehzahlen kann die Gefahr von Körperverletzungen vergrößern Vor dem Starten der Maschine alle Blocki...

Страница 5: ...r la lame immobile si la tondeuse à gazon doit être inclinée pour le transport lorsqu elle traverse des surfaces autres que le gazon et lorsque vous transportez la tondeuse à gazon d un endroit à l autre N utilisez jamais la tondeuse à gazon avec des pro tections défectueuses ou sans dispositif de sécurité comme par exemple des déflecteurs ou bacs à herbe en place Conserverlerégimederotationdumote...

Страница 6: ... el motor el silenciador el comportamiento de la batería limpios de césped hojas y de demasiado grasa Verifique frecuentemente el recogedor del césped para ver si hay uso o deterioración Para la seguridad reemplace las partes que estén usadas o dañadas Si el tanque del combustible debe ser vaciado hágalo afuera I Instrucción Lea todas las instrucciones cuidadosamente Famil iarícese completamente c...

Страница 7: ...rmaat aan smeervet Controleer de opvangzak vaak op slijtage of verwer ing Vervang versleten of beschadigde onderdelen om veiligheidsredenen Als de brandstoftank afgetapt moet worden moet dit buiten worden gedaan I Training Lees de instructies aandachtig Zorg dat u vertrouwd bentmetdebedieningselementenenhetjuistegebruik van de machine Laat kinderen of mensen die niet bekend zijn met de instructies...

Страница 8: ...ure verso la zona da falciare Non utilizzare mai la macchina con protezioni difet tose oppure in assenza di dispositivi di sicurezza ad esempio deflettori e o separatori di erba Non modificare le impostazioni del regolatore del motore né far operare il motore a velocità eccessive Le velocità eccessive possono aumentare il pericolo di infortuni Disinnestare tutte le lame e le frizioni prima di avvi...

Страница 9: ...rouver sur votre machine ou dans les publications fournies avec le produit Ap prenez à comprendre la signification de ces symboles Estos símbolos pueden aparecer sobre su unidad o en la literatura proporcionada con el producto Aprenda y comprenda sus significados Deze symbolen kunnen op uw machine of in de bij het produkt geleverde documentatie aanwezig zijn Lees en begrijp de betekenis Simboli ut...

Страница 10: ...10 5 2 3 1 9 4 8 6 7 ...

Страница 11: ...Winkel nach oben zeigend anbringen und mit den mitge lieferten Befestigungsteilen sichern HINWEIS Die Montage des Fußschutzes ist für den sicheren Betrieb dieser Maschine erforderlich Installez le protecteur de pieds arrière Placez l angle vers en haut et assurez le avec les attaches fournies REMARQUE Vous devez installer le protecteur de pieds arrière pour que l usage de la machine soit sûr Insta...

Страница 12: ... 2 est installé Para Convertir la Segadora PARA EL ACOLCHAMIENTO La tapa acolchadora 1 cerrado PARA NO RECOGER LA HIERBA La protección contra la descarga 2 instalada De Maaier Veranderen VOOR VERSPREIDEN VAN MULCH De mulchachterluik 1 moet gesloten zijn OMBOUWEN NAAR ACHTERUITWORP Voorplaat 2 moet geïnstalleerd zijn Per Convertire il Tosaerba PER LA PACCIAMATURA La portello a per la pacciamatura 1...

Страница 13: ...nstrucciones anexas para el uso del motor Bijvullen van olie Vul het carter met de bijgeleverde motorolie Multi grade zo als bijv SAE30 Lees tevens de bijgevoegde instructie voor de motor Riempimento dell olio Versare l olio nel motore Si possono usare le qualità SAE30 Solo per gli U S A Leggere anche le unstruzioni per il motore allegate Adjustment The handle can be set to different levels Einste...

Страница 14: ...de l essence avec ou sans plomb Ne pas faire le plein quand le moteur est en marche Placer la manette des gaz sur la position MAX Maintenez la commande contre le guidon et tirez vivement sur le starter Puis lâchez doucement la ficelle Coupez le moteur en lâchant la commande Arranque y Parada Colocar el cortacésped en una superficie llana sin gravilla guijarros etc Rellenar el tanque de gasolina pu...

Страница 15: ...ier du frein moteur jusqu à débrayage du réglage d embrayage Funcionamiento La conexión del accionamiento se efectúa desplazando hacia adelante el mando del embrague La desconexión se lleva a cabo soltando el mando del freno del motor hasta liberar el mando del embrague Aandrijving Het kippelen van de aandrijving geschiedt door de koppeling shandel naar voren te zetten Ontkoppeling geschiedt door ...

Страница 16: ...senmäner solite nicht in einem Gelände benützt werden das eine Neigung von mehr als 15 Grad hat In solchen Fällen können Schmierungsprobleme im Motor auftreten Utilisation La tondeuse ne doit pas être utilisée sur un terrain dont la pente dépasse 15 Il pourrait se produire des problèmes avec le graissage du moteur Aplicacion Paraevitarproblemasdeengraseserecomiendanousarelcorta césped en terrenos ...

Страница 17: ...arazioni pulizie o lavori di menutenzione Dopo 5 ore di funzionamento stringere viti e dadi Controllare l olio Piegando la falciatrice sul fiancolare attenzione che la candela sia il punto più alto Regularly Stop the engine and unscrew the dipstick The level should be between FULL and ADD NOTE the dipstick must be screwed all the way down in order to indicate correct oil level Avoid filling with t...

Страница 18: ...del lado inferior del motor y dejar salir el aceite Poner después aceite nuevo Pueden utilizarse los aceites SAE 30 Ververs de olie elk seizoen of na 25 u rijden Laat de motor warmlopen schakel de motor uit en demonteer de ontsteking skabel Verwijder de aftapplug op de onderkant van de motor en tap de olie af Vul daarna met verse olie SAE 30 Sostituire l olio al termine di ogni stagione oppure dop...

Страница 19: ...r De bougiekabel losmaken Ledig de benzinetank Bij open baar vervoer dienen zowel olie als benzinetank geledigd te worden INFORMAZIONE GENERALI Transporto Staccare il cavo d accensione dalla candela Svuotare il serbatoio della benzina In caso di transporto su mezzi pubblici si deve svuotare sia la benzina che l olio Cleaning of air filter Slacken the screw remove the lid and remove the filter cart...

Страница 20: ...532 41 90 73 Rev 4 Printed 10 17 08 TH TH BY BY BY in U S A ...

Отзывы: