


English –
17
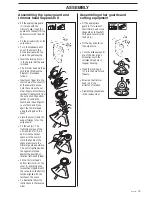
Assembling the handlebars
(323R)
ASSEMBLY
Assembling the handlebars
(325R
X
, 325R
XT
, 325RD
X
)
• Remove the screw at the
rear of the throttle handle.
• Slide on the throttle
handle on the right-hand
side of the handlebars, (see
the diagram).
• Align the hole in the
throttle handle for the
fixing screw with the hole
on the handlebars.
• Refit the screw in the rear
of the throttle handle.
• Fit the screw through the
throttle handle and the
handlebars and tighten.
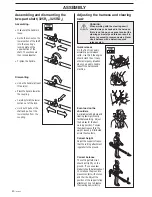
• Unscrew the bracket
components from the
handlebar bracket.
• Position the handlebars as
shown. Fit the bracket
components and tighten
the handle lightly.
• Put on the harness and
hang the machine in the
suspension hook. Now
finely adjust so that the
machine gives a
comfortable working
position when it‘s
attached to the harness.
Tighten the handle.
• The handlebars can easily
be turned to fit along the
shaft for easy
transportation and storage.
• Loosen the knob. Turn the
handles clockwise so that
the throttle comes against
the engine.
• Thereafter fold the
handlebars around the
shaft. Tighten the handle.
• Attach the transport
guard.
Transport position, handlebars
(325R
X
, 325R
XT
, 325RD
X
)
• Remove the screw at the
rear of the throttle
handle.
• Slide on the throttle
handle on the right-hand
side of the handlebars,
(see the diagram).
• Align the hole in the
throttle handle for the
fixing screw with the
hole on the handlebars.
• Refit the screw in the
rear of the throttle
handle.
• Fit the screw through the
throttle handle and the
handlebars and tighten.
• Fit the bracket
components as shown in
the diagram.
• The handle mounting
must be fitted between
the arrows on the shaft.
• Loosely tighten the four
screws.
• Put on the harness and
hang the machine in the
suspension hook. Now
finely adjust so that the
machine gives a
comfortable working
position when it’s
attached to the harness.
Tighten the screws.
Содержание 323R series
Страница 32: ...32 English 1 Super Auto II Super Auto II 1 2 3 4 5 6 7 8 9 10 4 0 m 13 2 4 mm 095 2 0 m 6 5 6 6 15 cm 15 cm ...
Страница 33: ...English 33 1 Tri Cut 2 3 4 5 6 7 8 20mm 20mm B A 6 Nm X 10 ...
Страница 34: ...34 English 1 Trimmy H II 2 3 4 5 6 7 8 9 7 5 m 25 2 0 2 4 mm 080 095 1 2 15 cm 6 3 7 m 12 15 cm 6 ...
Страница 39: ...English 39 1 2 3 4 5 6 7 8 9 35 50 NM 15 cm 6 Clic 3 5 m 11 7 0 m 23 2 4 3 3 mm 095 130 12 cm 5 Trimmy SII ...
Страница 40: ...40 English ...
Страница 41: ...English 41 ...
Страница 42: ...42 English H G 5q ...
Страница 43: ...English 43 ...
Страница 44: ...2002W13 H G 5q 114 01 03 95 ...