


9
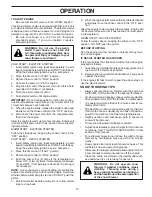
RECOIL
(AUXILIARY)
STARTER
HANDLE
THROTTLE
/ ENGINE
CONTROL
MUF FLER
GAS O LINE
FILLER CAP
SAFETY
IGNITION
KEY
CHOKE
CON-
TROL
ELECTRIC
START
BUTTON
PRIM ER
FUEL
SHUT-OFF
VALVE
OPERATION
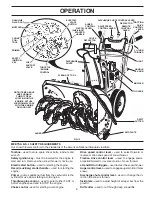
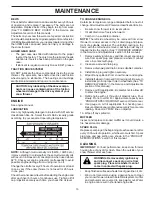
Drive speed control lever -
used to select forward or
reverse motion and speed of snow thrower.
Traction drive control lever -
used to engage power-
pro pelled for ward or reverse motion of snow thrower.
LH and RH turn triggers -
used to steer the snow thrower.
Auger control lever -
used to engage auger motion (throw
snow).
Discharge chute control lever -
used to change the di-
rec tion the snow is thrown.
Skid plate -
used to adjust height of scraper bar from the
ground.
Drift cutter -
used to cut through deep snowdrifts.
Toolbox -
used to store spare shear bolts, locknuts and
wrench.
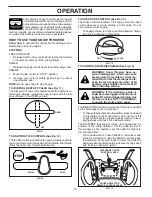
Safety ignition key -
must be inserted for the engine to
start and run. Remove when snow thrower is not in use.
Electric start button –
used for starting the engine.
Recoil (auxiliary) starter handle –
used for start ing the
en gine.
Primer -
pumps additional fuel from the carburetor to the
cylinder for use when starting a cold engine.
Throttle/engine control -
used to se lect either FAST or
SLOW engine speed and to STOP the engine.
Choke control -
used for starting a cold engine.
MEETS A.N.S.I. SAFETY REQUIREMENTS
Our snow throwers conform to the standards of the American National Standards Institute.
TRACTION
DRIVE
CONTROL
LEVER
DISCHARGE CHUTE CONTROL LEVER
DRIVE SPEED
CON TROL LEVER
AUGER
CONTROL
LEVER
MUF FLER
TOOLBOX
HANDLE
KNOB
SKID PLATE
CHUTE
DE FLEC TOR
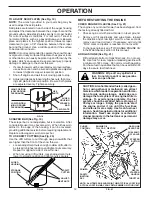
NOTE: ITEMS ABOVE
ARE SHOWN IN
THEIR TYPICAL
LOCATION ON THE
ENGINE. ACTUAL
LOCATION MAY VARY
WITH THE ENGINE
ON YOUR UNIT.
FIG. 10
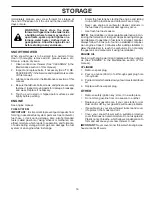
AU GERS
DISCHARGE
CHUTE
CLEAN-OUT TOOL
LIGHT
LH TURN
TRIGGER
DRIFT
CUTTER
DEFLECTOR
REMOTE
CONTROL
LEVER
Содержание 15530SB-LS
Страница 1: ...15530SB LS 15530SB LS Operator s Manual 96193003801 2009 06 ...
Страница 21: ...21 SERVICE NOTES ...
Страница 22: ...22 SERVICE NOTES ...
Страница 23: ...23 SERVICE NOTES ...


