


E
MBROIDERY
S
TITCH
-O
UT
8:9
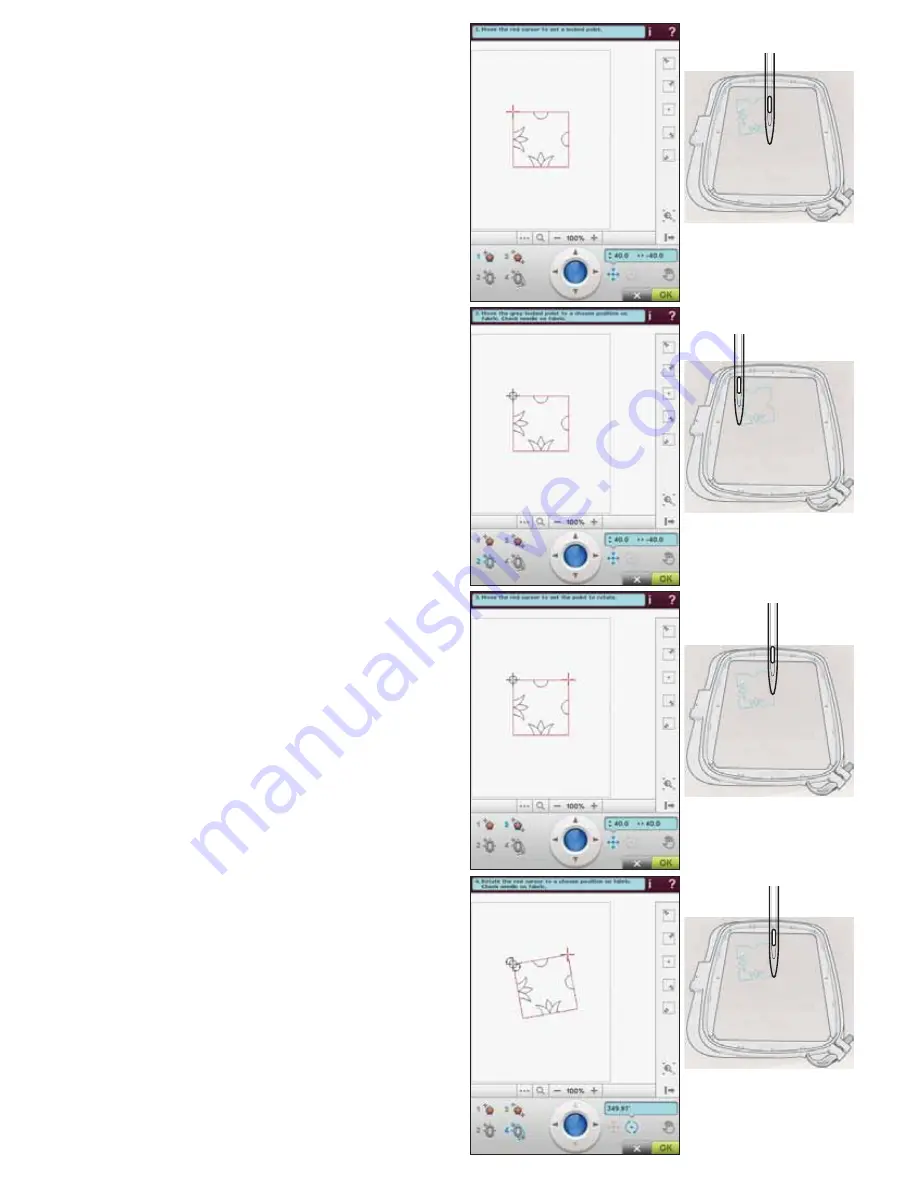
DESIGN POSITIONING EXERCISE
6HOHFW'HVLJQ55BYSDQGHPEURLGHURQHLQWKH
upper left corner of the hoop. Touch number 1. Use
the stylus or Control Arrows to move the cursor to
the upper left corner of the design. Touch Zoom to
Cursor to maximize the zoom so that you will be able
WRSODFHWKHFXUVRUDFFXUDWHO\RQWKHGHVLJQ6HOHFW3DQ
to move the design on the screen without moving the
cursor. Reselect Position when you want to move the
cursor.
2. Touch number 2. The cursor is now locked. Move
the locked point to the upper left corner of the
embroidered design. Use the Position function and
the Control to move the cursor. Watch the hoop
move until the needle is exactly above the point where
you want the embroideries to connect. Once you are
VDWLVÀHGWRXFK2.WRFORVHWKH'HVLJQ3RVLWLRQLQJ
window and start embroidering.
3. If you want to line up the design with the previously
embroidered design, you can select a second matching
point. Touch number 3 and move the red cursor to a
point where you want the second matching point to
be. Watch the screen and zoom in as much as you can
so that you will be able to place the cursor accurately.
4. Touch number 4 to rotate the design so that it lines up
with the previously embroidered design on your fabric.
Check that the needle is in the exact position on the
fabric.
5. Touch OK to close Design Positioning and start
embroidering.
Содержание Designer Ruby Royale
Страница 1: ...User s Guide KEEPING THE WORLD SEWING ...
Страница 7: ...GETTING TO KNOWYOUR MACHINE1 ...
Страница 21: ...SET UP2 ...
Страница 33: ...SETTINGS FUNCTIONS3 ...
Страница 47: ...SEWING4 ...
Страница 71: ...PROGRAM5 ...
Страница 79: ...EMBROIDERY SET UP6 ...
Страница 85: ...EMBROIDERY EDIT7 ...
Страница 102: ...7 18 ...
Страница 103: ...EMBROIDERY STITCH OUT8 ...
Страница 117: ...FILE MANAGER9 ...
Страница 123: ...MAINTENANCE10 ...


