


de fluído.
2. Desconéctele y guarde el resorte
pequeño o guárdelo dentro del
resorte grande.
3. Para ensamblar la unidad, haga lo
contrario a lo indicado en el paso 1.
Preparación
PREPARACION DEL MATERIAL
1. Antes de comenzar a utilizar la
pistola pulverizadora deberá
limpiarla con thinner o solvente
adecuados para el material que va a
rociar, para eliminar cualquier tipo
de contaminantes o residuos.
2. Mezcle bien el material según las
instrucciones del fabricante. Si fuera
necesario, adelgace la pintura según
las instrucciones del fabricante.
Cuele el material por un colador de
pintura. Pruebe la consistencia del
material haciendo unos cuantos
pases sobre un pe-dazo de cartón.
Cerciórese de que el material a rociar
esté limpio y libre de grumos.
La Figura 3 le muestra cómo conectar
la pistola cuando vaya a usar un
tanque de pintura a presión. Vea las
instrucciones suministradas con el
tanque acerca de cómo conectarlo y
usarlo.
NO USE TANQUE DE PINTURA
ANTES DE LEER DICHAS
INSTRUCCIONES
.
Prepare la pistola para usarla con el
tanque de pintura de la siguiente
manera:
1. Desconéctele el envase.
2. Desconéctele el tubo de material.
3. Desconecte la parte superior del
envase y el anillo en O.
4. Desconecte el tornillo ubicado en la
tapa del envase.
5. Desconecte la tapa de aire para
tener acceso a la boquilla de fluído.
6. Ubique el orificio pequeño ahusado
ubicado en la parte inferior de la
boquilla de fluído y conecte el
tornillo allí.
7. Conecte la manguera de material del
tanque de pintura a la pistola en vez
de conectarla al envase.
NOTA:
Asegúrese de usar el adaptador
cuando conecta la manguera (Ver la
Figura 10, item 26 para la ubicación del
adaptador de la manguera para
fluido).
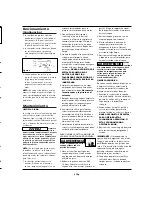
CONVERSIÓN DE SIN-PURGADOR A
PURGADOR
IMPORTANTE:
Las pistolas de rociado
vienen listas para una operación “sin
purgador”.
(Vea la Figura 4)
1. Desconéctele la perilla de control de
fluído, el resorte grande y la aguja
19 Sp
Instalación
(Continuación)
materiales que no sean espesos tales
como lacas y esmaltes sintéticos. Este
método es mejor para trabajos de
acabado finos.
ESTAS TAPAS SE
PUEDEN USAR CON SISTEMAS DE
SIFON O PRESION.
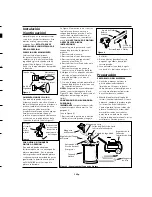
DIRECCION DEL MOVIMIENTO
La dirección del movimiento
(horizontal o vertical) se puede
cambiar con sólo aflojar el anillo de
seguridad y girar la tapa de aire 90
grados (Vea la Figura 1). Apriete el
anillo con la mano después de cambiar
la dirección.
ALIMENTACION DEL FLUIDO
Este modelo se puede usar con los
sistemas a presión o de sifón. Viene de
fábrica lista para usarse con el sistema a
presión; cámbiela al sistema de sifón
para lograr un acabado más fino
usando materiales que no sean espesos.
Para hacer este cambio, sáque el
tornillo en la parte superior del envase
y conéctelo en la parte inferior de la
cabeza de la pistola (Vea la Figura 2).
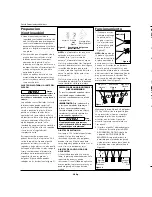
PARA USAR UN TANQUE DE
PINTURA A PRESION
Este modelo puede adaptarse
fácilmente para uso con un tanque de
pintura presurizado. Ésto le permite
aplicar grandes cantidades de pintura
continuamente sin necesidad de parar.
Igualmente, le permite usar la pistola
en CUALQUIER posición sin que la
pintura se derrame.
Figura 1
Movimiento
Horizontal
Movimiento Vertical
Tapa de Aire
Anillo de
Seguridad
Coloque
el tornillo
en el
orificio
inferior
Desconéctelo
del extremo
inferior de la
parte superior
del tanque
Figura 2
Figura 3 - Conexiones del Tanque de Pintura
Regulador del Tanque
de Pintura
Válvula de Seguridad
Manguera de Aire
Tanque de
Pintura
Manguera
de Material
Manguera
de Aire
Salida de Alta Presión Hacia
la Pistola Pulverizadora
Entrada de Alta
Presión Desde el
Compresor
Regulador de la
Fuente de
Suministro de Aire
6
Multi-Purpose Spray Gun
Troubleshooting Chart
Symptom
Possible Cause(s)
Corrective Action
Spray pattern too small
Unsatisfactory spray
pattern
Too much spray mist
Leakage around fluid
packing nut
Leakage around
canister and canister
cover
Orange Peel
(Rough rolling
appearance similar to
an actual orange
peeling)
Runs and sags
Mottled, rough surface
finish
1.
Dried material lodged in
openings of air cap
2.
Lumpy material
3.
Not enough material
4.
Insufficient fluid pressure
1.
Material too heavy
2.
Dirty air cap
3.
Too much material being
applied
4.
Spray pattern too wide
1.
Too much air pressure for
material being sprayed
2.
Material too thin
1.
Packing too loose
2.
Worn or dry packing
1.
Canister gasket not seating
properly
2.
Canister not tightened
securely
1.
Material drying too fast
2.
Gun too far from surface
3.
Material too thick
1.
Material too thin
2.
Moving gun too slow
3.
Excessive material flow
4.
Gun too close to surface
1.
Too much thinner
2.
Poor spray technique
1.
Clean air cap
2.
Thin and strain material
3.
Open fluid control knob further
4.
Increase air pressure. Do not exceed 50 psi
1.
Thin material
2.
Clean
3.
Close fluid control knob to reduce material flow
4.
Close fluid control knob further or move closer to the work
1.
Reduce air pressure
2.
Mix with thicker material. Reduce air pressure. Open fluid
control knob gradually
1.
Tighten packing nut. Replace packing if tightening does
not stop leakage
2.
Replace or lubricate with non-silicone oil
1.
Clean gasket. Replace if necessary
2.
Tighten securely. Apply a small amount of Vaseline
®
or
mineral type grease on the threads when assembling the
canister to the canister cover
1.
Use a slower solvent or add a retarding agent
2.
Move gun closer to surface
3.
Thin material per thinning instructions
1.
Add material to increase thickness
2.
Move gun more quickly
3.
Turn material control knob clockwise to reduce flow
4.
Move gun further from surface
1.
Reduce thinner
2.
Refer to “Operation” for spraying instructions
Perilla de
Control de
Fluído
Aguja de Fluído
Resorte Grande
Resorte
Pequeño
Figura 4


