background image

23 Sp

Guía de Diagnóstico de Averías

Problema

Posible(s) Causa(s)

Acción a Tomar

El patrón de rocío es
muy pequeño

El patrón de rocío es
inadecuado

Exceso de rocío

Fuga por la tuerca de
control de fluído 

Fuga por el envase y la
tapa del envase

Cáscara de naranja
(apariencia de
ondulación áspera
semejante a una
cáscara de naranja real)

Chorreos y depresiones

Superficie con acabado
moteado y tosco

1. Acumulación de material

seco en los orificios de la tapa
de aire

2. Material aglutinado
3. Insuficiente cantidad de

material 

4. Insuficiente presión de fluído

1. El material está muy espeso
2. La tapa de aire está sucia
3. Está aplicando mucho

material

4. El patrón es muy ancho

1. Demasiada presión de aire

para el tipo de material que
está aplicando

2. El material está muy diluído

1. El empaque está muy flojo

2. El empaque está desgastado

o reseco

1. El empaque del envase está

mal colocado

2. El envase no está bien

apretado

1. El material se está secando

muy rápido

2. Pistola muy lejos de la superficie
3. Material muy espeso

1. Material muy diluido
2. La pistola se está moviendo

muy lentamente

3. Flujo excesivo de material

4. Pistola muy cerca de la superficie

1. Demasiado solvente
2. Técnica deficiente de rociado

1. Limpie la tapa de aire

2. Diluya o cuele el material
3. Abra más la perilla de control de fluído

4. Aumente la presión de aire. No exceda 3,45 bar

1. Diluya el material
2. Límpiela
3. Cierre la perilla de control de fluído para reducir el flujo de

material

4. Cierre más la perilla de control de fluído o acerque más la

pistola a la pieza de trabajo

1. Reduzca la presión de aire

2. Mézclelo con material más espeso. Reduzca la presión de

aire. Gradualmente abra la perilla de control de fluído

1. Apriete la tuerca del empaque. Reemplace el empaque si no

puede parar la fuga al apretar la tuerca

2. Reemplácela o lubríquela con aceite sinsilicón

1. Limpie el empaque. Reeplácelo si es necesario

2. Apriételo bien. Aplique una pequeña cantidad de vaselina o

grasa mineral en las roscas cuando vaya a colocarle la tapa al
envase

1. Use un solvente más lento o añanda un agente retardante

2. Acerque la pistola a la superficie
3. Diluya el material según las instrucciones de cómo hacer

menos densos los materiales

1. Añada material para aumentar el espesor
2. Mueva la pistola más rápido

3. Gire la perilla de control de material en sentido horario para

reducir el flujo

4. Aleje más la pistola de la superficie

1. Disminuya el solvente
2. Refiérase a “Operación” para las instrucciones de rociado

Set Up

USE OF AIR CAPS

Internal Mix—Generally
used with slow drying,
heavy bodied materials
and for faster material
application. NOT to be used with fast
drying paints and lacquers which will
clog the opening in the air cap.

INTERNAL MIX CAPS MUST BE USED
WITH PRESSURE FEED

operation.

External Mix—Used for
quick drying, light bodied
materials such as lacquers
and synthetic enamels.
Better for finer finish work. 

THESE

CAPS CAN BE USED WITH EITHER
SIPHON OR PRESSURE FEED.
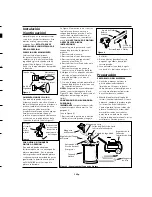
FAN DIRECTION

The direction of the fan (horizontal or
vertical) can be changed by loosening
the lock ring and turning the air cap 90
degrees (See Figure 1). Hand tighten
lock ring after adjustment.

FLUID FEED

This model is capable of pressure or
siphon feed. Standard set-up is
pressure feed mode; change to siphon
mode for a finer finish using light
materials. To change modes, remove
setscrew from the canister top and
place in the lower part of the gun
head (See Figure 2).

Spray Gun Terms
(Continued)

type of operation is used with a
compressor equipped with a tank or
with a large factory air system. Do not
use with a continuous run compressor
that does not have a tank.

VISCOSITY

– A measurement of the

resistance of the flow of a liquid.

ATOMIZATION 

- Conversion of liquid

to spray droplets (mist).

PATTERN CONTROL KNOB

– Used to

form the proper pattern (size and
shape) of material as it is sprayed from
the gun to the work piece. 

FLUID CONTROL KNOB

– Used to

control the amount of material being
mixed with air.

PAINT TANK

– An auxiliary pressurized

paint reservoir that allows continuous
spraying of large amounts of paint
without stopping for refills as with a
canister. It also allows using the spray
gun at any angle or orientation. 

General Safety

1.  Read all manuals

included with this
product carefully. Be
thoroughly familiar
with the controls and the proper
use of the equipment.

2. Follow all local electrical and safety

codes as well as in the United
States, the National Electrical Codes
(NEC), Occupational Safety and
Health Act (OSHA) and the
Environmental Protection Agency
(EPA).

Use a face mask/respirator
and protective clothing
when spraying. Always
spray in a well ventilated
area to prevent health and fire hazards.
Refer to Material Safety Data Sheets
(MSDS) of spray material for details.

Never spray closer than 25
feet to the compressor! If

!

DANGER

!

WARNING

2

Multi-Purpose Spray Gun

possible, locate compressor in separate
room. Never spray into the compressor,
compressor controls or the motor.

3. Do not smoke or eat when spraying

paint, insecticides, or other
flammable substances.

Do not spray flammable
materials in vicinity of
open flame or near
ignition sources. Motors, electrical
equipment and controls can cause
electrical arcs that will ignite a
flammable gas or vapor. Never store
flammable liquids or gases in the
vicinity of the compressor.

4. When spraying and cleaning,

always follow the instructions and
safety precautions provided by the
material manufacturer (Refer to
MSDS).

Do not spray acids, 
corrosive materials,

toxic chemicals, fertilizers or pesticides.
Using these materials could result in
death or serious injury.

5. Keep visitors away and NEVER

allow children or pets in the work
area.

Never aim or
spray at yourself

or anyone else or serious injury could
occur.

6. Always work in a clean

environment. To avoid injury and
damage to the workpiece, do not
aim the spray gun at any dust or
debris.

Do not use pressure that
exceeds the operating
pressure of any of the
parts (hoses, fittings, etc.) in the
painting system.

Keep hose away 
from sharp objects.

Bursting air hoses may cause injury.
Examine air hoses regularly and replace
if damaged. 

7. Always use a pressure regulator on

the air supply to the spray gun.

Failure to install 
appropriate

water/oil removal equipment may
result in damage to machinery or
workpiece.

NOTICE

!

CAUTION

!

WARNING

!

WARNING

!

WARNING

!

WARNING

MANUAL

Figure 1

Horizontal Fan

Vertical Fan

Air Cap

Lock Ring

Place
setscrew
in lower
hole

Remove from

underside of

canister top

Figure 2

Содержание General Purpose

Страница 1: ... to bring material into the gun for spraying PRESSURE FEED Method of material feed where a canister or paint tank is pressurized to force material to the gun Either internal or external mix air caps are used with this method Pressure feed is generally used for WARNING NOTICE CAUTION WARNING DANGER IN283801AV 3 03 spraying heavy bodied materials or for large size projects SIPHON FEED Method of mate...

Страница 2: ...trical and safety codes as well as in the United States the National Electrical Codes NEC Occupational Safety and Health Act OSHA and the Environmental Protection Agency EPA Use a face mask respirator and protective clothing when spraying Always spray in a well ventilated area to prevent health and fire hazards Refer to Material Safety Data Sheets MSDS of spray material for details Never spray clo...

Страница 3: ...ing to store 3 Reassemble unit by reversing step 1 Preparation MATERIAL PREPARATION 1 Before using desired material in the spray gun spray a compatible thinner or solvent through the gun to remove any contaminants and residue 2 Thoroughly mix the material in accordance with the manufacturer s instructions If necessary thin per paint manufacturer s instructions Strain material through a paint strai...

Страница 4: ...uns with canister Remove and empty the canister then rinse with a solvent recommended for the paint or other material used 2 Refill canister with clean solvent and attach to the gun Spray solvent through the gun while shaking the gun vigorously Wipe the gun exterior with a solvent soaked rag Repeat until the gun is clean 3 Remove the air cap and soak in solvent until clean Use a small brush for st...

Страница 5: ...wing solvent into the eyes or on the skin causing possible injury PERIODIC CLEAN UP Due to dirty lumpy paint etc it may be necessary to inspect and clean the internal parts and the gun body 1 Examine openings in air cap and fluid tip If clogged remove any o rings and soak the air cap or fluid tip in solvent 2 A brush or toothpick or something similar may be used to dislodge the dried paint from ho...

Страница 6: ...thick 1 Material too thin 2 Moving gun too slow 3 Excessive material flow 4 Gun too close to surface 1 Too much thinner 2 Poor spray technique 1 Clean air cap 2 Thin and strain material 3 Open fluid control knob further 4 Increase air pressure Do not exceed 50 psi 1 Thin material 2 Clean 3 Close fluid control knob to reduce material flow 4 Close fluid control knob further or move closer to the wor...

Страница 7: ... 1 11 Material adjusting knob 1 12 Valve piston 1 13 3 8 x 1 4 O ring 1 14 7 16 x 5 16 O ring 1 15 Spring 1 16 11 16 x 7 8 O Ring 1 17 Packing 1 set 18 Packing nut 1 19 Canister cover assembly DH404200AV 1 20 5 40 x 1 8 Socket hd setscrew 1 21 Canister gasket pkg of 3 DH420400AV 1 22 Material tube DH065700AV 1 23 Hose connection 1 4 NPS M HF001800AV 1 24 Trigger DH011800AV 1 25 Canister DH054001AV...

Страница 8: ...ident purchaser s abuse neglect or failure to operate products in accordance with instructions shall also include the removal or alteration of any safety devices If such safety devices are removed or altered this warranty is void D Normal adjustments which are explained in the owner s manual s provided with the product E Items or service that are normally required to maintain the product i e o rin...

Страница 9: ...ds boulons etc avant d utiliser le modèle Ne pas utiliser un outil qui a été endommagé pendant le transport la manipulation ou l utilisation Le dommage peut résulter en éclatement et peut causer des blessures ou dégâts matériels AVERTISSEMENT AVIS ATTENTION AVERTISSEMENT DANGER IN283801AV 3 03 Terminologie du Pistolet Vaporisateur ALIMENTATION Méthode pour amener la peinture au pistolet pour la va...

Страница 10: ...ionnement est utilisé avec un compresseur ayant un réservoir à air ou si l alimentation en air de l usine est large N utilisez pas avec un compresseur sans réservoir à fonctionnement continu VISCOSITÉ La mesure de la résistance du débit de liquide VAPORISATION PULVÉRISATION Transformation de liquide en goutelettes vapeur BOUTON DE RÉGLAGE DE CONFIGURATION Utilisé pour le réglage de taille et de co...

Страница 11: ...lacement du raccord d adaptation du tuyau de fluide CONVERSION NON PURGEUR À PURGEUR AVIS Les pistolets pulverisateurs sont délivrés prêts pour l opération non purgeur Voir Figure 4 1 Enlever le bouton de contrôle de fluide le grand ressort et l aiguille de fluide 11 Fr Montage Suite CAPUCHONS PEUVENTÊTRE UTILISÉS AVEC SOIT L ALIMENTATION PAR SIPHON OU SOUS PRESSION DIRECTION DE L ÉVENTAIL La dire...

Страница 12: ... Figure 9 Préparation Suite 4 S assurer que le régulateur de la pression d air soit réglé pour le bon fonctionnement du pistolet Se référer à la section spécifications La pression d air devrait être vérifiée à l arrivée du pistolet quand la gâchette est tirée 5 Faites des essais sur un morceau de carton et régler le pistolet afin d obtenir la configuration de pulvérisation désirée RÉGLAGES DU MATÉ...

Страница 13: ...T UTILISÉ AVEC UN RÉSERVOIR À PEINTURE Couper l alimentation en air au réservoir et dissiper toute la pression du réservoir 1 Ouvrir le purgeur d air du réservoir Si un capuchon de mélange externe a été utilisé le desserrer légèrement 2 Réduire la pression d air à 69 138 kPa Tenir un morceau de tissu enroulé fermement autours des ouverture s dans le capuchon d air et appuyer sur la gâchette L air ...

Страница 14: ...e matériel 1 12 Piston d appareil de robinetterie 1 13 Joint torique 3 8 x 1 4 po 1 14 Joint torique 7 16 x 5 16 po 1 15 Ressort 1 16 Joint torique 11 16 x 7 8 po 1 17 Garniture 1 jeu 18 Écrou de garniture 1 19 Assem du couvercle de boîte DH404200AV 1 20 Vis de pression à tête creuse 40 x 1 8 po 1 21 Joint d étanchéité de la boîte 3 DH420400AV 1 22 Tube de matériel DH065700AV 1 23 Raccord de tuyau...

Страница 15: ...riel par un filtre 3 Ouvrir encore plus le bouton de contrôle de fluide 4 Augmenter la pression d air Ne pas dépasser 345 kPa 1 Diluer 2 Nettoyer 3 Fermer le bouton de contrôle de fluide pour réduire le débit 4 Fermer encore plus le bouton de contrôle de fluide ou s approcher de l objet de travail 1 Réduire la pression d air 2 Mélanger avec du matériel plus épais Réduire la pression d air Ouvrir l...

Страница 16: ...agnant le produit Un accident l utilisation abusive par l acheteur la négligence ou le manque de faire fonctionner les produits selon les instructions comprend aussi l enlevage ou la modification de n importe quel appareil de sûreté Si ces appareils de sûreté sont enlevés ou modifiés la garantie sera annulée D Réglages normaux qui sont expliqués dans le s manuel s d utilisation accompagnant le pro...

Страница 17: ...as y conexiones antes de usarlo No debe utilizar la unidad si se ha dañado durante el envío manejo o uso Los daños podrían ocasionar una explosión y ocasionarle heridas o daños a su propiedad ADVERTENCIA AVISO PRECAUCION ADVERTENCIA PELIGRO IN283801AV 3 03 Terminología de las Pistola Pulverizadoras SISTEMA DE ALIMENTACION Es el método usado para suministrarle a la pistola la pintura que se va a ro...

Страница 18: ...n una fábrica No utilizar con un compresor de aire de uso continuo que no tenga tanque VISCOSIDAD Es la medida de la resistencia al flujo de un líquido ATOMIZACION Es el proceso para convertir líquidos en gotas minúsculas rocío PERILLA DE CONTROL DE PATRON Se usa para seleccionar el patrón adecuado tamaño y forma de la pintura rociada con la pistola cuando se quiere pintar una superficie PERILLA D...

Страница 19: ... Las pistolas de rociado vienen listas para una operación sin purgador Vea la Figura 4 1 Desconéctele la perilla de control de fluído el resorte grande y la aguja 19 Sp Instalación Continuación materiales que no sean espesos tales como lacas y esmaltes sintéticos Este método es mejor para trabajos de acabado finos ESTAS TAPAS SE PUEDEN USAR CON SISTEMAS DE SIFON O PRESION DIRECCION DEL MOVIMIENTO ...

Страница 20: ...ean lo suficientemente largas para permitir el desplazamiento total de la pistola a lo largo de la superficie que va a pintar 4 Cerciórese de que el regulador de la presión de aire esté fijado al nivel indicado para el funcionamiento adecuado de la pistola Vea las indicaciones al respecto en la sección de especificaciones Oprima el gatillo y chequée la presión de aire en la entrada de la pistola 5...

Страница 21: ...aya usado pinturas a base de agua rocíe aguarrás para evitar que la pistola se oxide 6 Use aceite sin silicón para lubricar todas las piezas movibles antes de ensamblar la pistola Use Vaselina o grasa liviana para lubricar todas las conexiones con roscas antes de almacenar la pistola 7 Limpie bien la pistola para eliminar todos los contaminantes que podrían oxidar la pistola pulverizadora PARA LIM...

Страница 22: ... pistola No disponible 1 2 Anillo retenedor 2 3 Pasador del gatillo 1 4 Ensamblaje de la aguja de flujo 1 5 Anillo de la tapa de aire 1 6 Tapa de aire mezcla externa 1 7 Tapa de aire mezcla interna 1 8 Boquilla 1 9 Anillo en O de 8 7mm x 5 6mm 2 10 Resorte 1 11 Perilla para el control del material 1 12 Pistón de la válvula 1 13 Anillo en O de 10mm x 6 4mm 1 14 Anillo en O de 11mm x 8mm 1 15 Resort...

Страница 23: ...icie 1 Demasiado solvente 2 Técnica deficiente de rociado 1 Limpie la tapa de aire 2 Diluya o cuele el material 3 Abra más la perilla de control de fluído 4 Aumente la presión de aire No exceda 3 45 bar 1 Diluya el material 2 Límpiela 3 Cierre la perilla de control de fluído para reducir el flujo de material 4 Cierre más la perilla de control de fluído o acerque más la pistola a la pieza de trabaj...

Страница 24: ...s instrucciones del manual de instrucciones suministrado también debe incluir la desconexión o modificación de los instrumentos de seguridad Si dichos instrumentos de seguridad son desconectados la garantía quedaría cancelada D Los ajustes normales explicados en el los manual es suministrado s con el producto E Artículos o servicios normalmente requeridos para el mantenimiento del producto tales c...

Отзывы: