2
GETTING STARTED
Thank you for purchasing a Hunter Douglas shade. With proper installation, operation, and care,
your new shades will provide years of beauty and performance.
Please thoroughly review this instruction booklet and the enclosed packing list before beginning
the installation.
Tools and Fasteners Needed
■
Flat blade and Phillips screwdriver
■
Level (laser level is recommended)
■
Measuring tape and pencil
■
Power drill,
3
∕
32
" drill bit and
1
∕
4
" hex driver
In addition, you will need fasteners designed to work with your specific mounting surface(s).
■
Standard Shades.
Two 1
1
∕
4
" #8 Hex head screws
are provided per installation bracket. A kit with
O-rings will be provide for the pull cord assembly.
■
Cassette Shades.
Two 1
1
∕
2
" #6 Hex head screws
are provided per installation bracket.
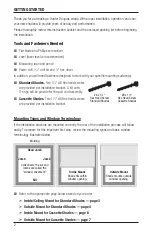
Mounting Types and Window Terminology
If the installation brackets are mounted correctly, the rest of the installation process will follow
easily. To prepare for this important first step, review the mounting types and basic window
terminology illustrated below.
■
Refer to the appropriate page below based on your order:
➤
Inside/Ceiling Mount for Standard Shades — page 3
➤
Outside Mount for Standard Shades — page 4
➤
Inside Mount for Cassette Shades — page 6
➤
Outside Mount for Cassette Shades — page 7
#6 x 1½"
Hex Head Screw
Cassette Shades
#8 x 1¼"
Hex Head Screw
Standard Shades
Outside Mount
Shade mounts outside
window opening.
Inside Mount
Shade fits within
window opening.
Collectively, the sill and
jambs are called the
“window casement.”
Molding
Head Jamb
Sill
Jamb
Jamb
Содержание Alustra Woven Textures
Страница 19: ......

