background image

INSTALLATION

11

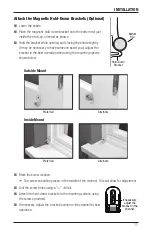
Attach the Magnetic Hold-Down Brackets (Optional) 


Lower the shade.


Place the magnetic hold-down bracket onto the bottom rail just 
inside the end cap, oriented as shown.


Hold the bracket while opening and closing the shade slightly  
(it may be necessary to have someone assist you). Adjust the 
bracket to the best overall position using the mounting options 
shown below.


Mark the screw location.


The screw should be placed in the middle of the channel. This will allow for adjustment.


Drill the screw holes using a 

3

/

32

" drill bit. 


Attach the hold-down brackets to the mounting surface using  
the screws provided.


If necessary, adjust the bracket location in the channel for best 
operation.

Hold-Down

Bracket

Bottom

Rail

Outside Mount

Preferred

Alternate

Inside Mount

Preferred

Alternate

If necessary, 

adjust the 

bracket in the 

channel.

Содержание Alustra Woven Textures

Страница 1: ...Installation Operation Care Designer Roller Shades Designer Screen Shades and Alustra Woven Textures Roller Shades UltraGlide Lifting System ...

Страница 2: ...ion Brackets Inside Mount for Cassette Shades 6 Mount the Installation Brackets Outside Mount for Cassette Shades 7 Install the Shade 8 Attach the Standard Hold Down Brackets Optional 9 Attach the Magnetic Hold Down Brackets Optional 10 Operation Operate the Shade 11 Troubleshooting 12 Care Removing the Shade If Necessary 13 Cleaning Procedures 14 Child Safety Child Safety 15 2019 Hunter Douglas A...

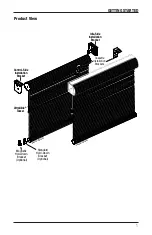
Страница 3: ... Idle Side Installation Bracket Cassette Installation Brackets Magnetic Hold Down Bracket Optional Standard Hold Down Bracket Optional Cassette Shade Control Side Installation Bracket Idle Side Installation Bracket UltraGlide Tassel Standard Shade UltraGlide Tassel ...

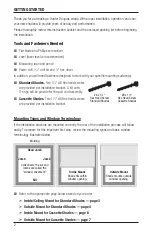
Страница 4: ...e for the pull cord assembly Cassette Shades Two 11 2 6 Hex head screws are provided per installation bracket Mounting Types and Window Terminology If the installation brackets are mounted correctly the rest of the installation process will follow easily To prepare for this important first step review the mounting types and basic window terminology illustrated below Refer to the appropriate page b...

Страница 5: ...s shown The brackets must be mounted so the shade is level when installed Measure the width of the fabric then add 13 16 to the measurement Using this measurement mark this distance from the control side of the window casement Place the outside edge of the control side bracket against the jamb then mark the location of the screw holes The minimum depth required for mounting is 2 Control Side Idle ...

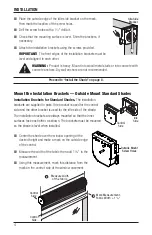
Страница 6: ...ard Shades Installation Brackets for Standard Shades The installation brackets are supplied in pairs One bracket is used for the control side and the other bracket is used for the idle side of the shade The installation brackets are always mounted so that the inner surfaces face each other as shown The brackets must be mounted so the shade is level when installed Center the shade over the window o...

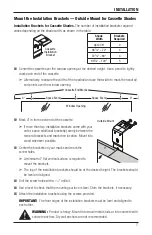
Страница 7: ...ed height Drill the screw holes with a 3 32 drill bit Use a level to check that the mounting surface is level Shim the brackets if necessary Attach the installation brackets using the screws provided IMPORTANT The top edges of the installation brackets must be level and aligned to each other WARNING Product is heavy Mount into wood metal studs or into concrete with concrete anchors Drywall anchors...

Страница 8: ...unting is 2 Fully recessed mounting requires 4 for the cassette to be flush with the front of the window opening Drill the screw holes with a 3 32 drill bit Use a level to check that the mounting surface is level Shim the brackets if necessary Attach the installation brackets using the screws provided IMPORTANT The front edges of the installation brackets must be level and aligned to each other WA...

Страница 9: ... into wood whenever possible Center the brackets on your marks and mark the screw holes A minimum 4 flat vertical surface is required to mount the brackets The top of the installation brackets should be at the desired height The brackets should be level and aligned Drill the screw holes with a 3 32 drill bit Use a level to check that the mounting surface is level Shim the brackets if necessary Att...

Страница 10: ...he shade onto the pegs on the control side bracket Install Idler End Push in the spring idler to compress Slide the idler onto the bracket and slide to the center hole Idler will expand and will engage the bracket to secure the shade into the bracket After installing the shade remove the paper banding that is used to prevent the shade from unrolling Holes O Rings Align holes with the pegs on the b...

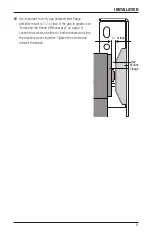
Страница 11: ...e and idler mount is 1 16 or less If the gap is greater see Removing the Shade If Necessary on page 14 Loosen the screws on either or both brackets and slide the brackets closer together Tighten the screws and reinstall the shade Shade 1 16 or less Mount Gap Flange ...

Страница 12: ...standard hold down brackets may be used with outside mount shades only With the shade fully lowered insert the pin on the hold down bracket into the hole on the bottom rail end cap Mark the hole locations on the mounting surface Center the hold down brackets over the mounting hole locations and check their alignment Attach using two screws IMPORTANT Disconnect the bottom rail from the hold down br...

Страница 13: ... best overall position using the mounting options shown below Mark the screw location The screw should be placed in the middle of the channel This will allow for adjustment Drill the screw holes using a 3 32 drill bit Attach the hold down brackets to the mounting surface using the screws provided If necessary adjust the bracket location in the channel for best operation Hold Down Bracket Bottom Ra...

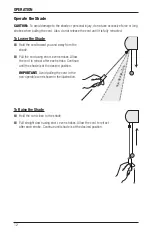
Страница 14: ...shade Pull the cord using short even strokes Allow the cord to retract after each stroke Continue until the shade is at the desired position IMPORTANT Avoid pulling the cord in the non operable zone shown in the illustration To Raise the Shade Hold the cord close to the shade Pull straight down using short even strokes Allow the cord to retract after each stroke Continue until shade is at the desi...

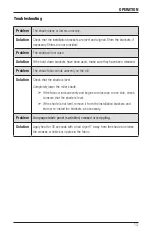
Страница 15: ...de fabric winds unevenly on the roll Solution Check that the shade is level Completely lower the roller shade If the fabric winds unevenly and begins to telescope to one side check to insure that the shade is level If the shade is not level remove it from the installation brackets and shim or re install the brackets as necessary Problem An opaque fabric panel is wrinkled creased or is rippling Sol...

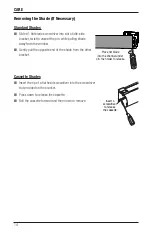
Страница 16: ... window Gently pull the opposite end of the shade from the other bracket Cassette Shades Insert the tip of a flat head screwdriver into the screwdriver slot provided on the bracket Press down to release the cassette Roll the cassette forward and then down to remove Place flat blade into the channel under pin then twist to release Insert a screwdriver to release the cassette ...

Страница 17: ...or more thorough dust removal Compressed Air Hair Dryer Cool Setting Use compressed air or a hair dryer on a cool setting to blow dust and dirt off of shades Spot Cleaning Prepare a solution of warm water and a mild detergent Dampen a clean cloth in the solution and wring it out Dab the spot with the dampened cloth until it is gone Do not rub the fabric Allow the shade to dry in the completely low...

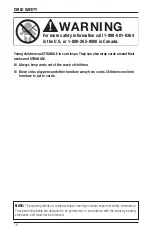
Страница 18: ...ens and other furniture away from cords Children can climb furniture to get to cords For more safety information call 1 888 501 8364 in the U S or 1 800 265 8000 in Canada WARNING NOTE The warning labels on corded window coverings contain important safety information These warning labels are designed to be permanent in accordance with the industry s safety standards and must not be removed ...

Страница 19: ......

Страница 20: ...TY Hunter Douglas window fashion products are covered for defects in materials workmanship or failure to operate for as long as the original retail purchaser owns the product unless shorter periods are provided below All internal mechanisms Components and brackets Fabric delamination Operational cords for a full 7 years from the date of purchase Repairs and or replacements will be made with like o...

Отзывы: