background image

41949-01  02/12/2008

20

2500 Frisco Avenue, Memphis, Tennessee 38114

printed in China

  Warranty

Hunter Fan Company

Bath Exhaust Fan

LIMITED WARRANTY

Hunter Fan Company makes the following limited warranty to the original user or consumer purchaser of this Hunter bath exhaust fan:

If any part of your Hunter bath exhaust fan (except for glass fixtures and light bulbs) fails at any time within one year after the date of 

sale to you due to a defect in material or workmanship, we will repair or, at our option, replace the defective part free of charge for parts 

and labor performed at our nearest service center or at our Service Department in Memphis, Tennessee.  After this one-year period, you 

will be responsible for all parts and labor costs for repairs on the bath exhaust fan except for motor repairs as provided below.

If your Hunter bath exhaust fan motor fails at any time within five years after the date of sale to you due to a defect in material or work

-

manship, labor and materials to repair the defect will be provided free of charge at our nearest service center or our Service Department 

in Memphis, Tennessee.  If no replacement part can be provided, we will, at our option, either refund the actual purchase price of your 

bath exhaust fan or provide a replacement free of charge. After this five-year period, you will be responsible for all parts and labor costs 

for repairs on all parts of the bath exhaust fan.

IF THE ORIGINAL USER OR CONSUMER PURCHASER CEASES TO OWN THE FAN, THIS WARRANTY AND ANY IMPLIED 

WARRANTY WHICH THEN REMAINS IN EFFECT, INCLUDING BUT NOT LIMITED TO ANY IMPLIED WARRANTY OF MERCHANT-

ABILITY OR FITNESS FOR A PARTICULAR PURPOSE, ARE VOIDED. NO WARRANTY, EXPRESS OR IMPLIED, INCLUDING ANY 

WARRANTY OF MERCHANTABILITY OR FITNESS FOR A PARTICULAR PURPOSE, IS MADE IN RESPECT OF GLASS FIXTURES 

OR LIGHT BULBS OR THE FINISH ON ANY METAL PORTION OF THE BATH EXHAUST FAN.

THIS WARRANTY IS IN LIEU OF ALL OTHER EXPRESS WARRANTIES. THE DURATION OF ANY IMPLIED WARRANTY, INCLUD-

ING, BUT NOT LIMITED TO, ANY IMPLIED WARRANTY OF MERCHANTABILITY OR FITNESS FOR A PARTICULAR PURPOSE, IN 

RESPECT TO ANY HUNTER FAN BATH EXHAUST FAN MOTOR OR OTHER FAN PART, IS EXPRESSLY LIMITED TO THE PERIOD 

OF THE EXPRESS WARRANTY SET FORTH ABOVE FOR SUCH MOTORS OR OTHER PARTS.

This warranty is voided if your Hunter bath exhaust fan is not purchased and installed in the U.S.A. This warranty excludes and does 

not cover defects, malfunctions or failures of any Hunter bath exhaust fan which were caused by repairs by persons not authorized by 

us, use of parts or accessories not authorized by us, mishandling, improper installation, modifications or damage to the Hunter bath 

exhaust fan while in your possession, or unreasonable use, including failure to provide reasonable and necessary maintenance.

To obtain servicing, contact the nearest Hunter authorized service center of the Hunter Fan Company Service Department, 2500 Frisco 

Avenue, Memphis, Tennessee 8114. Please contact us before shipping your bath exhaust fan to us. If we authorize you to ship it to 

us, you will be responsible for all insurance and freight or other transportation charges to our factory or service center. We will return 

your Hunter bath exhaust fan freight prepaid. Your Hunter bath exhaust fan should be properly packed to avoid damage in transit since 

we will not be responsible for any such damage. Proof of purchase is required when requesting warranty service. The purchaser must 

present the sales receipt or other document that establishes proof of purchase.

IN NO EVENT SHALL HUNTER FAN COMPANY BE LIABLE FOR CONSEQUENTIAL OR INCIDENTAL DAMAGES.

SOME STATES DO NOT ALLOW LIMITATIONS ON HOW LONG AN IMPLIED WARRANTY LASTS OR THE EXCLUSION OR LIMITA-

TION OF INCIDENTAL OR CONSEQUENTIAL DAMAGES SO THE ABOVE LIMITATION OR EXCLUSIONS MAY NOT APPLY TO 

YOU.

THE WARRANTY GIVES YOU SPECIFIC LEGAL RIGHTS AND YOU MAY ALSO HAVE OTHER RIGHTS WHICH VARY FROM STATE 

TO STATE. 

© 2008 Hunter Fan Company

011_41949_EngS_2-12-08.indd   20

2/12/08   2:44:09 PM

Содержание Riazzi 83001

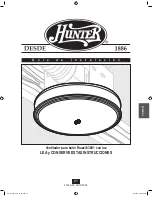
Страница 1: ...2 12 2008 I n s t a l l a t i o n G u i d e 83001 Riazzi Bath Ventilator with Light READ and SAVE THESE INSTRUCTIONS ENGLISH See page 2 Espa ol Vea la p gina 21 011_41949_EngS_2 12 08 indd 1 2 12 08 2...

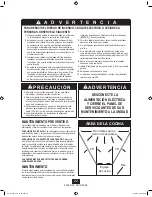
Страница 2: ...e same time C A U T I O N W arning 1 Use this unit only in a manner intended by the manufacturer If you have questions contact the manufacturer 2 Before servicing or cleaning the unit switch power off...

Страница 3: ...4 K 77520 01 L 65219 75184 01 133 96374 01 214 Extra Screws x2 D x2 3 8 Cable Connector 1 Turn off the power source Tools Needed Not supplied Estimated assembly time 30 to 60 minutes Before Installati...

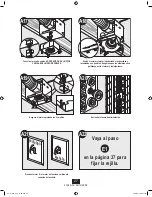
Страница 4: ...the housing 3 I F Remove the pre loaded screw tip covers Remove the wiring cover screw 6 Back out the pre loaded screw tips until flush with the side of the housing Remove the wiring cover Remove pack...

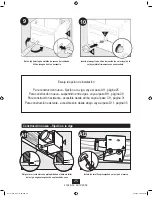
Страница 5: ...ew Construction attaching to joist 10 B C Choose Installation Option For New Construction attaching to joist go to step A11 page 5 For New Construction suspended between joists go to step B11 page 8 F...

Страница 6: ...ther Option A13 0 A16 Route wires through strain relief For supply connection use wires suitable for at least 90 C 194 F Connect wires as shown Connect 4 duct and vent to the outside Tape joints If du...

Страница 7: ...THE WIRING HARNESS 0 0 0 0 A17 Reinstall the motor by inserting the tabs and pushing up into position Make sure the wires are not pinched between the motor and the housing 0 0 0 0 I A18 ON OFF A21 Tes...

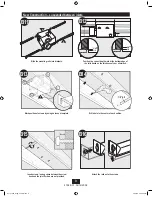
Страница 8: ...ween the screw head and the joist Screws are not provided New Construction suspended between joists B11 E F 1 8 bit B14 B15 F B13 Position the correct depth mark at the bottom edge of the joist based...

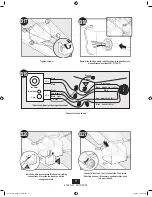
Страница 9: ...White White Bare Copper Ground B19 Night Light Night Light Switch 1 AC In Main Switch 1 AC In Switch 2 AC In Option Fan Main Light Together Option B21 Connect 4 duct and vent to the outside Tape join...

Страница 10: ...I B23 Reinstall the motor by inserting the tabs and pushing up into position Make sure the wires are not pinched between the motor and the housing B25 Turn on the power source ON OFF B26 B24 J Test th...

Страница 11: ...ommodate the new motor housing 9 x 9 75 Cut out an opening for the housing Use the motor housing as a template to mark position Slide the mounting rails into brackets Position the correct depth mark a...

Страница 12: ...joist Screws are not provided Attach the rails onto the screws Tighten screws Connect 4 duct and vent to the outside Tape joints If ducting does not fit securely an adapter may need to be purchased R...

Страница 13: ...witch 1 AC In Switch 2 AC In Option Fan Main Light Together Option Tighten the strain relief screws Connect wires as shown C24 I H C23 G Install the wiring cover plate Make sure all wiring connections...

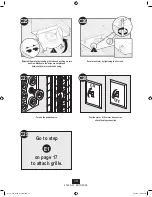
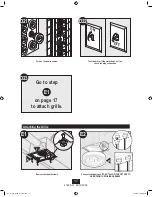
Страница 14: ...source Test the motor If the motor does not run check the plug connection C29 E1 Go to step on page 17 to attach grille Reinstall the motor by inserting the tabs and pushing up into position Make sur...

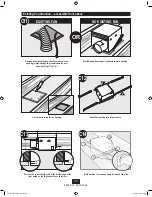
Страница 15: ...nd check to make sure the opening is large enough to accommodate the new motor housing 9 x 9 75 Move the housing into position above the ceiling Attach existing ducting to duct connector Tape joints I...

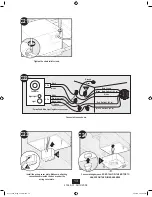
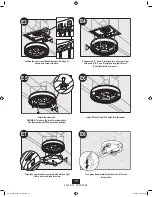
Страница 16: ...20 J Connect wires as shown Reinstall the motor by inserting the tabs and pushing up into position Make sure the wires are not pinched between the motor and the housing Connect wiring harness DO NOT A...

Страница 17: ...21 Test the motor If the motor does not run check the plug connection Turn on the power source Attaching the Grille Remove the thumbscrews Connect wiring harness DO NOT ALLOW THE FIXTURE TO HANG FROM...

Страница 18: ...ax 60 watt A 15 bulbs Not Included E8 Turn glass dome assembly as shown until it locks into position E6 O E7 Attach thumbscrews WARNING To reduce the risk of electrical shock all 4 thumbscrews MUST be...

Страница 19: ...diagram Problem Light does not come on Solution Replace the light bulb with a new bulb Turn power on replace fuse or reset breaker Check all plug connections to be sure they are secure Check the wiri...

Страница 20: ...IS IN LIEU OF ALL OTHER EXPRESS WARRANTIES THE DURATION OF ANY IMPLIED WARRANTY INCLUD ING BUT NOT LIMITED TO ANY IMPLIED WARRANTY OF MERCHANTABILITY OR FITNESS FOR A PARTICULAR PURPOSE IN RESPECT TO...

Страница 21: ...41949 02 02 12 2008 21 G u a d e i n s t a l a c i n Ventilador para ba o Riazzi 83001 con luz LEA y CONSERVE ESTAS INSTRUCCIONES Espa ol 011_41949_Sp_2 12 08 indd 21 2 12 08 2 46 25 PM...

Страница 22: ...ci n Nacional de Protecci n contra Incendios NFPA la Asociaci n de Ingenieros Americanos en Calefacci n y Aire acondicionado ASHRAE y los c digos locales 5 Al cortar o taladrar en paredes o techo no d...

Страница 23: ...1 214 Tornillos adicionales x2 D x2 Conector de cable de 3 8 1 Incluido 2 F J Apague la fuente de alimentaci n Herramientas necesarias no suministradas Tiempo estimado de ensamblaje entre 30 y 60 minu...

Страница 24: ...biertas de las puntas de tornillo precargadas Retire el tornillo de la cubierta del cableado Retire las puntas de tornillo precargadas hasta que est n a nivel con el lado del alojamiento Retire la cub...

Страница 25: ...viga seg n el espesor de su plancha de yeso Construcci n nueva fijaci n a la viga Escoja la opci n de instalaci n Para construcci n nueva fijaci n a la viga vaya al paso A11 p gina 25 Para construcci...

Страница 26: ...Conecte los alambres como se muestra Conecte un ducto de 4 y ventile hacia el exterior Aplique cinta a las uniones Si el ducto no se ajusta firmemente puede ser necesario comprar un adaptador Instale...

Страница 27: ...enda la fuente de alimentaci n Conecte el mazo de cables NO PERMITA QUE EL MOTOR CUELGUE DEL MAZO DE CABLES Vuelva a instalar el motor introduciendo las pesta as y levantando a su posici n Aseg rese q...

Страница 28: ...plantilla Introduzca los tornillos dejando espacio entre la cabeza del tornillo y la viga No se proporcionan los tornillos Construcci n nueva suspendido entre vigas Ubique la correcta marca de profund...

Страница 29: ...s tornillos Conecte los alambres como se muestra Conecte un ducto de 4 y ventile hacia el exterior Aplique cinta a las uniones Si el ducto no se ajusta firmemente puede ser necesario comprar un adapta...

Страница 30: ...GUE DEL MAZO DE CABLES Vuelva a instalar el motor introduciendo las pesta as y levantando a su posici n Aseg rese que los alambres no se pellizquen entre el motor y el alojamiento Encienda la fuente d...

Страница 31: ...acomodar el alojamiento del motor nuevo 9 x 9 75 Recorte una abertura para el alojamiento Utilice el alojamiento del motor como una plantilla para marcar la posici n Deslice los rieles de montaje en...

Страница 32: ...los Fije los rieles con los tornillos Apriete los tornillos Conecte un ducto de 4 y ventile hacia el exterior Aplique cinta a las uniones Si el ducto no se ajusta firmemente puede ser necesario compra...

Страница 33: ...ci n Ventilador y luz principal juntos Opci n Motor del ventilador C22 C24 I H C23 G Apriete los tornillos del aliviador de tensiones Conecte los alambres como se muestra Instale la placa de cubierta...

Страница 34: ...retando los 2 tornillos Encienda la fuente de alimentaci n Pruebe el motor Si el motor no funciona verifique la conexi n del enchufe Vuelva a instalar el motor introduciendo las pesta as y levantando...

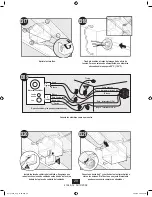
Страница 35: ...posici n encima del techo Conecte el ducto existente con el conector de ducto Aplique cinta a las uniones Si el ducto no se ajusta firmemente puede ser necesario comprar un adaptador Instale el aloja...

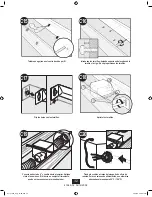
Страница 36: ...20 J H D17 G Conecte los alambres como se muestra Vuelva a instalar el motor introduciendo las pesta as y levantando a su posici n Aseg rese que los alambres no se pellizquen entre el motor y el aloja...

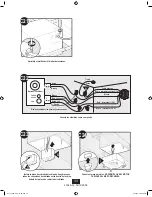
Страница 37: ...1 M E2 Pruebe el motor Si el motor no funciona verifique la conexi n del enchufe Encienda la fuente de alimentaci n Fijaci n de la rejilla Retire los tornillos de mano Conecte el mazo de cables NO PER...

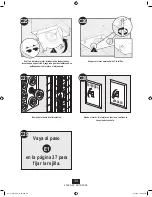
Страница 38: ...vatios como m ximo No incluidas E8 Gire el conjunto de la pantalla como se muestra hasta que quede trabada en posici n E6 O E7 Instale los tornillos de mano ADVERTENCIA Para reducir el riesgo de desc...

Страница 39: ...el diagrama de cableado Problema La luz no funciona Soluci n Reemplace la bombilla con una nueva Encienda la alimentaci n el ctrica reemplace el fusible o restablezca el interruptor autom tico Verifiq...

Страница 40: ...O DE CUALQUIER PARTE MET LICA DEL EXTRACTOR DE AIRE PARA BA O ESTAGARANT ASUSTITUYEATODAS LAS OTRAS GARANT AS EXPRESAS LADURACI N DE TODAGARANT AIMPL CITA INCLUYENDO PERO SIN LIMITARSE A CUALQUIER GAR...

Отзывы: