background image

15

45013-01  •  01/28/10  •  Hunter Fan Company

Problem:  Nothing happens; fan does not move

1. Turn power on, replace fuse, or reset breaker.
2. Loosen canopy, check all connections according to the wiring the 

fan section.

3. Check the plug connection in the switch housing.
4. Push motor reversing switch firmly left or right to ensure that the 

switch is engaged.

5. Pull the pull chain to ensure it is on.
6. Remove the shipping bumpers.

Problem:  Noisy operation

1. Tighten the blade assembly screws and blade iron armature screws 

until snug.

2. Check to see if the blade is cracked.  If so, replace all the blades.

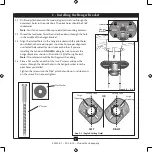
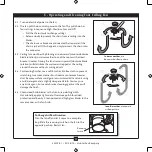
Problem:  Excessive wobbling

1. If your fan wobbles when operating, use the enclosed balancing kit 

and instructions to balance the fan.

2. Tighten all blade iron screws.
3. Turn power off, support fan very carefully, and check that the 

hanger ball is properly seated.

Problem:  Lights turn off when installed or dim when turned on

1. Check to make sure the wattage and type of light bulbs installed 

match the specifications on the light socket.

Problem:  Lights shut off suddenly

1. Turn the power to the fan off at the wall switch. Wait 30 seconds, 

then resume power to the fan.

If you need parts or service assistance, please call 
888-830-1326 (In Canada, call 866-268-1936) or 
visit us at our Web site at 


http://www.hunterfan.com.

Hunter Fan Company
7130 Goodlett Farms Parkway #400
Memphis, Tennessee 38016

9 • Troubleshooting

Содержание 45013-01

Страница 1: ...lso attach your receipt or a copy of your receipt to the manual __________________________________________ Model Name __________________________________________ Model No ______________________________...

Страница 2: ...ssible electrical shock before installing your fan disconnect the power by turning off the circuit breakers to the outlet box and associated wall switch location If you cannot lock the circuit breaker...

Страница 3: ...ntrol To install and use the accessories follow the instructions included with each product For quiet and optimum performance of your Hunter fan use only Hunter speed controls For ceilings higher than...

Страница 4: ...dder height dependent upon installation site CheckingYourFanParts Carefully unpack your fan to avoid damage to the fan parts Refer to the included Parts Guide Check for any shipping damage to the moto...

Страница 5: ...nt use slotted holes directly across from each other If you are installing the fan on an ANGLED ceiling be sure to orient the hanger bracket as shown in Illustration 2 3 left or right view Note The is...

Страница 6: ...y installed 2 3 threads on the pipe will still be visible this is normal Securely retighten the set screw with a wrench or pliers CAUTION The adapter has a special coating on the threads Do not remove...

Страница 7: ...eiling plate and the green ground wire from the fan 4 4 Connect the white wire ungrounded from the ceiling to the white wire ungrounded from the fan 4 5 Connect the remaining wires as follows Dual Swi...

Страница 8: ...th canopy screw in round hole on canopy Securely tighten all four screws 5 5 Using both hands push the canopy trim ring up to the top of the canopy 5 6 Twist canopy trim ring clockwise to secure the c...

Страница 9: ...de iron and medallion Install three blade screws to attach the medallion to the blade iron Repeat for all blades 6 3 For each blade insert one blade mounting screw through the blade iron and attach li...

Страница 10: ...Turn the housing counterclockwise until the housing assembly screws are firmly situated in the narrow end of the keyhole slots Install the remaining screw into the housing Tighten all three screws fi...

Страница 11: ...polarized and will only fit together one way Make sure the connectors are properly aligned before connecting them Incorrect connection could cause improper operation and damage to the product 7 7 Pla...

Страница 12: ...bowl 7 12 Thread the light pull chain through the hole in the center of the glass bowl Then Thread the light pull chain through the hole in the center of the cover plate 7 13 Thread the fan pull chain...

Страница 13: ...xture from the lower switch housing pulling disconnected wires through the hole in the center of the lower switch housing Note When removing the wires pull the thin plug connector male through first a...

Страница 14: ...ir upward clockwise blade rotation will distribute the warmer air trapped at the ceiling around the room without causing a draft 8 4 For cleaning finishes use a soft brush or lint free cloth to preven...

Страница 15: ...Excessive wobbling 1 If your fan wobbles when operating use the enclosed balancing kit and instructions to balance the fan 2 Tighten all blade iron screws 3 Turn power off support fan very carefully...

Отзывы: