background image

3

45051-01  •  05/12/11  •  Hunter Fan Company

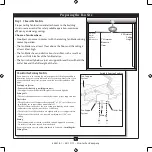
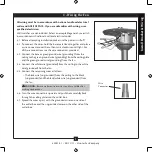
Preparing the Fan Site

7’ Minimum 

Blades to 

Floor

8’ Minimum 

Ceiling 

Height

30” From 

Wall or 

Nearest 

Obstruction

Step 1 - Choose the Fan Site

Proper ceiling fan location and attachment to the building 
structure are essential for safety, reliable operation, maximum 
efficiency, and energy savings.

Choose a fan site where:

• No object can come in contact with the rotating fan blades during 

normal operation.

• The fan blades are at least 7 feet above the floor and the ceiling is 

at least 8 feet high.

• The fan blades have no obstructions to airflow, such as walls or 

posts, within 30 inches of the fan blade tips.

• The fan is directly below a joist or support brace that will hold the 

outlet box and the full weight of the fan.

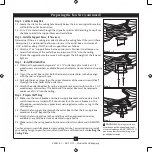
Checklist for Existing Fan Site

If you want to use an existing fan site, complete the following checklist to 

determine if the site is acceptable and safe for your new Hunter fan. If you 

cannot check off every item, prepare a new fan site as described on this 

page.

Fan Support System

• 

Fan attaches directly to building structure.

• Fan support system will hold full weight of the fan and light kit.

Ceiling Hole

• The outlet box clearance hole is directly below the joist or support brace.

Outlet Box

• The outlet box is an UL-approved octagonal 4” x 1-1/2” outlet box (or as 

specified by the support brace manufacturer).

• The outlet box is secured to the joist or support brace by wood screws 

and washers through the inner holes of outlet box.

• The outer holes of the outlet box are aligned with joist or support brace.
• The bottom of the outlet box is recessed a minimum of 1/16” into 

ceiling.

Wiring

• The electrical cable is secured to outlet box by an approved connector.
• Six inches of lead wires extend from outlet box.
If your existing fan site is suitable, skip ahead to Section 

2 • Installing the 

Ceiling Plate.

Suitable Existing Fan Site

Fan Support 

System

Fan Support 

System

Wiring

Outlet Box

Содержание 21781

Страница 1: ...also attach your receipt or a copy of your receipt to the manual __________________________________________ Model Name __________________________________________ Model No __________________________________________ Date Purchased __________________________________________ Where Purchased English Español Owner s Guide and Installation Manual ...

Страница 2: ...90 Pre Assembled Out Of The Box Makes Installation Fast Easy 1 Install mounting bracket and make wiring connections 2 Attach EasyLockTM Blades Please follow the detailed installation instructions inside this manual Installation is complete ...

Страница 3: ...your fan disconnect the power by turning off the circuit breakers to the outlet box and associated wall switch location If you cannot lock the circuit breakers in the off position securely fasten a prominent warning device such as a tag to the service panel All wiring must be in accordance with national and local electrical codes and ANSI NFPA 70 If you are unfamiliar with wiring use a qualified e...

Страница 4: ...ne if the site is acceptable and safe for your new Hunter fan If you cannot check off every item prepare a new fan site as described on this page Fan Support System Fan attaches directly to building structure Fan support system will hold full weight of the fan and light kit Ceiling Hole The outlet box clearance hole is directly below the joist or support brace Outlet Box The outlet box is an UL ap...

Страница 5: ...2 outlet box plus two 8 x 1 1 2 wood screws and washers available from any hardware store or electrical supply house 4 2 Orient the outlet box so that both the inner and outer holes in the box align with the joist or support brace 4 3 Drill pilot holes no larger than the minor diameter of the wood screws 5 64 through the inner holes of the outlet box 4 4 Attach the outlet box directly to the suppo...

Страница 6: ...ontrol To install and use the accessories follow the instructions included with each product For quiet and optimum performance of your Hunter fan use only Hunter speed controls For ceilings higher than 8 feet you can purchase Hunter extension downrods All Hunter fans use sturdy 3 4 diameter pipe to assure stability and wobble free performance Standard Mounting hangs from the ceiling by a downrod i...

Страница 7: ...lectric drill with 9 64 bit Standard screwdriver magnetic tip recommended Phillips head screwdriver magnetic tip recommended Wrench or pliers Ladder height dependent upon installation site CheckingYourFanParts Carefully unpack your fan to avoid damage to the fan parts Refer to the included Parts Guide Check for any shipping damage to the motor or fan blades If any parts are missing or damaged cont...

Страница 8: ...lotted holes directly across from each other If you are installing the fan on an ANGLED ceiling be sure to orient the hanger bracket as shown in Illustration 2 3 left or right view Note The isolators should be flush against the ceiling 2 4 Place a flat washer on each of the two 3 screws and pass the screws through the slotted holes in the hanger bracket into the pilot holes you drilled Tighten the...

Страница 9: ...sible this is normal Securely retighten the set screw with a wrench or pliers CAUTION The adapter has a special coating on the threads Do not remove this coating the coating prevents the downrod from unscrewing Once assembled do not remove the downrod WARNING Do not carry or lift fan by canopy 3 4 Raise the fan and place the ball into the hanger bracket 3 5 Align the notch on the ball with the ind...

Страница 10: ... or green ground wire grounding from the ceiling to the green ground wire grounding from the ceiling plate and the green ground wire grounding from the fan 4 4 Connect the white wire grounded from the ceiling to the white wire grounded from the fan 4 5 Connect the remaining wires as follows The black wire ungrounded from the ceiling to the black ungrounded and the black white wire ungrounded from ...

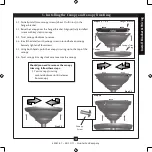
Страница 11: ...y screw in round hole on canopy Securely tighten all four screws 5 5 Using both hands push the canopy trim ring up to the top of the canopy 5 6 Twist canopy trim ring clockwise to secure the canopy Should you need to remove the canopy trim ring follow these steps 1 Twist canopy trim ring counterclockwise until it releases from canopy Steps 5 1 5 2 Canopy Trim Ring Canopy Hanger Bracket Step 5 3 Ca...

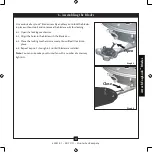
Страница 12: ...ng 6 1 Open the locking mechanism 6 2 Align the holes in the blade with the blade iron 6 3 Close the locking mechanism securely You will feel it lock into place 6 4 Repeat steps 6 1 through 6 3 until all blades are installed Note You can customize your Hunter fan with a number of accessory light kits Step 6 1 Step 6 3 Open Close 6 Assembling the Blades Attach EasyLock TM Blades ...

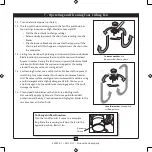
Страница 13: ...air upward clockwise blade rotation will distribute the warmer air trapped at the ceiling around the room without causing a draft 7 4 For cleaning finishes use a soft brush or lint free cloth to prevent scratching A vacuum cleaner brush nozzle can remove heavier dust Remove surface smudges or accumulated dirt and dust using a mild detergent and a slightly dampened cloth You may use an artistic age...

Страница 14: ...oisy operation 1 Tighten the blade assembly screws and blade iron armature screws until snug 2 Check to see if the blade is cracked If so replace all the blades Problem Excessive wobbling 1 If your fan wobbles when operating use the enclosed balancing kit and instructions to balance the fan 2 Tighten all blade iron screws 3 Turn power off support fan very carefully and check that the hanger ball i...

Отзывы: