Hunter 21617 Скачать руководство пользователя страница 15

15

42700-01  •  01/15/08  •  Hunter Fan Company

11 • Operating and Cleaning Your Ceiling Fan

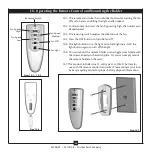
11-1.   Restore power at the main electrical panel and turn on the wall 

switch. The light kit should turn ON.


Note:

 To turn on the light without the remote, turn off the wall 

switch for 5 seconds, then back on. The light kit will turn on at 
maximum brightness. 

11-2.   Press the remote control’s HIGH speed button. The fan should 

start and reach its maximum speed.

Note: 

For everyday operation, leave the wall switch ON. If the              

remote control will not be used for 5 days or more, turn the wall 
switch OFF.

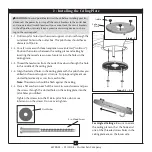
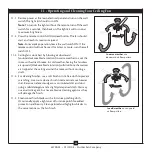
11-3.   Ceiling fans work best by blowing air downward 

(counterclockwise blade rotation) in warm weather to cool the 
room with a direct breeze. In cold weather, having the fan draw 
air upward (clockwise blade rotation) will distribute the warmer 

air trapped at the ceiling around the room without causing a 
draft. 

11-4.   For cleaning finishes, use a soft brush or lint-free cloth to prevent 

scratching. A vacuum cleaner brush nozzle can remove heavier 
dust. Remove surface smudges or accumulated dirt and dust 

using a mild detergent and a slightly dampened cloth. You may 

use an artistic agent, but never abrasive cleaning agents as they 

will damage the finish.

11-5.   Clean wood finish blades with a furniture polishing cloth. 

Occasionally, apply a light coat of furniture polish for added 
protection and beauty. Clean painted and high-gloss blades in 

the same manner as the fan finish.

In warm weather

, use 

downward air flow pattern

In cold weather

, use upward 


air flow pattern

Содержание 21617

Страница 1: ...________________ Serial No ________________________ Date Purchased ____________________ Where Purchased _ _________________ For reference also attach your receipt or a copy of your receipt to the manu...

Страница 2: ...er nameplate label located on the top of the fan motor housing CautionsandWarnings READ THIS ENTIRE MANUAL CAREFULLY BEFORE BEGINNING INSTALLATION SAVE THESE INSTRUCTIONS Use only Hunter replacement p...

Страница 3: ...uded with each product For quiet and optimum performance of your Hunter fan use only Hunter speed controls For ceilings higher than 8 feet you can purchase Hunter extension downrods All Hunter fans us...

Страница 4: ...rench or pliers Ladder height dependent upon installation site CheckingYourFanParts Carefully unpack your fan to avoid damage to the fan parts Refer to the included Parts Guide Check for any shipping...

Страница 5: ...d areas on each isolator into the holes in the ceiling plate 2 3 Thread the lead wires from the outlet box down through the hole in the middle of the ceiling plate 2 4 Align the slotted holes in the c...

Страница 6: ...into slot Align the holes on the blade with the holes in the fan motor 3 2 Slide flat washers onto the shafts of the blade assembly screws 3 3 Attach the blade to the motor using the blade assembly s...

Страница 7: ...ing to the hanger adapter align the three raised tabs on the hanger adapter with the three narrow notches in the top housing Make certain the housing sits flat on the adapter 4 2 Install three 3 assem...

Страница 8: ...visible this is normal Securely retighten the set screw with a wrench or pliers Skip to Step 5 6 CAUTION The adapter has a special coating on the threads Do not remove this coating the coating prevent...

Страница 9: ...the receiver Make sure that the jumpers match in the remote receiver and transmitter If they don t match the transmitter will not function 6 2 Install the included 12 volt battery into the transmitter...

Страница 10: ...op of the fan through the open slot in the receiver 7 4 Place the receiver in the canopy Make sure the slot in the receiver is aligned with the hook in the ceiling plate 7 5 To connect the wires hold...

Страница 11: ...e strands are visible after making connections 7 7 Run the thin white antenna wire from the receiver through one of the slots in the ceiling plate For best reception make sure the end of the antenna i...

Страница 12: ...8 Installing the Canopy 8 1 Holding the canopy raise the fan off the hook 8 2 Align the holes in the canopy with the mounting holes on the ceiling plate 8 3 Insert and tighten the mounting screws secu...

Страница 13: ...to the light kit mounting plate Securely tighten all three screws 9 5 Connect the 2 pin plug connector from the fan to the 2 pin plug connector from the ballast 9 6 Attach the ballast to the light ki...

Страница 14: ...the fan off 10 5 The light button turns the light on to full brightness Push the light button again to turn off the light 10 6 You can mount the remote holder to any toggle switch plate with the screw...

Страница 15: ...weather to cool the room with a direct breeze In cold weather having the fan draw air upward clockwise blade rotation will distribute the warmer air trapped at the ceiling around the room without caus...

Страница 16: ...to see if the blade is cracked If so replace all the blades 3 Be sure that the glass is secure Problem Excessive wobbling 1 If your fan wobbles when operating use the enclosed balancing kit and instru...

Отзывы: