background image

HUNTER/LEGEND Owner’s Manual 

Page 21 


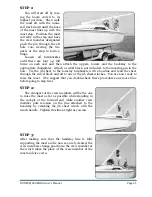
STEP 1: 


You will start off by rais- 

ing the boom crutch to its 
highest position.  Then walk 
the mast aft with the main- 
sail track down until the base 

of the mast lines up with the 
mast step.  Position the mast 
correctly in the step and have 
the crew member designated 
push the pin through the aft 

hole con- necting the two 
parts at the step to form a 
hinge. 

Loosen all turnbuckles 

until there are four (4) full 

turns on each end and then attach the uppers, lowers and the backstay to the 
appropriate chainplates.  Attach a swivel block, not included, to the mooring pin in the 
bow.  Tie the jib sheet to the forestay turnbuckle with a bowline and lead the sheet 

through the swivel block and aft to one of the jib sheet winches.  You are now ready to 
raise the mast.  (We suggest that you double-check these procedures one more time 
before going to step two.) 


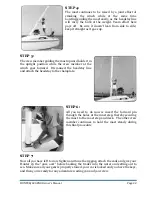
STEP 2: 


The strongest of the crew members will be the one 

to raise the mast as far as possible while standing in 
the cockpit at the forward end while another crew 
member puts ten-sion on the line attached to the 
headstay by cranking the jib sheet winch with the 
winch handle.  Tighten this line as tight as you can. 


STEP 3: 


After making sure that the headstay line is fully 

supporting the mast and is now sec-urely cleated, the 
crew members change pos-itions; the crew member at 
the winch takes the place of the crew member at the 
mast and vice versa. 


Содержание Hunter 23

Страница 1: ...vessels in the 1980s In addition to minor formatting spelling and grammar changes sections from the original manual pertaining to systems on larger vessels have been removed It is the intention of th...

Страница 2: ...HUNTER LEGEND Owner s Manual Page 2...

Страница 3: ...NG 11 BRIEF GLOSSARY OF SAILING TERMS 13 II General Handling Operation 15 A Electrical System 15 B Water System 15 C Stove 15 D Pumps 15 E Docking 15 F Anchoring 16 III Sails Rigging 17 A Tuning the C...

Страница 4: ...aintenance 30 A Electrical Systems 30 B Plumbing Systems 30 C Fuel System 30 D General Care 30 V Storage Winterization 33 A Sails 33 B Electrical 33 C Cushions 33 D Hatches 33 E Outboard Engine 33 VI...

Страница 5: ...ten 10 days of the purchase date Section 15 of the Federal Boat Safety Act requires first owners to be registered The warranty data should also be recorded in the space below for your own reference Yo...

Страница 6: ...y of Chapman s Piloting Seamanship and Small Boat Handling is provided with your Hunter Marine boat as part of the standard equipment Any questions regarding the meaning of terminology used in this ma...

Страница 7: ...s or parts which have been altered or subjected to negligence or misuse 3 Commercially used boats This warranty is expressly in lieu of any and all other remedies and expressed warranties Any implied...

Страница 8: ...ls Check battery water level Oil level tighten V belts Check for loose electrical connections in the engine room Secure tools or any loose equipment in the engine room so as not to get fouled in engin...

Страница 9: ...DDRESS ____________________________________ __________ ______________________ NAME AGE PHONE ______________________________________________________________________ ADDRESS 4 Engine ___________________...

Страница 10: ...nd set it firmly amidships with the mainsheet purchase It is also a good idea to rig a line from the steering wheel or tiller to a convenient cleat to keep the rudder from swinging back and forth with...

Страница 11: ...and inspect your engine s fuel system periodically Heed fire extinguisher regulations and keep them in good condition While refueling a Fill the portable tanks on the dock b Tie the boat securely c E...

Страница 12: ...ediately Slay with the boat In cold water huddle together to prevent hypothermia FLOAT PLAN Make copies of the example on page 1 5 and use one before each trip Fill it out and leave it with a reliable...

Страница 13: ...pin used to hold a clevis pin in place DOWNHAUL A device used to tighten the luff of a sail FAIRLEAD An eye used to lead line in the direction desired FOOT The lower edge of a sail GOOSENECK A metal...

Страница 14: ...ope used to trim a sail SHROUD A length of wire used to support a spar same as a stay SLACK The opposite of taut i e slack away or off to pay out SPREADERS Aluminum tubes that project from a mast in a...

Страница 15: ...ns regarding discharge of substances into bodies of water C Stove Follow the operating instructions supplied with the unit installed with your boat See appendix D Pumps All pumps should be checked fre...

Страница 16: ...g pay particular attention to the scope of your anchor rode i e the relationship between the depth of the water and the length of the rode A good rule of thumb is to allow a scope of about 7 1 a rode...

Страница 17: ...UNING THE RIGGING After raising your mast attach the headstay backstay upper shrouds and lower shrouds Set the headstay turnbuckle at half open and then tighten back stay turnbuckle to medium tension...

Страница 18: ...side When mast tuning is complete install cotter pins in all turnbuckles and tape over sharp edges of the collar pins with chafe tape B Roller Furling OPERATING THE ROLLER FURLING 1 To furl the sail r...

Страница 19: ...r capabilities 2 Never let them luff for extended periods of time 3 Rinse your sails in freshwater whenever possible if you sail in saltwater 4 Tub wash them every few seasons to keep them bright and...

Страница 20: ...nal lubricating improves both the life and the function of the turnbuckles F Care of Running Rigging To protect your running rigging sheets halyards from damage wash with cold water and a mild deterge...

Страница 21: ...he jib sheet to the forestay turnbuckle with a bowline and lead the sheet through the swivel block and aft to one of the jib sheet winches You are now ready to raise the mast We suggest that you doubl...

Страница 22: ...s forward Disconnect the headstay line and attach the headstay to the chainplate STEP 6 All you need to do now is insert the forward pin through the holes at the mast step thereby securing the mast to...

Страница 23: ...ordance with the instructions provided by the manufacturer As a precaution to insure that you do not lose the outboard if the clamp comes loose always have a safety line attached from the motor to the...

Страница 24: ...uently General Thru hull List varies from boat to boat see diagrams in section VI 1 Engine cooling system 2 Galley sink 3 Head sink 4 Head toilet water intake 5 Holding tank discharge 6 Scupper drains...

Страница 25: ...able quality it should be given a coat of teak oil once a year or more in northern climates and twice a year or more in tropical climates Teak can be allowed to weather out as seen on many boats but t...

Страница 26: ...ted place Many sailboat owners send their sails back to the sail manufacturer at the end of each season The sail maker will check the stitching and sailcloth for wear and store the sails until the sta...

Страница 27: ...HUNTER LEGEND Owner s Manual Page 27 VI Specifications Technical Information...

Страница 28: ...HUNTER LEGEND Owner s Manual Page 28...

Страница 29: ...HUNTER LEGEND Owner s Manual Page 29...

Страница 30: ...HUNTER LEGEND Owner s Manual Page 30...

Страница 31: ...HUNTER LEGEND Owner s Manual Page 31...

Страница 32: ...HUNTER LEGEND Owner s Manual Page 32...

Отзывы: