background image

45 

E. 


DIGITAL ZOOM 

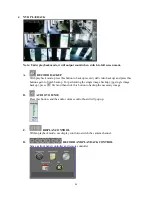
In the live full screen mode, left-click the button of the mouse to pull a range to zoom in or 
zoom out the image. User can right-click the button of the mouse to disable this function. 
(NOTE: Using the mouse to operate digital zoom can zoom in to max. 16 times.) Moreover, 
user can also use ZOOM key on the front panel to perform this function. (First, click ZOOM 
Key and then click ▲▼◄► key to select zoom in or zoom out position. Finally, click 
ENTER key to complete the setting. Moreover, click ZOOM Key again can disable digital 
zoom function. Using the panel key to perform zoom in function is fixed at 2 times.)   


F.   

FULLSCREEN


        Press the bottom for full-screen mode. 


Содержание HNR-09AF

Страница 1: ... USER MANUAL 09 CHANNELS NETWORK VIDEO RECORDER ...

Страница 2: ...FERENCE CAUSING EQUIPMENT REGULATIONS WARNINGS CAUTIONS COPYRIGHT WARINGS TO REDUCE THE RISK OF FIRE OR ELECTRIC SHOCK DO NOT EXPOSE THIS PRODUCT TO RAIN OR MISTURE DO NOT INSERT ANY METALLIC OBJECT THROUGH VENTILATION GRILLS CAUTION Explanation of Graphical Symbols The lightning flash with arrowhead symbol within an equilateral triangle is intended to alert the user to the presence of insinuated ...

Страница 3: ... ALARM SETUP 29 3 6 NETWORK SETUP 31 3 7 AUTHORITY SETUP 36 3 8 DISK MANAGEMENT 38 3 9 SYSTEM SETUP 39 4 NVR PLAYBACK 44 4 1 TIME SEARCH 46 4 2 EVENT SEARCH 46 4 3 BACKUP 47 4 4 SYSTEM LOG 48 5 BACKUP PLAYBACK 49 5 1 MAIN SCREEN SETTING 49 5 2 PLAYBACK OPERATION 52 6 NETWORK VIEWING PLAYBACK 55 6 1 IP ADDRESS SETUP ON PC SITE 55 6 2 OPTIONAL MICROSOFT INTERNET EXPLORER SETUP 57 6 3 LOGIN 59 6 4 RE...

Страница 4: ... remote control mode Up to four online clients for independent remote control individual live time play back time search function available Support PPPoE Static DHCP IP DDNS Powerful mobile surveillance function support i Phone Android Support log function 1 2 SPECIFICATION MODEL HNR 09AF VIDEO MODE Multiplex DISPLAY CHANNEL 9Ch SUPPORT IP CAM RESOLUTION Up to 1080P 2 M pixel DISPLAY FRAME RATE Up...

Страница 5: ...MOUSE Yes IE BROWSER Yes PLAYER Yes STORAGE BACKUP DEVICE INTERNAL HDD SUPPORT SATA HDD x 4 EXTERNAL USB BACKUP DEVICE HDD BURNER Yes NETWORK ETHERNET Yes 10 100M IE REMOTE CONTROL Yes DDNS Yes NTP Yes E MAIL FTP Yes NETWORK IP Static Dynamic PPPoE DDNS MULTI REMOTE CLIENT Yes 4 Clients at the same time available ALARM ALARM INPUT 8 In ALARM OUTPUT 2 Out NO NC MOTION DETECTION Yes MOTION DETECTION...

Страница 6: ...PASSWORD CONTROL Two levels one for system and the other for HDD format KEY LOCK Yes MULTI LANGUAGE Yes FIRMWARE UPDATE USB Host Update on line Others POWER INPUT DC 12V DIMENSIONS W x H x D 370mm X 60mm X 311mm OPERATION TEMPERATURE 0 45 SPECIFICATIONS ARE SUBJECT TO CHANGE WITHOUT NOTICE ...

Страница 7: ...ONT PANEL NVR OPERATION NO LABEL OPERATION PTZ 1 IR Sensor For Remote Control 2 4 3 2 1 5 7 6 8 19 9 21 20 10 11 12 16 17 18 15 14 13 22 USB Connector 3 MIC IN Microphone input Phone Jack 4 AUDIO OUT 3 5mm Audio output Phone Jack ...

Страница 8: ...GA Switch HDMI and VGA output 3 VIDEO OUT VGA D SUB connector Connect to LCD monitor 4 POWER Power switcher DC 12V 5A input 5 RS 485 ALARM IN RELAY OUT 2 pin RS 485 8 pin alarm input connector 2 pin GND connector 2 pin Relay connector 1 pin COM connector 6 ETHERNET RJ 45 connector ...

Страница 9: ...he icon pops up to remind the user e The post alarm recording video can be sent to e mail uploaded to FTP f CGI can be sent to an http server B When External Alarm or Digital Input from Camera happen a External relay built in buzzer can be triggered b Alarm timepoint can be recorded in the event list and you can search for the event in playback c On the channel which the alarm triggered the icon p...

Страница 10: ... is used for RS 485 N C and N O is for relay output connection EX1 Connect GND Alarm to external IR detector EX2 Connect N O COM to external siren RS 485 D RS 485 sends receives RS 485 D RS 485 sends receives GND GND ALARM IN 1 8 Camera alarm input N C Relay N C N O Relay N O ...

Страница 11: ... Split Screen Switch ID ID setup to control NVRs Switch split screen Move upward or increase Switch split screen Move right or increase Switch split screen Move downward or decrease Switch split screen Move left or decrease To enter item or make choose MENU To into or exit main menu STOP Stop play and playback Each NVR can setup its own ID number The user can control NVR via remote controller by p...

Страница 12: ...mera joystick controller to control PTZ camera via NVR please check the CAMERA ID BANDRATE default at 9600 bps and RS 485 cable Under Two Core connection controller can control speed dome without integrated protocol into NVR Moreover one keyboard can connect MAX 256 units of speed dome ...

Страница 13: ...14 3 SYSTEM SETUP 3 1 MENU SETUP INTERFACE GUI A CAMERA SETUP B RECORD SETUP C ALARM SETUP D NETWORK SETUP ...

Страница 14: ...15 E AUTHORITY SETUP F DISK MANAGEMENT G SYSTEM SETUP H EXIT ...

Страница 15: ... click the button of the mouse to pull a range to zoom in or zoom out the image User can right click the button of the mouse to disable this function NOTE Using the mouse to operate digital zoom can zoom in to max 16 times Moreover user can also use ZOOM key on the front panel to perform this function First click ZOOM Key and then click key to select zoom in or zoom out position Finally click ENTE...

Страница 16: ... smaller Move the mouse and the arrow will follow the mouse and change direction In this mode user can click on the live view to control direction instead of the direction key on control panel If a fisheye camera is connected E PTZ Steps 1 Select the channel number you want to setup if there are several ones 2 Select the View Mode 360 degree or 180 degree 3 Select the camera location ceiling desk ...

Страница 17: ...lume control board will pop up F SWITCH DWELL Press it to start switch dwell The interval depends on the setting in IPCam Image Setup when it s on single channel view For split screen the switch dwell interval is 5 sec G DISPLAY CONTROL Within live viewing or playback mode use display control to switch the camera channel H RECORD AND PLAYBACK CONTROL Same as front panel controller and remote contr...

Страница 18: ...ck video As long as the audio setup is enabled the playback video includes audio even the sound output here is turned off L RECORDING STATUS Beneath the date and time it displays the current recording type Record mode Schedule NO REC period Record mode Schedule ALARM REC period Record mode Alarm trigger Record mode Manual Stop Recording Record mode Schedule FULL REC period Record mode Manual Recor...

Страница 19: ...n and click Search Device button in the following NVR will search the IPCAM devices which IP address are setup as the same domain as NVR IP address Moreover click the IPCam device which from the list can import the device information to the channel automatically without any manual key in step ...

Страница 20: ... the NVR only support the IP address indication the live video and video recording Other functions like motion detection are not supported 1 Enable Choose RTSP Mode 2 IP Address Insert the IP address of the connecting device 3 Port Insert the port number of the connecting device Please key in 554 here 4 User Insert the user name of the connecting device 5 Password Insert the password of the connec...

Страница 21: ...the live view screen A 2 Connect IPCAM After insert the IPCAM related information click Connect IPCAM button to test the connection circumstances B IPCam Video Setup B 1 Resolution Click drop down list to change the resolution of connecting device B 2 Quality Click drop down list to change the image quality For H 264 IPCam above 1 Megapixel the resolution options support 4Mbps 3Mbps 2Mbps 1 5Mbps ...

Страница 22: ...ent value is between 0 255 C 6 Hue Press or to change hue level The adjustment value is between 0 255 C 7 Saturation Press or to change saturation level The adjustment value is between 0 255 C 8 Sharpness Press or mouse wheel to change sharpness level The adjustment value is between 0 15 D Motion Setup D 1 Relay Dwell Press or to change the relay time or disable relay function D 2 Buzzer Dwell Pre...

Страница 23: ...ll to set up global motion detection Select Clean All to clean the area of the current color in the view Select Exit Without Saving to go back to motion setup menu and the setting you just changed will not be saved E Mask Setup The masked area will not show on the live video and video playback E 1 Area1 Tick the Area1 box and click Area Setup to drag a blue area for masking E 2 Area2 Tick the Area...

Страница 24: ...e versa No sound will be recorded in the playback video of the channel which is not ticked G Quick Setup Other than IPCAM Setup you can choose another way to complete the IP camera connection job using Quick Setup G 1 Key in information manually Here is the all channel list You can key in the IP address port and user name password of the IP camera and then assign the channel number Tick Enable to ...

Страница 25: ...ant to connect with assign a channel number for it and tick Enable so that this IP camera will be added to the all channel list Back to the all channel list you can key in the user name and password and tuck Enable to connect with the camera If you want to revise the IP setting of a camera click Edit ...

Страница 26: ... list to switch the recording mode 1 Manual Click to start recording Click to stop recording 2 Schedule a Schedule Setup Click the tag Full Recording Red Alarm Recording Yellow No Recording Green and then draw on the calendar The recording type will follow the schedule The tag Alarm Recording includes external alarm and motion detection alarm b Mail Schedule Setup ...

Страница 27: ... time that the recording video is upload to FTP No file will be uploaded during NO MAIL time period even the motion detection is triggered 3 Alarm Trigger Start recording when the video loss motion detection or external alarm happen The recording video length is according to the setting of Post Alarm Record Time C Mobile Streaming Setup Choose ON to record the streaming for mobile viewing ...

Страница 28: ...red A 3 Digital Input IPCam Use the drop down list to switch on off the Digital Input from IP camera When the alarm devise connected with the camera is triggered the alarm action will be triggered A 4 Ext Alarm Detection Use the drop down list to switch the external alarm detection When the alarm devise connected with NVR is triggered the alarm action will be triggered A 5 Ext Alarm Mode Use the d...

Страница 29: ... Relay Time option the user can press or to switch the external buzzer time and video loss buzzer time The adjustment value is from 5 to 99 seconds as well The Value of Ext Alarm Buzzer Relay Time determine the buzzer relay time of both external alarm in and digital input IPCam C Alarm Event Setup When the selected events are happened and triggered the log will be recorded in the event playback li...

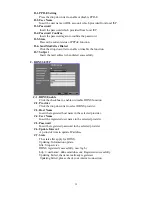
Страница 30: ...dress Use the virtual keypad to setup the NVR IP ADDRESS A 3 Network Use the virtual keypad to change SUBNET MASK A 4 Gateway Use the virtual keypad to change Default GATEWAY A 5 DNS1 Use the virtual keypad to change DNS A 6 DNS2 Use the virtual keypad to change OTHER DNS A 7 WebPage Port Use the virtual keypad to change the IE browser port B PPPoE SETUP ...

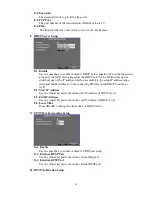
Страница 31: ...NS SETUP C 1 DDNS Enable Click the checkbox to enable or disable DDNS function C 2 Provider Click the drop down list to select DDNS provider C 3 Host Name Insert the registered host name in the selected provider C 4 User Name Insert the registered user name in the selected provider C 5 Password Insert the registered password in the selected provider C 6 Update Interval A period of time to update I...

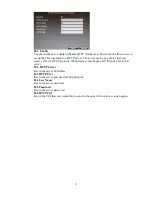
Страница 32: ...o the mail server D 5 Password The password while log in to the mail server D 6 Sender s Mail The sender s account when send the mail via this mail server D 7 Receiver s Mail The receiver s mail address D 8 BCC Mail The receiver s mail address for Bcc Mail D 9 Subject The subject while sending the mail E FTP SETUP E 1 Enable Tick Alarm to upload video to FTP when external alarm or DI from IPCam is...

Страница 33: ...cording to the setup IP address range start and end IP Address to the connecting IPCAM setup DHCP function as well F 2 Start IP Address Use the virtual keypad to insert the start IP Address of DHCP server F 3 End IP Address Use the virtual keypad to insert the end IP Address of DHCP server F 4 Lease Time Press or to change the lease time of DHCP server G UPNP Port Forwarding Setup G 1 Enable Use t...

Страница 34: ...hat can receive CGI via HTTP protocol When alarm events happen NVR sends CGI to that server H 2 HTTP Server Key in the server IP address H 3 HTTP Port Key in the server port used for http protocol H 4 User Name Key in the server username H 5 Password Key in the server password H 6 HTTP CGI Key in the CGI that you would like to send to the server when alarm events happen ...

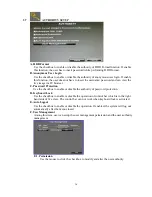
Страница 35: ...ssword Protection Use the checkbox to enable or disable the authority of password protection D Keyboard Lock Use the checkbox to enable or disable the operation of control bar which is in the right hand side of live view The control bar can not work when keyboard lock is activated E Auto Logout Use the checkbox to enable or disable the operation If enabled the system will log out automatically aft...

Страница 36: ...37 F 2 Add User After click button the setup page will present in the following The user can distribute the authority and the permission for the new user ...

Страница 37: ...AUDIBLE ALARM of BUZZER of ALARM SETUP is ON C Auto Deletion Click the drop down list to enable or disable auto deletion function D Reserve Day Use or to setup the reserve day While enable auto deletion function the data will be removed when reserve day is exceed the setting The value can be setup between 1 30 days E Storage Information The information of storage device will present in this page F...

Страница 38: ...and Simplified Chinese three options D Date Format Use the drop down list to change DATE There are DD MM YYYY YYYY MM DD and MM DD YYYY three modes E Version The firmware version of the NVR will show in this column F Software Update Click button to perform firmware updating G Configure Setup Click the checkbox to select which item can be setup by the user The user can also load the setting to fact...

Страница 39: ...ylight saving time After complete the setting please click button to reserve the setting J Status Display Setup Use the mouse to click the options which is including Date and Time Display Record Information Display and Camera Title Display K Monitor Adjust User can use or to adjust the monitor related setting within this page there are Brightness Contrast Hue and Saturation four options can be set...

Страница 40: ...41 ...

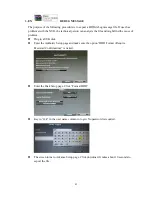
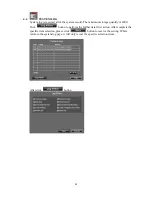
Страница 41: ...ile and might find the cause of problem Plug in a USB disk Enter the Authority Setup page and make sure the option HDD Format Require Password Confirmation is ticked Enter the Disk Setup page Click Format HDD Key in k in the user name column to login No password is required The screen turns to Advance Setup page Click download It takes about 10 seconds to export the file ...

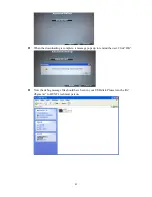
Страница 42: ...43 When the downloading is complete a message pops up to remind the user Click OK Now the debug message file should have been in your USB disk Please turn the file dbgms tar to HUNT s technical person ...

Страница 43: ... again to finish backup For performing the single image backup jpg single image backup press first and then click this button to backup the necessary image B AUDIO VOLUME Press this button and the audio volume control board will pop up C DISPLAY CONTROL Within playback mode use display control to switch the camera channel D RECORD AND PLAYBACK CONTROL Same as front panel controller and remote cont...

Страница 44: ...e digital zoom can zoom in to max 16 times Moreover user can also use ZOOM key on the front panel to perform this function First click ZOOM Key and then click key to select zoom in or zoom out position Finally click ENTER key to complete the setting Moreover click ZOOM Key again can disable digital zoom function Using the panel key to perform zoom in function is fixed at 2 times F FULLSCREEN Press...

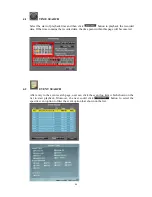
Страница 45: ...ains the recorded data the time point within this page will become red 4 2 EVENT SEARCH After entry to the event search page user can click the event log item which shown on the list to start playback Moreover the user could click button to select the specific event option to filter the event option that shown on the list ...

Страница 46: ...p down list to select the storage device USB and the backup time selection mode Time Mode Hours Mode After that click button to start backup TIME MODE Click or to select the start and end backup time Moreover click button to select the channel which is going to backup ...

Страница 47: ...imum storage quantity is 2000 Click button to perform the further data filter action After complete the specific item selection please click button to reserve the setting While return to the system log page it will only reveal the specific selection items After click button ...

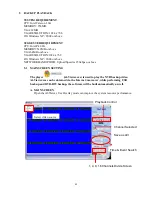
Страница 48: ...NDWIDTH Upload Speed is 256kbps or above 5 1 MAIN SCREEN SETTING The player A6Viewer exe is used to play the NVR backup video A6Viewer exe can be obtained via the Internet moreover while performing USB backup and DVD RW backup the software will be built automatically as well A MAIN SCREEN Open the A6Viewer Use Overlay mode can improve the system resource performance Time Event Search Save as AVI C...

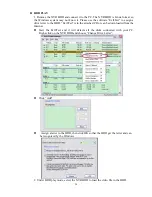
Страница 49: ...Ext2Fsd is in the attached CD or can be downloaded from the Internet Start the Ext2Fsd and it will detects all the disks connected with your PC Right click on the NVR HDD and choose Change Drive Letter Click Add Assign a letter to the HDD then click OK so that the HDD get the letter and can be recognized by the Windows 2 Under HDD play mode select the NVR HDD to load the video file in the HDD ...

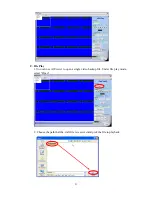
Страница 50: ...51 C File Play 1 You can use A6Viewer to open a single video backup file Under file play mode select Open 2 Choose the path that the daX file is reserved and pick the file to playback ...

Страница 51: ...AYBACK OPERATION A TIME SEARCH Select the Date and Time and then click to play the film B EVENT SEARCH It will display all the events which are reserved within the NVR HDD after press Shown in the following and double click left button of mouse to trigger event C LOG ...

Страница 52: ...53 Click to check the log records D ZOOM Tick the Zoom box and drag an area on the screen Click the area to zoom in E BACKUP FILE TO AVI 1 Please select specific channel to backup ...

Страница 53: ...54 2 During video playback mode please press AVI bottom to start 3 Make up a filename and path than press bottom to start AVI backup 4 Press AVI bottom to finish backup ...

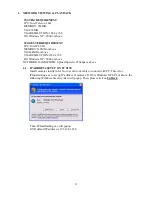
Страница 54: ...ON 1024 x 768 OS Windows XP 2000 or above NETWORK BANDWIDTH Upload Speed is 256kbps or above 6 1 IP ADDRESS SETUP ON PC SITE Install cameras inside in LAN or use network cable to connect with PC This is for IPInstallerEng exe to set up IP address of cameras If OS is Windows XP SP2 or above the following Windows Security Alert will popup Then please click on Unblock Then IPInstallerEng exe will pop...

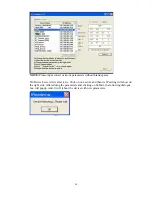
Страница 55: ...ank spaces On Device Lists it lists all servers Click on one server and then its IP setting will show on the right side After editing the parameters and clicking on Submit the following dialogue box will popup And it will reboot the device with new parameters ...

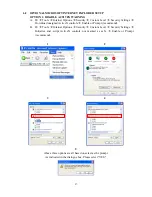
Страница 56: ... Settings Download unsigned ActiveX controls Enable or Prompt recommend B IE Tools Internet Options Security Custom Level Security Settings Initialize and script ActiveX controls not marked as safe Enable or Prompt recommend 1 2 3 4 5 Above three options are all based on select as the prompt As indicated in the dialogue box Please select YES ...

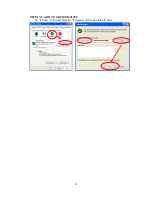
Страница 57: ...58 OPTION 2 ADD TO TRUSTED SITES IE Tools Internet Options Security Trusted sites Sites ...

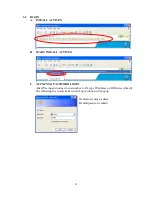
Страница 58: ...START INSTALL ACTIVEX C ACCOUNT PASSWORD LOGIN After IP setup and connect to network or LAN type IP address on IE Browser directly The following User name Password Login window will popup Default user name admin Default password admin ...

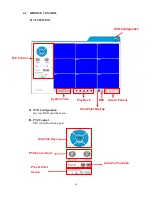
Страница 59: ...VR Configuration Get into NVR network menu B PTZ Control PTZ control function panel NVR Configuration PTZ Control Direction Keys PTZ Zoom in out Preset Point Setup Auto Pan Function System Time Screen Format Play Back REC Time Point Backup ...

Страница 60: ... channels with full screen E Full Screen Click again to return F REC Click to start record the live video to the PC or storage device The saved file is da9 file G Playback Click and select time playback or event playback H Time Point Backup Click to select backup time point The saved file is da0 file Up to 32 preset points for operation ...

Страница 61: ...t HDD1 or HDD2 for playback B Playback Time User can select the time then press Time Search for playback C Time Search User can select the time then press Time Search for playback D Event Search User can select event item by pressing Event Search for playback HDD Select Event Search Playback Time Time Search ...

Страница 62: ...lick Save button to select the position on PC where the user is going to backup the data After that press OK button to start the backup Finally double click the left button of the mouse to open the saved backup file The backup file will named as the time when start to backup For example 20080526113258 da0 was built at 2008 05 26 11 32 58 ...

Страница 63: ...ser can select image quality high medium low C Use Overlay User can use Overlay function The function can save system resource and promote the efficacy D Play audio User can play audio function by channel Note remote user can receive audio from NVR However there s no influence on sound recording of playback video whether the audio is played or not ...

Страница 64: ...ion A 1 SYSTEM INFORMATION SERVER NAME This name will show on the IP Installer MAC ADDRESS The MAC address cannot be revised A 2 NTP Setting TIME ZONE It can only be modified via adjust DATE and TIME SETUP in the NVR Menu NTP SERVER Revise the time of NVR via different NTP Server ...

Страница 65: ... Having Live Image and Video Playback authority Moreover PTZ controlled is included as well Guest Only have Live Image authority Default administrator account Username admin Password admin B 1 AUTHORITY SETTING Enable or Disable those option to limit the authority B 2 USER MANAGEMENT Add Key in the Username and Password The manager can give authority to the new user by tick at the choice below Ex ...

Страница 66: ...f you ever clicked Download and saved the settings before ActiveX Updating The ActiveX control should be also updated when you update the DVR NVR firmware Use the tool in the attached CD to uninstall the old ActiveX control so that the newest version can be registered Automatic Uninstall Please follow the steps 1 After updating the DVR NVR firmware close the web browser 2 Run the file unreg in the...

Страница 67: ...egsvr32 C WINDOWS system32 WATCH_16R KConfig ocx u 3 Start Run Key in regsvr32 The path of WATCH_16R ocx u Click OK Ex regsvr32 C WINDOWS system32 WATCH_16R WATCH_16R ocx u 4 Log in the DVR NVR via web browser again and the browser will require you to install the new version of ActiveX control D NETWORK IP SETTING ...

Страница 68: ...ORWARDING When a router is used you can enable this function to allow the user to link the device in the intranet E NETWORK PPPoE E 1 PPPoE SETTING Click on Enabled to enable ADSL dial function Username Username for ADSL account Password Password for ADSL account After dialed successfully new IP address will appear E 2 SEND MAIL AFTER DIALED Click on Enabled to enable SEND MAIL AFTER DIALED functi...

Страница 69: ...ING DYNDNS ORG PROVIDER Select dyndns org HOSTNAME The registered hostname in DYNDNS ORG USERNAME The registered username in DYNDNS ORG PASSWORD The registered password in DYNDNS ORG SCHEDULE UPDATE A period of time to update IP address STATE 1 Updating Information update 2 Idle Stop service ...

Страница 70: ...update IP address STATE 1 Updating Information update 2 Idle Stop service 3 DDNS registered successfully now log by http username ddns camddns com Registered successfully 4 Updating Failed the name is already registered 5 Updating Failed please check your internet connection DDNS Setting Steps Press 1 ENABLE option to enable DDNS function and select 2 ddns camddns com of the provider drop down lis...

Страница 71: ...ver if dyndns org provider is selected please go to www dyndns org website to register the account first The user has to fill in the username password and hostname for applying the account After the user applied the account successfully the dyndns org will give the user a complete DDNS domain name 3 If setting up IP schedule update too frequently the IP may be blocked In general schedule update ev...

Страница 72: ...mail server Receiver s Mail The receiver s mail address Bcc Mail The receiver s mail address for Bcc Mail Event Subject The subject of this mail Default value is ALARM MAIL FTP Server The IP address of FTP Server Username The username while log in to the ftp server Password The password while log in to the ftp server Port The port number of file transmission Default value is 21 Path The ftp path w...

Страница 73: ...Player in the left list and your browser will start up downloading A6Viewer exe to your PC J OTHERS NVR Setting NVR setting can be changed via the Internet Actually the settings here is the same as what you can operate on the NVR directly ...

Страница 74: ...etting Please refer to Chapter3 3 Camera Setup J 2 RECORD SETTING Please refer to Chapter3 4 Record Setup J 3 ALARM SETTING Please refer to Chapter3 5 Alarm Setup J 4 DISK STEEING Please refer to Chapter3 8 Disk Setup ...

Страница 75: ...76 J 5 SYSTEM SETTING Please refer to Chapter3 9 System Setup ...

Страница 76: ... Mbps LOW 0 25M MEDIUM 0 5M STANDARD 1M HIGH 1 5M AVERAGE AVERAGE AVERAGE AVERAGE 16CH 1920 960 480 320 6TB UNIT Hours IMAGE QUALITY Mbps LOW 0 25M MEDIUM 0 5M STANDARD 1M HIGH 1 5M AVERAGE AVERAGE AVERAGE AVERAGE 16CH 2880 1440 720 480 8TB UNIT Hours IMAGE QUALITY Mbps LOW 0 25M MEDIUM 0 5M STANDARD 1M HIGH 1 5M AVERAGE AVERAGE AVERAGE AVERAGE 16CH 3840 1920 960 640 The value is for reference onl...

Страница 77: ...GB 7200 11 ST31000333AS 1TB 7200 11 ST31000340AS 1TB 7200 11 ST31000340NS 1TB Barracuda ES 2 ST31000340SV 1TB SV35 3 ST31000322CS 1TB Pipeline HD 2 ST31000525SV 1TB SV35 5 ST31000524AS 1TB SATA3 7200 12 ST1500DL003 1 5TB SATA3 Barracuda LP ST31500341AS 1 5TB 7200 11 ST32000542AS 2TB Barracuda LP ST3320620AS 320 GB 7200 ST3500413AS 500GB 7200 ST3500320NS 500GB 7200 WD WD1600AAJS 160 GB 7200 CB WD25...

Страница 78: ...RX 1TB SATA3 Green Power WD15EADS 1 5TB 7200 GP WD15EARS 1 5TB 7200 GP WD15EURS 1 5TB 7200 GP WD5000AVDS 63U7B0 1 5TB 7200 GP WD15EVDS 1 5TB 7200 GP WD20EADS 2 0TB 7200 GP WD20EVDS 63T3B0 2 0TB 7200 GP WD20EARS 2 0TB Caviar Green WD20EURS 2 0TB 7200 GP WD30EURS 3TB CE GP WD30EZRX 3TB 7200 HITACHI HDS721616PLA380 160 GB 7200 HDT725025VLA380 250 GB 7200 HDT725032VLA360 320 GB 7200 HDP725050GLA360 50...

Страница 79: ...E There is no upgrade file within Pen Drive or the name of upgrade file does not correspond with NVR format Please adjust the upgrade file name based on the following information 16CH UpdateN16AF bin 09CH UpdateN09AF bin 04CH UpdateB bin USB DEVICE NOT FOUND NO USB Pen Drive undetected Please Unplug the Pen Drive and plug it again BACKUP START TIME ERROR Backup start time error BACKUPEND TIME ERRO...

Отзывы: