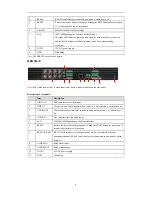
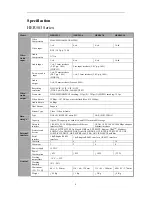
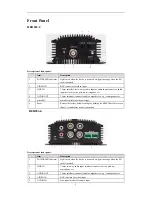
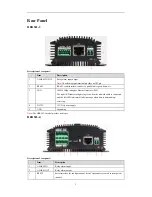
Hunt HER503 Series Скачать руководство пользователя страница 8


HER503-16: 


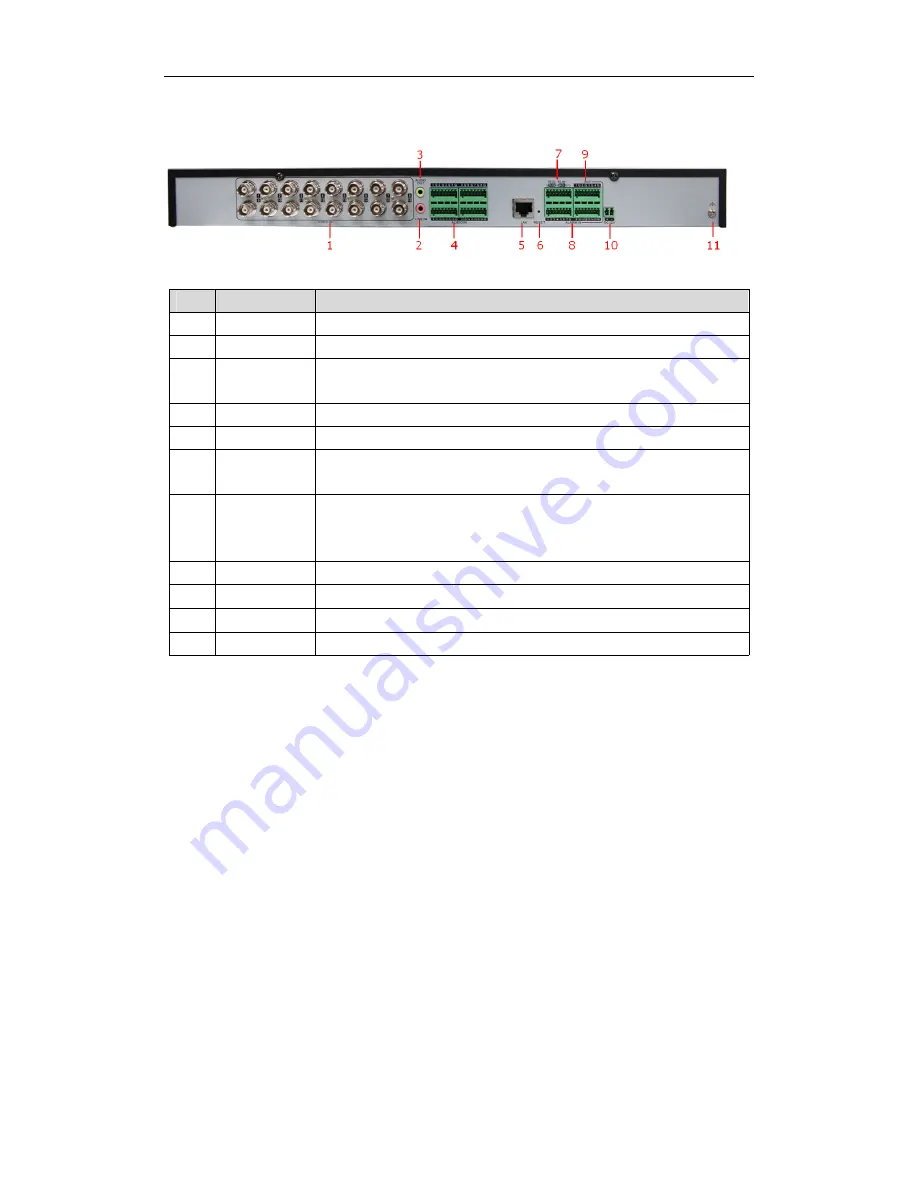
Description of rear panel: 


Item 

Description 

VIDEO IN 

BNC connectors for video input. 

LINE IN   

3.5mm two-way audio interface; connect to active pick-up, microphone, etc.   

AUDIO OUT   

3.5mm audio output interface; connect to audio output device, e.g., loudspeaker, 

etc.    

AUDIO IN 

Line input interface for audio input.   

LAN 

10M/100/1000Mbps adaptive Ethernet interface.   

RESET 

Restore the factory default settings by holding the

 RESET

 button for more than 15 

seconds after power is turned on. 

RS-232, RS-485  RS-232 serial interface for configuration of device’s parameters or used as 

transparent channel; RS-485 serial interface for connection to pan/tilt unit, speed 

dome, etc. 

8 ALARM 

IN Relay 

alarm 

input. 

ALARM OUT 

Relay alarm output.   

10 

DC12V 

12V DC power supply. 

11 GND 

Grounding 


Содержание HER503 Series

Страница 1: ...Network Audio Video Encoder HER503 series Encoder Quick Operation Guide...

Страница 2: ...re should be within the range of 10 C 55 C 14 F 131 F 8 Environmental humidity should be within the range of 10 90 Hard Disk Installation not for HER503 Series This section is applicable to SATA model...

Страница 3: ...ssories box Plug one end of the data line to the circuit board and the other end to the data line port of HDD Connect the power cord to HDD in the same way Replace the cover and then tighten the screw...

Страница 4: ...e g loudspeaker etc 5 microSD microSD interface for data storage 6 Reset Restore the factory default settings by holding the RESET button for more than 15 seconds after power is turned on HER503 4 Des...

Страница 5: ...ansmitting receiving 3 Blinks at higher frequency when the data for transmitting receiving is larger HER503 16 Description of front panel Indicator Description 1 POWER Lights in red when the device is...

Страница 6: ...nterface PoE The right LED indicator lights in green when the network cable is connected and the left LED indicator blinks in orange when data is transmitting receiving 4 DC12V 12V DC power supply 5 G...

Страница 7: ...terfaces on the rear panel Description of rear panel Item Description 1 VIDEO IN BNC connectors for video input 2 LINE IN 3 5mm two way audio input interface connect to active pick up microphone etc 3...

Страница 8: ...t interface for audio input 5 LAN 10M 100 1000Mbps adaptive Ethernet interface 6 RESET Restore the factory default settings by holding the RESET button for more than 15 seconds after power is turned o...

Страница 9: ...te 64 Kbps Dual Stream Support Stream Type Video Video Audio Data storage Type NAS iSCSI IPSAN microSD NAS iSCSI IPSAN Capacity Up to 4 TB capacity for each disk and 32G for microSD storage External i...

Страница 10: ...nd other parameters of the device Note For the first time user the default user name of HER503Series is admin and password is 12345 And the default IP address is 192 0 0 64 Searching Online Devices z...

Страница 11: ...panel Modifying Network Parameters Steps 1 Select the device to be modified in the device list and the network parameters of the device will be displayed in the Modify Network Parameters panel on the...

Страница 12: ...input the IP address port number default 8000 login user name default admin and password default 12345 of the device Note If you check the Private Domain Mode checkbox you can add the device by IP se...

Страница 13: ...iew mode e g capture picture start stop recording two way audio PTZ control with PTZ camera connected to the encoder digital zoom open close audio play back video files etc Note Please refer to the Us...

Страница 14: ...he system will use the HTTPS login mode e g https 192 0 0 64 by default when you input the IP address You can also input http IP address index asp e g http 192 0 0 64 index asp if you want to use HTTP...

Страница 15: ...encoder is connected with the camera dome which supports PTZ function Connect the R and R terminals of the pan tilt unit or speed dome to RS 485 T and RS 485 T terminals of the HER503 series respecti...

Страница 16: ...the first time to use Two recording types can be configured Manual and Scheduled The following section introduces the configuration of scheduled recording Steps 1 Click Remote Configuration Camera Set...

Страница 17: ...be Normal Motion Alarm Motion Alarm and Motion Alarm 3 Check the checkbox of Select All and click Copy to copy settings of this day to the whole week You can also check any of the checkboxes before th...

Страница 18: ...Operation Select window division mode Play Pause Stop playing Slow forward Fast forward Play by single frame Stop all channels from playing Capture pictures in playback mode Download video files Start...

Страница 19: ...network disk has been initialized for the first time to use Steps 1 Click Log on the menu bar to enter the Log interface 2 Set the log search conditions to refine your search including the Major Type...

Отзывы: