background image

CASE ASSEMBLY

INSTALLING THE BATTERIES / INTRODUCTION TO MOUNTING

Installing the Batteries

1.

With a #2 Phillips screwdriver, remove both
screws located on either side of the battery door.

2.

Insert the 8 AA batteries (not included) into
the case as shown on the diagram inside the
battery compartment.

Note: It is recommended that only high
quality alkaline batteries be used.

3.

Before reattaching the battery door, make
sure the silicon gasket is still in place. It
should be just above with the plastic, and
completely in the gasket channel. Make sure
that the gasket is clean of debris.

4.

Reattach the battery door to the case using a
#2 Phillips screwdriver. Partially insert one
screw and then the other. Fully seat the
screws.
Hand tighten only; do not use power tools.

5.

Under normal use you should expect the life of the batteries to last 25 hours with
the LCD backlights on, to 60 hours with the backlights off.

INTRODUCTION TO MOUNTING

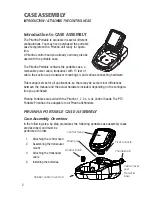
Once your Piranha Portable is fully assembled, (see the
Piranha Portable Case Assembly section for more informa-
tion) it takes just a few easy steps before you are ready to
fish, namely:

1.

Mounting the Transducer

2.

Mounting the Case.

Mounting the Transducer

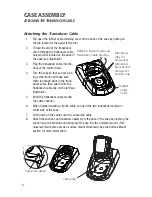
1.

Detach the transducer suction cup mount from the
back of the case.

2.

Unwind the desired amount of cable needed for the fishing platform and then clip
cable on one of the two indentions located on either side.

3.

Attach the suction cup to the back of the hull next to the motor. Make sure to keep
the transducer at least 20 inches away from the motor.

5

³⁄₁₆

Hull

Top View of
Battery layout

Enlarged view of battery layout

Polarity shows top of battery as

viewed with the battery installed.

Содержание Piranha Portable

Страница 1: ...P O R T A B L E USER S GUIDE ...

Страница 2: ...in order to get full benefit from all the features and uses of your Humminbird Piranha product WARNING This device should not be used as a navigational aid to prevent colli sion grounding boat damage or personal injury When the boat is moving water depth may change too quickly to allow time for you to react Always operate the boat at very slow speeds if you suspect shallow water or submerged objec...

Страница 3: ...taching the Transducer Cable 4 Installing the Batteries 5 Section 2 MOUNTING 5 Mounting the Transducer 5 Mounting the Case 6 Surface Mount 6 Nylon Web Strap 7 Removing the Case after Use 7 Section 3 MAINTENANCE AND WARRANTY 8 Maintenance 8 Replacing the Battery Power Cable 8 Warranty 9 Service Policy 10 Section 4 SPECIFICATIONS 11 pn531128 1 r30221F ...

Страница 4: ...ves for all applications so there may be some minor differences between the manual and the actual hardware included depending on the configura tion you purchased Piranha Portables are sold with the Piranha 1 2 2x 4 4x Control heads The PTC Portable Piranha kit is adaptable to all Piranha fishfinders PIRANHA PORTABLE CASE ASSEMBLY Case Assembly Overview In the following step by step procedures the ...

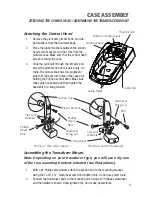
Страница 5: ...he Transducer Mount Note Depending on your transducer type you will use only one of the two mounting brackets included see illustrations 1 With a 2 Phillips screwdriver attach the suction cup to the mounting bracket using the 20 x machine screw Hand tighten only do not use power tools 2 Connect the transducer body to the mounting arm using a 2 Phillips screwdriver and the hardware shown Hand tight...

Страница 6: ...h it into the transducer cable clip on the left see illustration 5 Wind the transducer cable around the cable channel 6 When finished winding clip the cable on one of the two indentions located on either side of the case 7 Push down on the cable cover to conceal the cable 8 Attach the suction cup transducer assembly to the back of the case by pinching the suction cup on both sides and allowing it ...

Страница 7: ...only do not use power tools 5 Under normal use you should expect the life of the batteries to last 25 hours with the LCD backlights on to 60 hours with the backlights off INTRODUCTION TO MOUNTING Once your Piranha Portable is fully assembled see the Piranha Portable Case Assembly section for more informa tion it takes just a few easy steps before you are ready to fish namely 1 Mounting the Transdu...

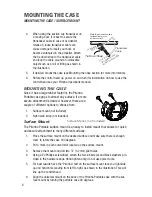
Страница 8: ...not included 2 Nylon web strap not included Surface Mount The Piranha Portable surface mount is an easy to install mount that allows for quick and secure attachment to many different surfaces 1 Place the surface mount on the desired surface and make sure there is enough room to rotate the case 180 degrees 2 Put a mark in each curved slot located on the surface mount 3 Remove the mount and drill tw...

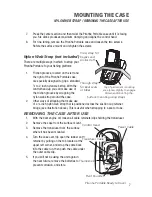
Страница 9: ...inch nylon web strap that is positioned across the suction cup retainer bridge see illustration above This is useful when strapping to a seat or tube REMOVING THE CASE AFTER USE 1 With the boat engine off loosen all cable retainers clips holding the transducer 2 Remove the case from the surface mount 3 Remove the transducer from the surface where it has been mounted 4 Turn the case over flip open ...

Страница 10: ...the electronics Repairs should be performed only by authorized Humminbird technicians Replacing the Battery Power Cable Note You will not have to install the battery power cable before first use but may need to replace it should it become corroded after prolonged usage in a marine environment 1 Flip open the rubber cable cover retainer on the back of the case by pulling on the tab located at the u...

Страница 11: ... parts We will have no obligations under this warranty for any product which has been improperly installed has been used in an installation other than as recommended in our installation or operation instructions or specifications has failed or has been damaged due to an accident or abnormal operation including racing misuse or alterations outside our factory has been repaired or modified by entiti...

Страница 12: ...ay are usually shipped by Wednesday units received Monday are usually shipped by Thursday etc We reserve the right to deem any product unserviceable when replacement parts are no longer rea sonably available or impossible to obtain After the original warranty period a standard flat rate service charge will be assessed for each repair physical damage and missing parts are not included Please call o...

Страница 13: ...IONS SPECCIFICATIONS Portable Case 9 H x 6 W x 5 D 248mm H x 159mm W x 127mm D Power Requirement Eight AA 1 5 volt alkaline batteries Not included Mounting Versatile options from quick disconnect to web strap 11 ...

Страница 14: ......
Отзывы: