background image

Hughes Model HIRD-E86 Platinum HD Receiver

Page 7-12

Set Channel

Using the  ,  ,  , and   keys, highlight one of the nine channel boxes. You can enter the desired 
channel using the number keys on the remote control or by using the

and

 keys. Pressing 

 while highlighting one of the channel boxes will also initiate a pop-up panel that will 

allow you to set the channel using the   and   keys on the remote control or the HD receiver’s 
front panel.

Installation

Highlighting the 

Installation

 button on the 

SETUP

 screen takes you to the 

INSTALLATION


screen, which contains utilities to facilitate installation of your satellite dish antenna. You can 
also evaluate your system’s signal strength via the 

INSTALLATION

 screen. This screen was 

discussed in detail in Chapter 4, “Setting Up the Satellite Dish Antenna and Terrestrial Inputs.”

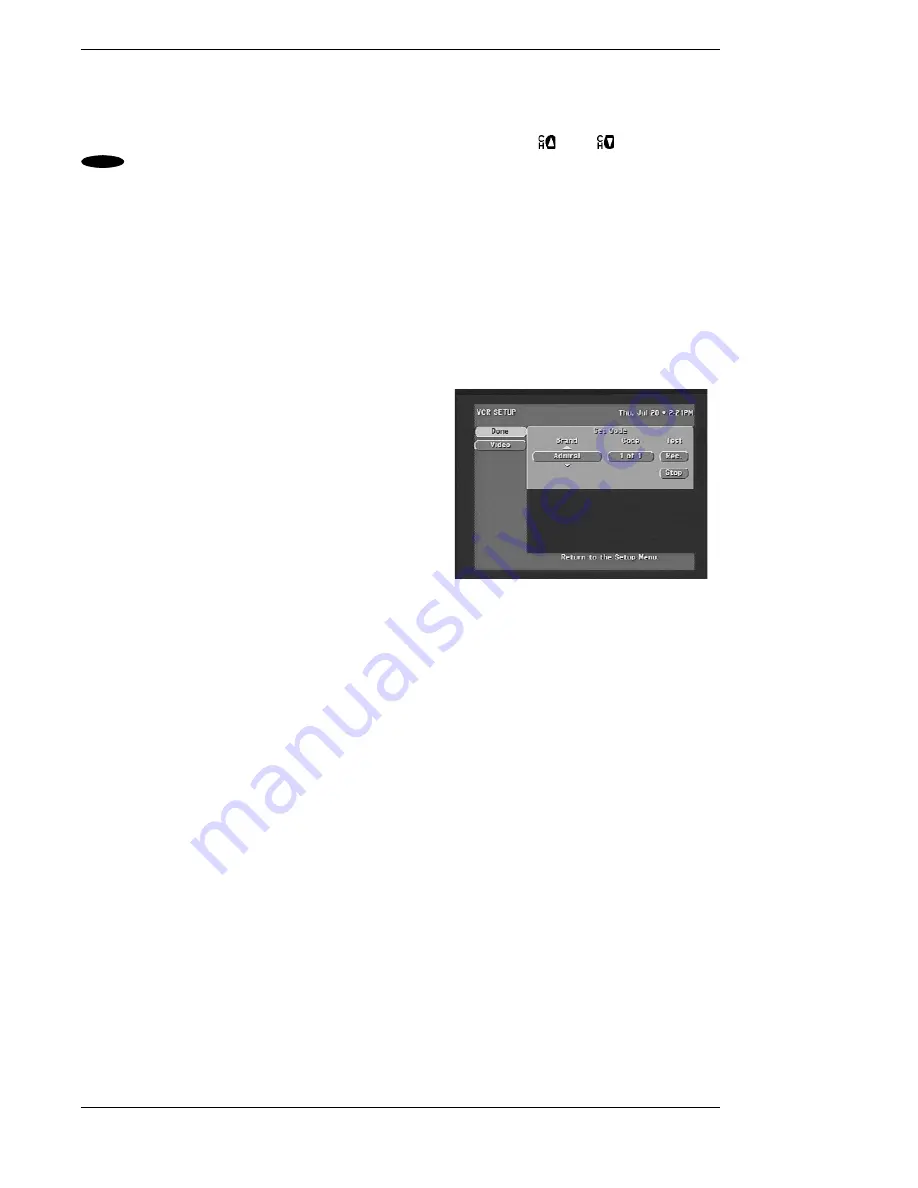
VCR Setup 

The 

VCR SETUP

 screen provides access to the 

settings that will allow the HD receiver to 
communicate the record and stop commands to your 
VCR.

Brand

Using the   and   keys, search through the various 
brands of VCRs that are supported. Related brands 
that share the same control codes may be suggested. 
You may want to experiment with these if you are 
having difficulty finding a functioning code under 
your VCR’s own brand name.

Code

More than one code may be assigned to your brand of VCR. Try each of the codes by using the   
and   keys to step through each code. Alternate between this procedure and testing the code.

Test (Record/Stop)

The testing function allows you to verify that the specified code will control your VCR. To run 
the test, the VCR control cable must be properly attached (see “Setting Up Your HD Receiver” in 
Chapter 2), a recordable tape must be in the VCR, and the VCR must be turned on.

Use the button on the front panel of the HD receiver (instead of the remote control) when testing 
the codes, because signals coming from the remote control at the same time as signals coming 
from the VCR control cable could give unreliable test results.

Be sure to test both the 

Record

 and the 

Stop

 commands, which are necessary for successful taping 

capability. If either 

Record

 or 

Stop

 fails to function, try other codes associated with your VCR 

brand. If you are unsuccessful in the test process after trying all available codes, recheck your 
VCR control cable connections and IR emitter placement.

When a scheduled recording begins or a command to the HD receiver to start a recording, the 
user must manually switch to the SD outputs (480i). The HD output (1080i) will turn off. To view 
the picture during the recording time, change the input on your TV to the SD input.

SELECT

The VCR SETUP screen

Содержание DirecTV HIRD-E86

Страница 1: ...Model HIRD E 8 6 Platinum HD High Definition Receiver Owner s Manual ...

Страница 2: ...nts and other intellectual property rights The anticopy process is licensed for noncommercial home use only Reverse engineering or disassembly is prohibited Dolby Information Manufactured under license from Dolby Laboratories Dolby and the double D symbol are trademarks of Dolby Laboratories Confidential unpublished works 1992 2000 Dolby Laboratories All rights reserved Note on Recording Programmi...

Страница 3: ...RE DEFINITIONS FOR ALERTS USED IN THIS MANUAL WARNING or CAUTION Where you see this alert symbol and the WARNING or CAUTION heading strictly follow the warn ing instructions to avoid personal injury DANGER Electric shock hazard Where you see this symbol and the DANGER heading strictly fol low the warning instructions to avoid electric shock injury THESE ALERTS APPEAR IN THIS MANUAL DANGER To reduc...

Страница 4: ...National Electric Code NEC and in particular Article 810 15 which covers proper installation and grounding of television receiving equipment as well as to Article 820 33 which specifies that the satellite dish antenna cable ground shall be connected to the grounding system of the building as close to the point of cable entry as practical These codes require proper grounding of the metal structure ...

Страница 5: ...y kind on the HD receiver No objects filled with liquids such as vases shall be placed on the apparatus Servicing Do not attempt to service this HD receiver yourself as opening or removing covers may expose you to dangerous voltage or other hazards There are no user serviceable parts inside Refer all servicing to qualified service personnel Conditions Requiring Service Unplug the HD receiver from ...

Страница 6: ...equipment complies with Part 68 of the FCC rules On the modem card is a label that contains among other information the FCC Registration Number and Ringer Equivalence Number REN for this equipment If requested this information must be provided to the Telephone Company The REN is used to determine the quantity of devices which may be connected to the telephone line An excessive number of REN s on t...

Страница 7: ...tallation 2 16 Controlling the HD Receiver 3 1 Front Panel vs Remote Control Keys 3 1 Basic Navigation 3 1 Setting Up the Satellite Dish Antenna and Terrestrial Inputs 4 1 Installing and Testing the Satellite Dish Antenna 4 1 Displaying the INSTALLATION Screen 4 2 Selecting the Correct Type of Satellite Dish Antenna 4 2 Dish Type Selections 4 2 Finding the Correct Antenna pointing Coordinates 4 3 ...

Страница 8: ...ted Programs 6 10 HD Receiver s Menu System 7 1 Menu Overview 7 1 Main Menu 7 2 Guide 7 2 Video 7 2 Setup Menu 7 2 Done 7 2 Video 7 2 Preferences 7 3 Done 7 3 Video 7 3 Advanced 7 3 Preference Options 7 3 Channel Tags 7 3 Scheme 7 3 Filters 7 4 Translucency 7 4 Advanced Preferences 7 4 Done 7 4 Video 7 4 Advanced Preference Options 7 4 Receiver ID 7 4 Channel Lock 7 5 Factory Defaults 7 5 Audio Vi...

Страница 9: ...Help 7 17 Lock Unlock 7 18 Locking Procedure 7 18 Unlocking Procedure 7 18 Temporarily Overriding the Lock 7 19 Programming Your Remote Control 8 1 Programming the Remote Control 8 1 Programming Mode 8 1 Code Scan 8 1 Code Entry 8 2 Using the Remote Control 8 5 Changing the Remote Control Address to Operate Other HD Receivers 8 5 Identifying Codes That Have Been Stored 8 5 Controlling Other Compon...

Страница 10: ......

Страница 11: ... a sophisticated technical product and an easy to operate source of entertainment You should complete the following steps to achieve the greatest performance from your system Read this manual to familiarize yourself with the system Install the HD receiver Connect the terrestrial antenna or cable for local analog and digital channels Install the DIRECTV PLUS antenna and cables Professional installa...

Страница 12: ...ving network shown Television stations film studios and other broadcasters send signals to earthbound terrestrial broadcasting towers and satellites The tower shown on the right is sending Digital ATSC format signals and the more traditional Analog NTSC format signals Both ATSC and NTSC signals can be received by the same VHF UHF antenna normally mounted on a roof or in an attic The satellites sho...

Страница 13: ...mately 18 inches high by 24 inches wide A Low Noise Block LNB Down Converter assembly is attached to the satellite dish antenna at the end of a tubular arm Your assembly provides for receiving signals from multiple satellite orbit locations and distributing the signal to the HD receiver and up to 3 more DIRECTV digital satellite receivers through the use of a multiswitch not shown The mounting bra...

Страница 14: ...ff The power light will illuminate when the unit is on The information key is used to display descriptions of programs and channels on your TV screen Pressing the key on the front panel will display the on screen guide where you can see a listing of all available programs If the key is pressed while the program guide is already displayed the Guide Pop Up menu will be displayed The Guide Pop Up men...

Страница 15: ...finition HD monitor set to achieve highest quality video images The output format is always 1080i The phono type AUDIO output jacks labeled and color coded L is white and R is red to indicate Left and Right can be used for connection to your TV VCR or audio system The phono type composite VIDEO output jack is color coded yellow and provides SD video signals You may use this jack for connection to ...

Страница 16: ...ou intend to control This is important since many devices share the same keys such as the key and the numeric keys You must press the appropriate device key before pressing a command key to make sure the remote control sends the right signal to the right device The only keys that deviate from this rule are the blue keys as they are always associated with the HD receiver For the HD receiver only th...

Страница 17: ...screen guide to sports only NEWS Filters the on screen guide to news only ALPHA Select channel by call sign HD SD Switches the output of the HD receiver between HD and SD Also switches between the DTV HD input and INPUT 2 SD on Mitsubishi HD upgradeable TVs Changes display between FULL CROPPED and LETTERBOX or SIDE PANELS Pressing this sequence a second time will undo the respective filter HD form...

Страница 18: ...unsnap the battery cover from the back of the remote control Install each fresh battery as shown making sure that the and on each battery line up with the marks in the battery compartment Next snap the cover back onto the remote control Refer to Programming Your Remote Control in Chapter 8 for setting the codes to control the devices in your entertainment system Battery installation ...

Страница 19: ... it to your television or entertainment system The carton includes the HD receiver with DIRECTV PLUS receiver built in an access card already installed in the HD receiver behind the door an RF IR remote control batteries included RF remote control receiver cables and the Owner s Manual You now need to decide where you want to place the HD receiver Choose a location near your TV where the power cor...

Страница 20: ...ectors and or cables from your dealer or electronic hardware store Choose which hookup method to use based on The capabilities of your TV and VCR Your desire to receive local terrestrial analog and or digital programming through the HD receiver Any other devices you want to include in the system stereo second VCR etc Before attempting to connect anything position yourself so you are looking at the...

Страница 21: ...Cable from the satellite dish antenna to the power pass input of the Diplexer Connect the output of the Diplexer to the back of the HD receiver at the connector marked SATELLITE IN Note It is very important that you use a Diplexer that is designed to combine satellite signals and terrestrial signals Standard signal combiners are not compatible 2 Connect the cable from your terrestrial antenna or c...

Страница 22: ...ections marked Y Pr and Pb Note Connect the Y Pr and Pb connectors of the HD receiver only to the Y Pr and Pb connectors on your TV that are compatible with HD signals in the 1080i scanning rate and that comply with the EIA 770 3 signal standards Refer to your television owner s guide for verification 3 Connect one set of audio cables one white left audio connector and one red right audio connecto...

Страница 23: ...ith Terrestrial Antenna or Cable Service on page 2 3 2 Connect one set of Component Video Cables one green Y connector one red Pr connec tor and one blue Pb connector to the back of the HD receiver using the connections marked Y Pr and Pb Connect the other ends of this cable to the back of the HDTV monitor using the HDTV input connections marked Y Pr and Pb Note Connect the Y Pr and Pb connectors ...

Страница 24: ... HD receiver signals converted to standard 480i signals to your VCR so they can be recorded You can see the playback of a video tape by selecting this input on your TV You can also pass HD receiver signals converted to standard 480i through your VCR to your TV however you may need to turn on your VCR to pass these signals When the HD receiver is converting all signals to standard 480i signals that...

Страница 25: ...Setting Up Your HD Receiver Page 2 7 ...

Страница 26: ...of the TV making sure to pair the S VIDEO input with the previously used audio inputs If you use an S video cable you will not need to use the yellow video cable 3 Optional If the TV does not have AUDIO and VIDEO input connectors then connect one end of a coaxial RF cable to the OUT TO TV connector on the back of the HD receiver Connect the other end of the coaxial RF cable to the antenna input co...

Страница 27: ...ne white left audio connector and one red right audio connector to the back of the HD receiver using the connectors marked AUDIO L R and VIDEO Connect the other end of the Audio and Video cables to the back of the TV monitor using the AUDIO and VIDEO input connectors Optional For better performance if your TV has an S VIDEO input then use an S Video cable instead of a standard yellow Video cable 3...

Страница 28: ...e back of the VCR and connect the other end of this cable to the ANTENNA or VHF input connector on the back of the TV Set the CH3 CH4 switch on the HD receiver to the channel not used in your area This is the channel you will select on your TV to view the HD receiver Note If you have connected a VCR into your entertainment system in a way that routes the cables from the HD receiver to your VCR bef...

Страница 29: ...Setting Up Your HD Receiver Page 2 11 ...

Страница 30: ... AUDIO OUT Connect the other end of this cable to the optical input on the back of your Dolby Digital receiver or decoder 2 Check the Owner s Guide for the Dolby Digital receiver or decoder for proper set up and operation AUDIO IN FROMANT CH 3 CH 4 OUT TOTV VIDEO VIDEO VCR CONTROL REMOTE PHONE JACK SATELLITE IN RF DIGITAL AUDIO OUT S VIDEO L Y L R R AUDIO Pr Pb HD receiver Home theater Amplifier w...

Страница 31: ...ill have to replace one set of the AUDIO L R connections as shown below Finishing Up You can mix and match the different hookups described herein to suit your entertainment system s available connections For example you can connect the VCR using audio video cables while the TV is connected with the RF signal using a coaxial RF cable Always try to achieve the highest quality audio and video and gre...

Страница 32: ...y on and off Once the VCR responds to pressing the key on the remote control note the posi tion of the remote control This should indicate the location of the VCR remote control sensor Once the sensor position has been determined temporarily attach the emitter to the area with a piece of tape until the system can be tested Refer to the VCR Setup subsection in Chapter 7 HD Receiver s Menu System to...

Страница 33: ...er s conversations See Chapter 7 HD Receiver s Menu System Advanced Preferences Receiver ID for instructions on changing the remote control address for the HD receiver See Chapter 8 Programming Your Remote Control Using the Remote Control for instructions on changing the remote control address Now You Can Turn It On Once you have connected everything you can begin powering up the components Turn t...

Страница 34: ...atellite dish antenna or local area antenna or cable system inputs are not yet installed highlighting the Installation button and pressing the key on the remote control will display the INSTALLATION screen Read Chapter 4 for installation and testing instructions If the satellite is properly pointed the program guide is loaded when power is applied You can exit out of this start up process but you ...

Страница 35: ...er front panel represent the direction keys On the remote control the direction keys are represented by the top bottom left and right keys surrounding the key These keys are primarily used to move the highlight also known as a cursor around the screen Press the key to activate a highlighted item Another key you will be using frequently is the key located on both the front panel of the HD receiver ...

Страница 36: ...System you can use the key to cycle through them quickly and easily Each press of the key will advance to the next list of channels After stepping through the favorite lists it will cycle back to All Channels At any time you can exit the on screen guide by selecting Video in the Guide pop up menu An even faster way is to press the key The key also clears all inputs and menus and returns to the pro...

Страница 37: ...kaged with the satellite dish antenna Your satellite dish antenna will need to be pointed at a satellite cluster located 22 300 miles in orbit above the equator To aim the satellite dish antenna at the satellites you need to know the azimuth elevation and tilt angles The HD receiver will assist you in determining these angles Set up of the satellite dish antenna and terrestrial inputs will be expl...

Страница 38: ...inates for pointing the dish antenna Highlighting the Dish Setup button on the INSTALLATION screen and pressing the key on the remote control will display the DISH SETUP screen Highlighting the Dish Type button on the DISH SETUP screen and pressing the key on the remote control will display the DISH TYPE pop up menu Press the and keys to highlight the type of dish antenna that is connected to the ...

Страница 39: ...ghting a selection button as explained immediately above and pressing the key on the remote control will confirm the selection and return to the DISH SETUP screen Finding the Correct Antenna pointing Coordinates The POSITION pop up menu will provide you with the correct coordinates to point your dish antenna This is important to receive all of the channels you are entitled to when you subscribe to...

Страница 40: ...he higher the number the greater the amount of the bar graph occupied or the faster the beeping tone the stronger the signal You should test the signals from each of the satellites that match the type of dish that you selected on the DISH TYPE screen Highlighting the Source button on the INSTALLATION screen and pressing the key on the remote control will display the Signal Source pop up menu shown...

Страница 41: ... receiver The SYSTEM TEST Menu offers the following options Begin Test Starts the receiver test which provides basic status information about the receiver The test may take up to one minute Cable Test Tests and displays indicators of all transponder signals from the satellite chosen by the Source pop up menu Upgrade Checks the status of software upgrades that DIRECTV periodically performs Highligh...

Страница 42: ...f the dish antenna you will need to select a satellite on the Source pop up menu Then select one or more transponders from that satellite by using the XPONDER pop up menu Once the pointing of the dish antenna has been fine tuned to receive a strong signal from Satellite A 101 and Satellite B 119 the pointing of the dish antenna at Satellite C 110 should be correct Selecting Transponders The XPONDE...

Страница 43: ...tton if you connected the jack labeled SATELLITE IN and used a Diplexer to combine your terrestrial antenna cable with the cable from the satellite dish antenna Then press the key on the remote control to display the Local In pop up menu On the Local In pop up menu use the and keys to highlight the buttons for the type of antenna or cable you connected to the HD receiver and then press the key on ...

Страница 44: ...tal channel by physical Channel Number not by virtual Channel Number The physical Channel Number is the channel number that the FCC uses to identify the channel frequency and it is a one digit or two digit number The virtual Channel Number is the number that a local broadcast station wishes to use to identify itself For instance if the number for your local CBS analog channel is 2 Channel 2 then t...

Страница 45: ... antenna to the jack labeled SATELLITE IN Then press the key on the remote control to display the Local In pop up menu On the Local In pop up menu use the and keys to highlight the buttons for the type of connection made to the HD receiver and then press the key on the remote control Local In Connection Options The connection options found on the Local In 1 and Local In 2 pop up menus are None You...

Страница 46: ...e control will display the DISH SETUP screen Highlighting the Dish Type button on the DISH SETUP screen and pressing the key on the remote control will display the DISH TYPE pop up menu Using the and keys highlight dish type None and press the key Editing Local Channels To remove or add local NTSC analog and ATSC digital channels in the channel list use the and keys to highlight the specific chann...

Страница 47: ...antenna has not been connected will be listed by a single or double digit Channel Number followed by a hyphen and a Sub channel Number of 1 or greater for examples 23 1 or 23 2 The main Channel Number can be either the physical Channel Number assigned to the broadcast frequency by the FCC or a virtual Channel Number assigned by the broadcast station The type of number physical or virtual depends o...

Страница 48: ...hange right away press the key on the remote control to instruct the HD receiver that you have finished entering channel number digits You can enter the number for any channel that you wish To select a terrestrial ATSC digital channel enter the main channel number followed by the hyphen key then the sub channel number and then press the key on the remote control Channel Banner Every time you selec...

Страница 49: ...rboTune feature provides access to nine of your preferred channels on top of the current video The TurboTune panel is displayed by pressing the remote control key while watching the video as long as there are no messages prompting you to press for some other purpose TurboTune is also accessible from the front panel key The TurboTune panel displays nine channel tags These channels can be specified ...

Страница 50: ...e data and time in the Channel Banner or on the on screen guide To use these services when available press the key and key on the remote control one after the other The Alternate Services banner shown at the right will appear at the bottom of the screen Audio Once you have selected the Audio button you can use the and keys to step through the audio tracks offered for the current program To choose ...

Страница 51: ...s include the PROGRAM GUIDE SM CELL PROGRAM GUIDE LG CELL and LOGO GUIDE Each guide can be filtered into smaller channel groupings as specified in your personalized favorite Channel Lists You can also reduce the displayed listing by specifying a Theme of interest and then narrow the offerings further by specifying a type within the Theme Additional settings such as Guide Times and Channel List may...

Страница 52: ...ram you were viewing Choosing the Guide Style To display the on screen guides press the key Press the key again to display or remove the guide pop up menu To choose a guide style simply highlight the Guide Style button and press A pop up menu shown at right offering each of the guide styles will be displayed Highlight your selection and press the key The guide will be redrawn to display your selec...

Страница 53: ...menu the tags may display the channel numbers or call signs This will dictate whether the channels are listed by channel number or alphabetically by call sign To navigate the guide use the and keys on the remote control You can continue to press the or keys on the remote control to scroll more program information on the screen Pressing the key on the remote control while highlighting any title wil...

Страница 54: ... will dictate whether the channels are listed by channel number or alphabetically by call sign To navigate the guide use the and keys on the remote control You can continue to press the or keys on the remote control to scroll more program information on the screen Pressing the key on the remote control while highlighting any title will display the INFORMATION screen Use the and keys on the remote ...

Страница 55: ...times the description may be only a message describing what type of program is highlighted such as Current News This option is chosen via the Descriptions button on the guide pop up menu Displaying the extra information reduces the number of channels or titles that can be displayed at one time Remember that you can always access program descriptions by pressing the key whether or not the Descripti...

Страница 56: ... remote control by pressing followed by a number key You will see labels on the remote control for filtering the guide to movies sports news and all Press for movies for sports or for news and the guide will filter accordingly Pressing the key sequence a second time or pressing will restore the guide to show all themes Channel List The Lists pop up menu enables you to filter the guide to display o...

Страница 57: ...e a search word If CAGNEY and ALIEN were specified the CAGNEY search word might find movies in which James Cagney performed as well as the TV series Cagney and Lacey The ALIEN search word might find the movie Aliens as well as any program which includes the word alien in the description Partial words work as well Entering the desired words is easy using the pop up keyboard You can highlight the de...

Страница 58: ...ess the button on the remote control to display the INFORMATION screen shown here If you are highlighting a Channel Tag in the channel column of the PROGRAM GUIDE screen press the button on the remote control to display a modified INFORMATION screen Information about the Channel Tag and Call Sign will be displayed Done Highlighting the Done button on the screen and pressing the key on the remote c...

Страница 59: ...To View however if you have connected your VCR to the HD receiver via the IR cable and have properly set the VCR code from the Setup Menu the chosen program will be recorded at the correct time If the HD receiver turned itself on to record the program it will also remember to turn itself back off after the program ends Programs you have scheduled for taping will be identified with a videotape icon...

Страница 60: ... taping the output of the HD receiver should manually be switched by the user to SD standard 480i when recording starts Attach the VCR Control cable See Chapter 2 Setting Up Your Satellite Receiver Use the VCR SETUP screen See Chapter 7 HD Receiver s Menu System Switch the HD receiver to SD 480i output mode Set your VCR to match the output of the HD receiver This could be either RF channel 3 or 4 ...

Страница 61: ...i cated to providing a brief explanation of the currently highlighted on screen button Places to go Down the left hand edge of the screen are a variety of buttons These but tons usually navigate you to different screens The top two buttons on the list are always Done and Video The Done button will take you back one level The Video button will return you to the most recently watched channel This bu...

Страница 62: ...de A quicker way to access the on screen guide from the MAIN MENU or any other menu is by pressing the key either on the remote control or on the HD receiver s front panel The remaining buttons provide access to those features described in greater detail in this chapter Video Highlighting the Video button on the screen and pressing the key on the remote control will return you to the last program ...

Страница 63: ...dditional preference options which are described under Advanced Preferences on the next page Preference Options The right hand panel shows a list of Option buttons and current settings that relate to the look of menus and guides These are Chan Channel Tags Scheme Filters and Translucency Channel Tags With the Chan Tags Channel Tags option you can select the Channel Tags that are displayed on the P...

Страница 64: ...ce settings to the factory default settings Done Highlighting the Done button on the screen and pressing the key on the remote control causes an exit from the ADVANCED PREFERENCES screen and a return to the PREFERENCES screen Video Highlighting the Video button on the screen and pressing the key on the remote control will return you to the last program you were viewing Advanced Preference Options ...

Страница 65: ... track for programs you watch While English is the default language you may choose an alternate language If your chosen language is available for the program you will hear that language Otherwise you will hear the primary language in which the program was produced Dolby Digital The Dolby Digital option lets you turn the Dolby Digital output On or Off This setting affects the optical DIGITAL AUDIO ...

Страница 66: ...cting your type of monitor or television Screen Ratio The Screen Ratio menu option lets you specify the aspect ratio of your monitor or television so that video programming can be properly displayed Select 4 3 standard or 16 9 widescreen Image Shape This button allows you to select the image of the video displayed on your television These display options can also be accessed from the remote contro...

Страница 67: ...anels The 4 3 image fills the screen vertically and is centered horizontally You will see gray bars on the left and right of the 4 3 image No image content is lost but the horizontal resolution is reduced Note If you are using a 16 9 television or monitor and receiving a 16 9 image the Image Shape setting will have no effect Limits Highlighting the Limits button on the SETUP screen and pressing th...

Страница 68: ...g and content themes listed in the menu The table on the next page provides more detail about the ratings Rating Description TV MA Mature Audience Only Specifically designed to be viewed by adults and may be unsuitable for children under 17 It contains one or more of the following content themes crude indecent language L explicit sexual activity S or graphic violence V TV 14 Parents Strongly Cauti...

Страница 69: ...ogram suitable for all ages It contains little or no sexual dialogue D no strong language L or sexual situations S and little or no violence V TV Y7 Directed to Children seven years and older Designed for children ages seven and above More appropriate for children who have acquired the developmental skills needed to distinguish between make believe and reality Themes and elements in this program m...

Страница 70: ...eo AutoSet Rename Clear and Set which are explained below Done Highlighting the Done button on the screen and pressing the key on the remote control causes an exit from the CHANNEL LISTS screen and a return to the SETUP screen Video Highlighting the Video button on the screen and pressing the key on the remote control will return you to the last program you were viewing AutoSet AutoSet is designed...

Страница 71: ...ark which indicates that the channel in that row is included in the list shown at the top of the column To help you decide whether to include or exclude a certain channel the title of the currently airing program for that channel will appear at the top of the screen Locking and unlocking the HD receiver is described later in this chapter When the system is locked the passcode will be needed to mod...

Страница 72: ...ioning code under your VCR s own brand name Code More than one code may be assigned to your brand of VCR Try each of the codes by using the and keys to step through each code Alternate between this procedure and testing the code Test Record Stop The testing function allows you to verify that the specified code will control your VCR To run the test the VCR control cable must be properly attached se...

Страница 73: ...umn permits entry of the duration in hours and minutes of the event The Freq Frequency column displays when or how often the event occurs Today Tomorrow Every Mon Tue and so on Everyday Mon Fri or to specify an exact date When using the PreSelect To Tape feature the following steps must be completed for the HD receiver to perform unattended recording Attach the VCR control cable as described in Ch...

Страница 74: ...keys you can specify when or how often the event occurs Your choices are Today Tomorrow Every Mon Every Tue Every Wed Every Thu Every Fri Every Sat Every Sun Everyday Mon Fri or to specify an exact date If you are specifying a date enter the numbers using the remote control in month day format The year will be set automatically Events can be scheduled up to eleven months in advance Once you have s...

Страница 75: ...ne Highlighting the Done button on the PURCHASES screen and pressing the key on the remote control causes an exit from the PURCHASES screen and a return to the MAIN MENU screen Video Highlighting the Video button on the PURCHASES screen and pressing the key on the remote control will return you to the last program you were viewing History Highlighting the History button on the PURCHASES screen and...

Страница 76: ...l the purchase If neither purchase option is of interest highlight the Don t Purchase button and press the key on the remote control Cancel Purchase Some events may allow cancellation after they have been purchased depending upon the event type and whether the event has been viewed Events that have been purchased but not yet viewed can usually be cancelled If the Cancel Purchase button is displaye...

Страница 77: ...e Highlighting the Done button on the screen and pressing the key on the remote control causes an exit from the Caller ID List screen and a return to the MAIN MENU screen Video Highlighting the Video button on the screen and pressing the key on the remote control will return you to the last program you were viewing Disable Highlighting the Disable button on the screen and pressing the key on the r...

Страница 78: ...reen After entering a four digit passcode highlight and select OK to proceed Otherwise choose Cancel to cancel the locking process If you continue you will be asked to confirm the code by entering it again in the same fashion as before Once again highlight and select OK to proceed Otherwise choose Cancel Once OK has been selected the HD receiver is locked You will need your passcode whenever you w...

Страница 79: ... the Lock There are times you may wish to temporarily remove the restrictions imposed by locking You can do this without unlocking the HD receiver You will be prompted by an on screen message when you have this option to override the lock When you press the OVERRIDE LOCK pop up will be displayed It looks and navigates just like the UNLOCK SYSTEM pop up panel Note Once the correct four digit passco...

Страница 80: ......

Страница 81: ...d While holding down the device key you are programming TV in this instance press the Mute key for one full second Then release the keys The device key should light and stay lit If it doesn t repeat the process If it does the remote control is now in programming mode Then choose either the code scan or code entry method as described below Code Scan Once you are in programming mode repeatedly press...

Страница 82: ...070 096 191 Fisher 007 057 Funal 028 043 Futuretech 043 GE 160 165 161 070 008 009 034 056 073 074 130 155 167 004 145 Goldstar 004 106 110 112 119 127 143 193 Hall Mark 004 Hitachi 011 004 009 010 012 023 075 143 007 072 Infinity 164 JBL 164 JCPenny 070 004 008 009 030 065 101 160 024 143 156 Jensen 013 JVC 038 001 083 034 KEC 043 Kenwood 070 001 Kloss 002 059 KMC 143 KTV 043 143 154 070 Kuehn 72...

Страница 83: ...010 014 031 034 053 072 139 134 MGA 045 046 059 Minolta 013 156 Mitsubishi 059 061 046 051 142 013 045 162 MTC 034 040 Multitech 024 034 NEC 012 023 043 048 039 Nordmende 043 Optonica 053 054 Panasonic 070 133 031 066 161 Pentax 013 031 063 156 Philco 031 034 067 Philips 031 067 034 101 054 071 Pilot 101 Pioneer 021 013 048 Portland 108 Quartz 002 014 Quasar 070 133 161 031 066 Radio Shack 123 RCA...

Страница 84: ...o 157 129 Samsung 068 Scott 180 190 Sharp 096 125 151 161 169 182 193 Sherwood 089 127 Sony 097 117 147 183 200 253 237 238 188 192 Soundstream 197 AUX AUDIO CODE NUMBER Starcom 141 Symphonic 124 Teac 102 159 180 062 Technics 131 184 187 200 202 208 165 Toshiba 175 Wards 163 Yamaha 092 120 166 240 125 169 216 Zenith 222 061 AUX LDP CODE NUMBER California Audio 047 Denon 043 044 Fisher 047 Kenwood ...

Страница 85: ...or Unit 8 Do not forget the two zeros when entering the receiver ID code number Remember to access the ADVANCED PREFERENCES screen using the keys on the front of the HD receiver to pair it with the remote refer to Chapter 7 Advanced Preferences for this procedure The other way to program your remote control to match your HD receiver is to scan for the correct code 1 Keep your remote control aimed ...

Страница 86: ...neously 2 Press the Volume Up key Once you perform these steps whenever your remote control is in AUX mode the volume keys will control the television volume In the event that you reprogram the AUX key to control a different component at some future time you can restore the remote control s capability to control the auxiliary component s volume by simply repeating these two steps Assigning a Devic...

Страница 87: ...al for specific instructions If you have already successfully programmed your remote control try pressing the appropriate device key to put your remote in the proper mode Then try controlling that device Also make sure that the batteries in the remote control are good Q Some channels look good while others freeze or indicate that no signal is available What s wrong A The most common causes for thi...

Страница 88: ...rding your equipment contact Hughes Network Systems Customer Care Center directly at 1 800 274 8995 If you would like call your dealer first They are most familiar with your installation and needs Also they are likely to be local to you If you need assistance with your subscription such as adding channels contact DIRECTV at 1 800 DIRECTV 1 800 347 3288 Q I thought I had set an event to record on m...

Страница 89: ...s nearby strikes acts of God cost of shipping to HNS batteries or cables after installation This limited warranty is not transferable and is valid only in the United States SERVICE If you have any questions or encounter any problems you may contact your authorized HNS dealer or call our Customer Care Center at 1 800 274 8995 To ensure prompt and efficient service please have your model and serial ...

Страница 90: ...Part 1029563 0001 Revision A ...

Отзывы: