


Chapter 4 • Installing a J-type radio assembly
36
1037312-0001 Revision B
Installing the radio
assembly
This section explains how to install the J-type radio assembly.
You must use the antenna kit indicated in Table 1 on page 8 for
the J-type radio assembly.
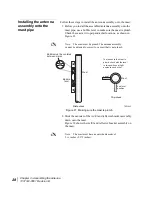
Attaching the upper
mounting bracket
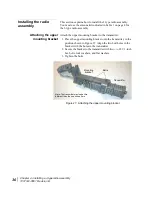
Attach the upper mounting bracket to the transmitter:
1. Place the upper mounting bracket onto the transmitter, in the
position shown in Figure 27. Align the two bolt holes in the
bracket with the holes in the transmitter.
2. Secure the bracket to the transmitter with two
5
/
16
-18
×
1-inch
hex bolts, lock washers, and flat washers.
3. Tighten the bolts.
Figure 27: Attaching the upper mounting bracket
Mounting
bracket
Transmitter
Bolts
Note: The transmitter may look a little
different than the one shown here.
Содержание AN6-098P
Страница 1: ...1037312 0001 Revision B October 21 2009 Installation Guide for 0 98 m Ku band Antenna Model AN6 098P ...
Страница 6: ... Contents vi 1037312 0001 Revision B ...
Страница 10: ... Tables x 1037312 0001 Revision B ...
Страница 22: ...Chapter 1 Overview 6 1037312 0001 Revision B ...
Страница 46: ...Chapter 3 Assembling the antenna 30 1037312 0001 Revision B ...
Страница 58: ...Chapter 4 Installing a J type radio assembly 42 1037312 0001 Revision B ...
Страница 72: ...Chapter 6 Cabling and connections 56 1037312 0001 Revision B ...
Страница 92: ...Chapter 7 Pointing the antenna 76 1037312 0001 Revision B ...
Страница 94: ... Acronyms and abbreviations 78 1037312 0001 Revision B ...
Страница 98: ... Index 82 1037312 0001 Revision B ...