


Pub. 42004-565B
TempSense Model TS100
Page
4
of 6
P:\Standard IOMs - Current Release\42004 Instr. Manuals\42004-565B.docx
03/21
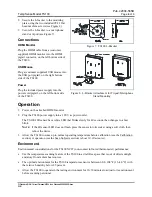
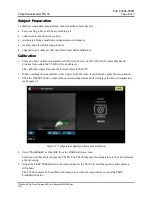
2.
Secure the L-bracket to the mounting
plate using the two included #8-32 flat
head machine screws (see Figure 8).
3.
Secure the L-bracket to a microphone
stand or tripod (see Figure 7).
Connections
HDMI Monitor
Plug the HDMI cable from a (customer
supplied) HDMI monitor into the HDMI
pigtail connector, on the left bottom side of
the TS100.
USB Mouse
Plug a (customer supplied) USB mouse into
the USB port pigtail, on the right bottom
side of the TS100.
Power
Plug the included power supply into the
power cord pigtail, on the left bottom side
of the TS100.
Operation
1.
Power on the attached HDMI monitor.
2.
Plug the TS100 power supply into a 120 V ac power outlet.
The TS100's IR sensor has a white LED that blinks slowly for 40 seconds, then changes to a fast
blink.
N
OTE
:
If the IR sensor LED does not flash, press the sensor into its socket using a soft cloth, then
reboot the device.
3.
Allow the TS100 to come up to normal operating temperature before calibration (see the Calibration
section) or operation (see the Scan Subjects section) (
about 10–30 minutes
).
Environment
Environmental considerations for the TS100 NCIT (non-contact infra-red thermometer) performance:
•
Use the temperature scanning feature of the TS100 in a draft-free space that is out of direct sunlight
and away from radiant heat sources.
•
The optimal environment for the TS100 temperature sensor is between 60.8–104 ºF (16–40 ºC) with
the relative humidity below 85 percent.
•
Allow the TS100 to operate in the testing environment for 10–30 minutes to adjust to its environment
before scanning personnel.
Figure 7. TS100 L-Bracket
Figure 8. L-Bracket Attachment for Tripod/Microphone
Stand Mounting