Pub. 42004-338K
Rugged Analog Auto-Dial Telephones
Page 7 of 21
P:\Standard IOMs - Current Release\42004 Instr. Manuals\42004-338K.docx
10/19
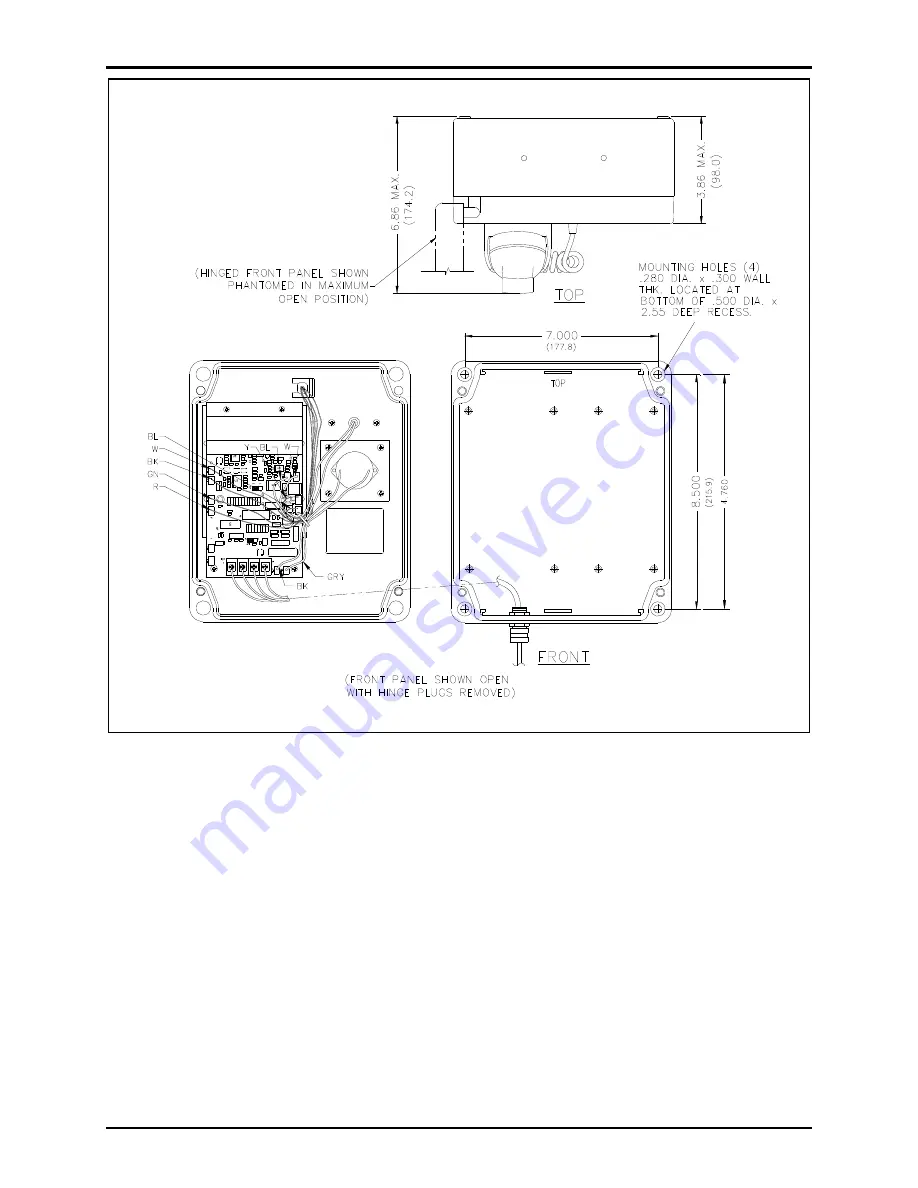
Figure 8. Model 247-001 Mounting Diagram
Страница 1: ...l 227 001 4 Model 247 001 6 Model 257 001 8 Model 277 001 10 Flush Mount Installation 10 Surface Mount Installation using a 236 00x Series or Model 238 001 Enclosure 11 Models 277 002BH and 277 002BHA...
Страница 2: ...e telephones are fully line powered and do not require internal batteries This manual applies to the following telephones Model 227 001 Public Access Auto dial Telephone Model 247 001 Indoor Industria...
Страница 3: ...cations unless the jack is specifically designed for wet locations Do not touch uninsulated telephone wires or terminals unless the telephone line has been disconnected at the network interface Securi...
Страница 4: ...nes Page 3 of 21 P Standard IOMs Current Release 42004 Instr Manuals 42004 338K docx 10 19 Figure 1 Bottom entry conduit installation details RECOMMENDED for non metallic enclosures Figure 2 Top entry...
Страница 5: ...re on the mounting surface and secure it with four fasteners The holes in the telephone enclosure accept 3 8 inch screws or bolts The Model 232 001 Pole Mounting Kit includes four 3 8 16 1 inch should...
Страница 6: ...42004 338K docx 10 19 9 Connect the telephone s modular cord to the incoming subscriber line with the appropriate connector 10 Verify operation by calling to and from another telephone 11 Replace the...
Страница 7: ...s Allow 8 10 inches of telephone cord to extend past the bushing 6 Tighten the bushing around the cord 7 Feed the free end of the telephone cord through the hole in the enclosure 8 Secure the bushing...
Страница 8: ...Pub 42004 338K Rugged Analog Auto Dial Telephones Page 7 of 21 P Standard IOMs Current Release 42004 Instr Manuals 42004 338K docx 10 19 Figure 8 Model 247 001 Mounting Diagram...
Страница 9: ...the bottom of the rear enclosure 7 Push the free end of the telephone cord through the gland bushing using needle nose pliers Allow 8 10 inches of telephone cord to extend past the bushing 8 Tighten...
Страница 10: ...Pub 42004 338K Rugged Analog Auto Dial Telephones Page 9 of 21 P Standard IOMs Current Release 42004 Instr Manuals 42004 338K docx 10 19 Figure 10 Model 257 001 Mounting Detail...
Страница 11: ...e line surge suppressor on the telephone line 3 Remove a tapered plug from a cable entry hole in the back box and install the customer supplied telephone line and cable fitting 4 Recommendation use si...
Страница 12: ...cess hole with gasket WARNING To prevent accidentally damaging equipment drill all holes before mounting the telephone 2 Outdoor Installations Install a customer supplied telephone line suppressor on...
Страница 13: ...H and 277 002BHAC Flush Mount Installation NOTE See the cutout and support framing details for installation planning see Figure 15 1 Remove the four nuts from the back of the dust cover and remove it...
Страница 14: ...No 238 003 Enclosure The Model 238 003 Enclosure includes rear and bottom access holes for cable entry Use the rear access hole s for a completely hidden installation or the bottom access hole s for c...
Страница 15: ...e the handset in the cradle on hook and move the plug in jumper on J2 to pins one and two 7 Test the auto dial number by removing the handset from its cradle off hook the telephone should automaticall...
Страница 16: ...maintenance than others depending on the environment and exposure to airborne contaminants The following maintenance steps should be performed on a regular basis or when corrosion is first noticed on...
Страница 17: ...rent volume control setting when hanging up the telephone see Figure 17 Auxiliary Output Each telephone includes one isolated solid state volt free closure capable of switching a maximum of 48 V dc 12...
Страница 18: ...and Noise Canceling Mic Black 10117 003 Handset Assembly with 29 inch Armored Cord Volume Control and Noise Cancelling Mic Black 10113 030 Handset Assembly with 12 inch armored cord 10113 020 Handset...
Страница 19: ...ounting Kit 22x Series 233 001 Security Screwdriver Torx T 25 Tip 238 001 Surface Mount Enclosure Stainless Steel Standard 238 003 Surface Mount Enclosure Stainless Steel BH Telephones Specifications...
Страница 20: ...280 inch diameter holes Weight Model 247 001 6 0 lb 2 70 kg Model 257 001 8 2 lb 3 72 kg Model 277 001 Enclosure construction Front panel 14 gauge 0 075 inch type 304 brushed stainless steel Enclosur...
Страница 21: ...N s contact the telephone company to determine the maximum REN for the calling area This equipment cannot be used on the telephone company provided coin service Connection to Party Line Service is sub...
Страница 22: ...ations Repairs to certified equipment should be coordinated by a representative designated by the supplier Any repairs or alterations made by the user to this equipment or equipment malfunctions may g...
Страница 23: ...of the Contractor s personnel from the work site Re performance of services shall be Buyer s sole and exclusive remedy and in no event shall GAI Tronics warranty obligations with respect to services e...