background image

38

9  Entertainment

9.1 Taking Photos and Recording Videos

9.1.1 Opening the Camera/Camcorder

• 

Touch 

 > Camera

 to open the camera. The camera opens in landscape mode, ready to 

take a picture.

• Touch   > 

Camcorder

 to open the camcorder. The camcorder opens in landscape mode, 

ready to record a video.

• Touch  to close the camera or camcorder.

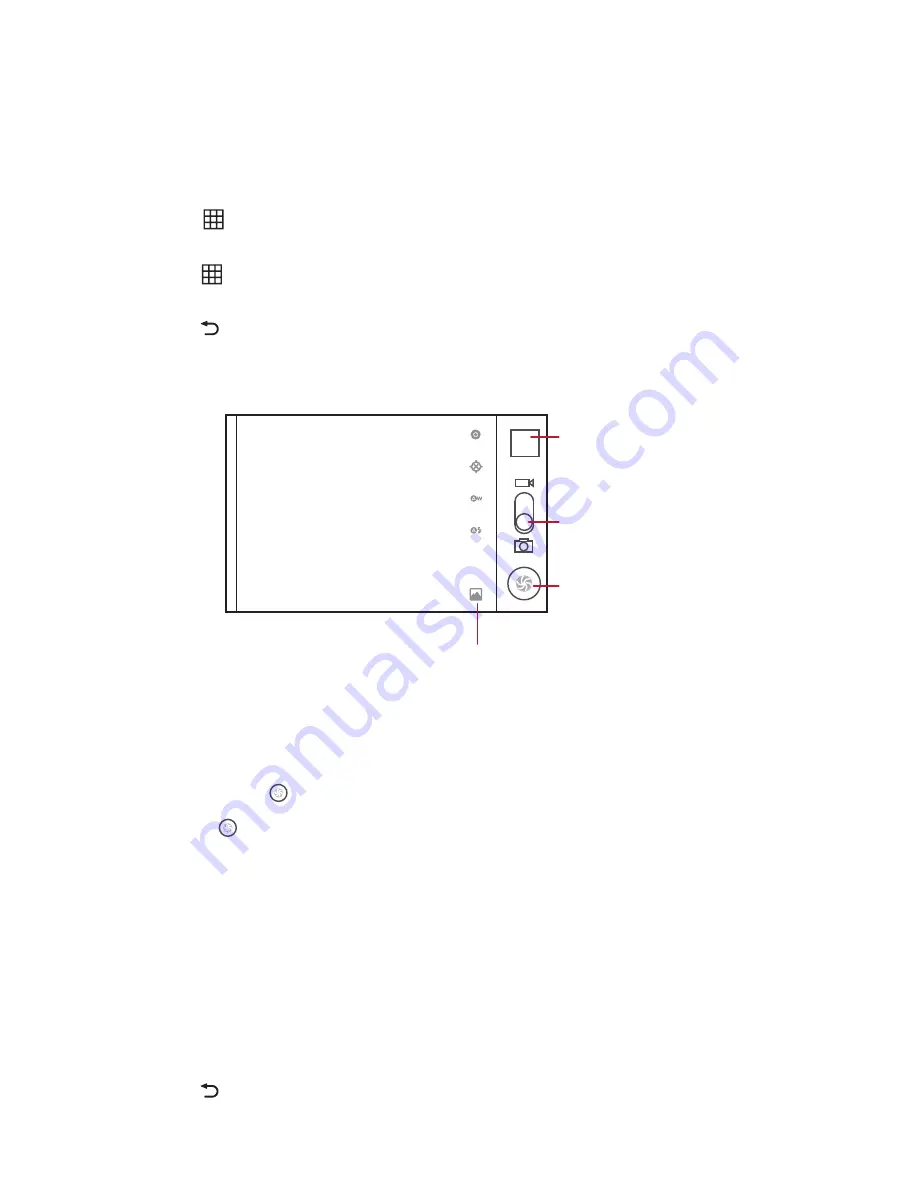
5

Thumbnail of last 
photo. Touch to 
preview the photos 
or videos.

Drag up to record 
videos, drag down 
to take photos.

Touch to take a 
photo.

Touch to customize the camera settings.

1x

Capture Screen

9.1.2 Taking Photos

1.  Open the camera. Make sure you are in camera mode.
2.  If necessary, change the camera settings. The preview changes as you change the settings.

3. Touch 

and 

hold   to set the focus.

4. Release   to take the photo.

9.1.3 Viewing Your Photos

1.  After taking the photo, the thumbnail is shown on the upper right corner of the capture screen. 

Touch the thumbnail to view it. 

2.  Touch the on-screen buttons to do any of the following:

• 

Share

: To send your photo in a message or post it online.

• 

Delete

: To delete your photo.

• 

More

: To access other options, such as photo details, crop, set as wallpaper or contact 

icon, rotate, and slideshow settings.

3. Touch   to return to the capture screen.

Содержание U8850

Страница 1: ...U8850 User Guide ...

Страница 2: ... medical apparatus Switch off your phone in aircraft The phone may cause interference to control equipment of the aircraft Switch off your phone near high precision electronic devices The phone may affect the performance of these devices Do not attempt to disassemble your phone or its accessories Only qualified personnel are allowed to service or repair the phone Do not place your phone or its acc...

Страница 3: ...ted by local network operators or network service providers Thus the descriptions herein may not exactly match the product or its accessories you purchase Huawei Technologies Co Ltd reserves the right to change or modify any information or specifications contained in this manual without prior notice or obligation Huawei Technologies Co Ltd is not responsible for the legitimacy and quality of any p...

Страница 4: ...NY SPECIAL INCIDENTAL INDIRECT OR CONSEQUENTIAL DAMAGES OR LOST PROFITS BUSINESS REVENUE DATA GOODWILL OR ANTICIPATED SAVINGS Import and Export Regulations Customers shall comply with all applicable export or import laws and regulations and will obtain all necessary governmental permits and licenses in order to export re export or import the product mentioned in this manual including the software ...

Страница 5: ...ay features depend on the phone you purchase Note When applying protective film on the phone use the protective film with good transmittance 2 1 2 Key Functions Press to power on your phone Press and hold to open the Phone options menu Press to lock the screen when your phone is active Touch to open the menu on an active screen Touch to open Complete action using then select Launcher or SPB Shell ...

Страница 6: ...phone off to prevent the data stored in the SIM USIM card from being lost 2 2 2 Installing the microSD Card You need a microSD card to use the camera applications and store photos music videos and other data 1 Remove the back cover Touch to return to the previous screen Touch to exit any application you are running Touch to hide the keyboard Touch to open Google search for searching your phone and...

Страница 7: ...to power on your phone immediately after you begin charging the battery Allow the battery to charge for a few minutes with the phone powered off before attempting to power on the phone Rechargeable batteries have a limited number of charge cycles and may eventually need to be replaced The battery isn t user replaceable it can be replaced only by an authorized service provider Using data services i...

Страница 8: ...ut 2 3 3 Turning the Phone Off 1 Press and hold to display the Phone Options menu 2 Touch Power off 3 Touch OK Note If something isn t working right try to press volume key and power key over 10 seconds at the same time until the phone is turned off 2 4 Locking and Unlocking the Screen 2 4 1 Locking the Screen When your phone is on press to lock the screen When the screen is locked you can still r...

Страница 9: ...ode Or on a locked screen drag the speaker icon from right to left To undo silent mode repeat the steps above Or on a locked screen drag the vibrate icon from right to left 2 5 2 Setting the Phone to Airplane Mode 1 Press and hold to display the Phone Options menu 2 Touch Airplane mode To undo airplane mode repeat the steps above ...

Страница 10: ...pen the Phone application Touch to open the Messaging application Touch to view all applications Touch to view all screens in 3D mode Touch to open the Browser application Notifications bar Displays notification and status icons Flick down to open the notifications panel Display area Home screen indicator After doing this action the Select Home screen window will no longer appear You can touch Set...

Страница 11: ...n EDGE in use Call in progress using a Bluetooth device GPRS connected Call on hold GPRS in use Missed call GPS connected New message Wi Fi connected New voicemail Wi Fi in use New Gmail message Bluetooth connected New Email message New Talk message Battery is fully charged New battery replacement needed Battery level Battery temperature is too high cannot charge battery Charging error Battery tem...

Страница 12: ...and hold a screen panel to rearrange its position 5 Touch to exit 3D edit screen mode Removing a Screen Panel 1 Touch to view the Home Screen in 3D mode 2 Touch to enter 3D edit screen mode 3 Touch and hold a screen panel and drag it out from the home screen deck 4 Touch to exit 3D edit screen mode Adding a New Screen Item 1 Touch and hold a blank area on the Home screen until the Add to Home scre...

Страница 13: ...fting your finger drag the item to the desired position on the Home screen 3 Release your finger to complete move 4 Touch or to close the edit screen mode 2 6 7 Changing the Wallpaper 1 On the Home screen touch Wallpaper 2 In the Select wallpaper from menu touch My Gallery Wallpapers or Live wallpapers 3 Select the picture you want to set as the wallpaper ...

Страница 14: ...h and hold the contact you want to add to Favorites then touch Add to favorites Touch a contact then touch the star to the right of the contact s name The star is lit 3 3 Importing and Exporting Contacts 3 3 1 Importing Contacts from the SIM Card 1 In the contact list touch Import Export 2 Touch Import from SIM card 3 Wait for the SIM card contents to be loaded Select the contacts you want to impo...

Страница 15: ...e contact you want to remove from Favorites then touch Remove from favorites In the contact list touch a contact then touch the colored star to the right of the contact s name to disable it 3 7 Communicating with Contacts From the Contacts or Favorites tab you can quickly call or send messages to your contacts 3 7 1 Connecting Through Quick Contact for Android 1 In the contact list touch a contact...

Страница 16: ...ations bar down and touch Current call 4 1 1 Making a Call with the Phone Application 1 Touch to display the dialer If you are on the Contacts or Call log screen touch the Phone tab 2 Touch the numeric keys to enter the phone number 3 Touch to make the call During a call touch Dialpad to enter other numbers on the dialpad 4 1 2 Making a Call from Contacts 1 Touch Contacts to display the contact li...

Страница 17: ...n an incoming call message is displayed on the screen If the caller is listed in Contacts the contact s name and number appear on the screen To answer the call drag to the right 4 2 2 Ending a Call Touch End to end a call 4 2 3 Rejecting an Incoming Call Drag to the left to reject the call ...

Страница 18: ...ll 3 To add more calls touch Add call and repeat step 2 4 To end the conference call and disconnect from everyone touch End 4 3 2 Switching Between Calls 1 While you are on the first call when the second call comes in answer the incoming call This automatically places the first call on hold 2 To switch back to the first call touch Swap 4 3 3 Muting the Microphone During a call touch Mute to mute t...

Страница 19: ... the call details and access other options 4 4 1 Adding an Entry to Contacts 1 Touch Call log 2 Touch and hold an entry 3 Touch Add to contacts 4 Touch Create new contact or touch an existing contact name to add the phone number to 4 4 2 Removing an Entry from Call Log 1 Touch Call log 2 Touch and hold an entry 3 Touch Remove from call log ...

Страница 20: ...hod to use Q W E R T Y U I O P Z X C V B N M A S D F G H J K L 123 1 2 3 4 5 6 7 8 9 0 Touch to insert a symbol Touch to delete a character Touch and hold to delete an entire word Touch to insert smileys Touch to enter text by voice Touch to select an input method or access Android keyboard settings Touch and hold to select an input method Touch to toggle between text mode and number symbol mode T...

Страница 21: ...v wxyz pqrs tjkl mno ghi abc def Touch to delete a character Touch and hold to delete an entire word Touch to toggle the keyboard to lower case upper case and all caps Touch to select the language entry mode Touch to enable or disable word prediction Touch to change from text mode number symbol mode Next 20 5 1 3 Using TouchPal Input You can change the keyboard layout only when TouchPal is selecte...

Страница 22: ...the Landscape Keyboard For a wider keyboard turn the phone sideways to display the keyboard in landscape mode Hold your phone on both hands and use both thumbs to type 5 2 Customizing Keyboard Settings 1 Touch Settings Language keyboard 2 Touch the input method of the keyboard you want to customize 5 3 Editing Text 5 3 1 Selecting Text 1 Touch and hold the text field of the text you want to select...

Страница 23: ...22 3 Touch and hold the text field and select Cut or Copy 4 Touch and hold the text field where you want to paste the text 5 Touch Paste ...

Страница 24: ...enter a phone number a contact name or an email address As you type matching contacts appear You can touch a contact or continue typing 3 Touch the composition text box and type your message 4 Touch to display the options panel To add a message subject touch Add subject Your message is now in multimedia message mode To add a picture music or video file touch Attach To insert smileys touch Insert s...

Страница 25: ...ssage 3 When you are finished touch Send 6 5 Forwarding Messages 1 In the message list touch the message thread to open it 2 Touch and hold the message that you want to forward 3 Touch Forward 4 Enter the recipient and complete your message then touch Send 6 6 Deleting Messages Deleting a Message 1 In the message list touch the message thread to open it 2 Touch and hold the message that you want t...

Страница 26: ...2 Touch Wireless networks Mobile networks 3 Select the Data enabled check box to turn on data connection 7 1 3 Turning On the Data Network Connection While Roaming You can still use your phone to connect to the Internet while roaming outside the network coverage such as when you travel to other countries However this service may incur extra charges Contact your network service provider for details...

Страница 27: ...e and share your phone s Internet connection with your computer Note You cannot share your phone s data connection and microSD card via USB at the same time 1 Connect your phone to the computer using the USB cable 2 Touch Settings 3 Touch Wireless networks Tethering portable hotspot 4 Select the USB tethering check box to share your data connection 7 3 2 Using Your Phone as a Portable Wi Fi Hotspo...

Страница 28: ...h 1 On the File Explorer application touch and hold the file to be sent to open the options menu 2 Touch Share and then touch Bluetooth and select a paired device 7 4 4 Disconnecting or Unpairing Bluetooth Devices 1 Touch Settings Wireless networks Bluetooth settings 2 On the Bluetooth devices section touch and hold the connected device 3 Touch Unpair to disconnect the device 7 5 Using the microSD...

Страница 29: ...ou cannot open some applications such as Camera when using the microSD card as a USB mass storage device 7 5 2 Removing the microSD Card 1 Touch Settings Storage 2 Touch Unmount SD card 3 Remove the microSD card ...

Страница 30: ...kmarks Forward Touch to forward to the next web page Windows Touch to display the web preview screen You can switch to another web page or open a new web page More Touch to access more browser functions 8 1 2 Opening a Web Page Opening a Web Page To open a web page type the web page address on the URL field As you type matching web page addresses appear on the screen You can touch a web page addre...

Страница 31: ...8 2 1 Using Text Search 1 On the Home screen touch the Google Search box 2 Enter the text you want to search on the box 3 As you type matching items on your phone or suggestions from Google Search appear If what you are searching for appears you can touch to open it in the appropriate application Otherwise continue typing then touch 8 2 2 Using Voice Search 1 On the Home screen touch the Google Se...

Страница 32: ...complete the setup 8 4 Gmail Gmail is Google s web based email service When you first set up your phone you may configure or create a Google account The first time you open Gmail on your phone your Inbox contains messages from your account 8 4 1 Opening Gmail Touch Gmail The Inbox screen appears 8 4 2 Creating and Sending Emails 1 On the Inbox screen touch Compose 2 In the To field enter the recip...

Страница 33: ... for Emails 1 On the Inbox screen touch Search 2 Enter the keyword to search then touch 8 4 6 Customizing Gmail Settings On the Inbox screen touch More Settings 8 5 Talk Talk is Google s messaging program that allows you to chat with your friends on your phone 8 5 1 Opening Talk Touch Talk 8 5 2 Adding a Friend 1 On the Talk screen touch Add friend 2 Enter the Talk instant messaging ID or the Goog...

Страница 34: ...n the friends list screen touch Settings 8 5 8 Signing Out of Talk On the friends list screen touch Sign out 8 6 Maps Maps allows you to keep track of your location view traffic information find places and get directions to your destination 8 6 1 Enabling Location Settings Before you start using Maps you must set your location Your phone can determine your location using GPS satellites or by ident...

Страница 35: ...dicate traffic conditions Satellite View map on aerial photo Terrain View map with 3D imagery Transit Lines View map with transit route Latitude Use Latitude and view your friends location My Maps View customized map Wikipedia View map with Wikipedia information 8 7 Latitude Latitude allows you to view your friends location and share your location with them on Maps 8 7 1 Opening Latitude To open L...

Страница 36: ...a friend on the list 2 Touch Remove this friend 3 Touch OK to confirm 8 7 7 Setting Privacy Options On the Latitude screen touch Settings 8 8 Market Market allows you to buy and download games and other applications to your phone 8 8 1 Opening Market To open Market touch Market When you open Market for the first time the Terms of Service is displayed Touch Accept to continue 8 8 2 Searching For Ap...

Страница 37: ...s 1 Touch Places 2 Touch a category to view the list of places near your location 3 Touch a place to view more information or use the search box to search for other places 8 11 YouTube YouTube allows you to watch download and upload videos to YouTube 8 11 1 Opening YouTube Touch YouTube When opening YouTube for the first time the Terms of Service appears Touch Accept to continue 8 11 2 Browsing fo...

Страница 38: ...he file to open the Upload video screen 3 Enter the video title If desired touch More details to add description set the privacy and add tags to your video 4 When you are finished touch Upload Capture and Upload Videos 1 On the YouTube home screen touch the video icon on the upper right corner of the screen 2 Touch the record icon to record When you are finished touch the stop icon 3 Enter the vid...

Страница 39: ...ngs 1x Capture Screen 9 1 2 Taking Photos 1 Open the camera Make sure you are in camera mode 2 If necessary change the camera settings The preview changes as you change the settings 3 Touch and hold to set the focus 4 Release to take the photo 9 1 3 Viewing Your Photos 1 After taking the photo the thumbnail is shown on the upper right corner of the capture screen Touch the thumbnail to view it 2 T...

Страница 40: ...ng My Gallery My Gallery automatically searches for photos and videos on your phone memory and microSD card Use My Gallery to view and edit pictures watch videos and set photos as wallpapers or as contact pictures 9 2 1 Opening My Gallery Touch My Gallery The My Gallery application groups your pictures and videos by storage location and stores these files in folders Touch a folder to the pictures ...

Страница 41: ...es saved on the phone s microSD card 9 3 1 Opening the Media Library Touch Music to display the media library The Music application organizes your music files by storage location It contains four tabs Artists Albums Songs and Playlists 9 3 2 Playing Music 1 Touch a category on the music library screen 2 Touch the song that you want to play 9 3 3 Adding Music to Playlists 1 Touch a category on the ...

Страница 42: ...nd attempts to merge duplicates into a single entry in Contacts While it is presented as a single contact entry the contact data itself is not merged 1 Touch Settings Accounts sync The screen displays your current synchronization settings and a list of your current accounts Note In some cases you may need to obtain account details from an IT support For example you may need to know the account s d...

Страница 43: ...rking with them directly that is when they are running in the background If you clear this option Gmail Google Mail stops receiving new mail Calendar stops synchronizing events and so on until you touch the Refresh menu item or send an email Select or clear the Auto sync check box to control whether changes you make to information on the phone or on the web are automatically synchronized with each...

Страница 44: ...he Calendar Touch Calendar to open the application Tip To access Google calendar touch and then touch More Calendars 11 2 2 Creating an Event 1 On any calendar view touch Then touch More New event to open the Event details screen 2 Enter the event name If there is a time frame for the event touch From and To to set the beginning and end times of the event If the event is a special occasion such as...

Страница 45: ... touch Home time zone to select your home time zone Set alerts notifications Touch to set event reminders to alert you send you a notification or to turn off event notifications on your mobile phone Select ringtone Touch to select the ringtone to sound when you receive an event reminder Vibrate Select to vibrate the mobile phone when you receive an event notification Default reminder time Touch to...

Страница 46: ... vibrate in addition to playing the ringtone 6 Touch Label to enter a name for the alarm 7 Touch Done Customizing Alarm Settings On the alarm list screen touch and then touch Settings 11 4 Using the FM Radio Plug the earphones to the device audio port to use the FM Radio 1 Touch FM Radio to open the application 2 Touch the radio power button on the upper right corner of the screen 3 Drag the frequ...

Страница 47: ...h Set when the configuration is complete 6 Select or clear the Use 24 hour format check box to switch between 24 hour format and 12 hour format 7 Touch Select date format to select how you want the date to display on your mobile phone 12 2 Setting the Display 12 2 1 Adjusting the Screen Brightness 1 On the Settings screen touch Display Brightness 2 Drag the slider left to make the screen darker or...

Страница 48: ...ays when selected 12 3 5 Changing the Message Ringtone 1 On the Home screen touch Messaging 2 In the message list touch Settings Select ringtone 3 Touch the ringtone you want to use and then touch OK The ringtone plays when selected 12 3 6 Enabling Other Sounds 1 On the Settings screen touch Sound 2 In the Feedback section check the box to enable the sound for the following options Audible touch t...

Страница 49: ... output Voice recognizer settings Language 2 Touch the desired language 12 5 2 Filtering Voice Input 1 On the Settings screen touch Voice input output Voice recognizer settings SafeSearch 2 Touch a voice search filter option 3 Check the Block offensive words box to hide offensive voice search results 12 5 3 Installing Voice Data Use the Text to Speech settings to configure the Android text to spee...

Страница 50: ... and or require a screen unlock pattern every time your mobile phone is turned on or wakes up from sleep mode 1 On the Settings screen touch Location security Set up screen lock Pattern 2 A tutorial appears on the screen touch Next to continue 3 Flick your finger vertically horizontally or diagonally and connect at least four dots in any order you choose Lift your finger from the screen when you a...

Страница 51: ...You can use your Google account to back up your mobile phone s settings to Google servers If you replace your mobile phone the settings you have backed up will be transferred to the new mobile phone the first time you sign in to your Google account 1 On the Settings screen touch Privacy 2 Select the Back up my data check box 3 Select the Automatic restore check box to restore the backed up setting...

Страница 52: ...ily injuries or even deaths Do not power on your device at refueling points such as service stations Comply with restrictions on the use of radio equipment in fuel depots storage and distribution areas and chemical plants In addition adhere to restrictions in areas where blasting operations are in progress Before using the device watch out for areas that have potentially explosive atmospheres that...

Страница 53: ...ng charged Keep the ambient temperature between 0 C to 40 C for using the device powered by a battery Prevention of Hearing Damage Using a headset at high volume can damage your hearing To reduce the risk of damage to hearing lower the headset volume to a safe and comfortable level Safety of Children Comply with all precautions with regard to children s safety Letting the child play with your devi...

Страница 54: ...ract these objects and hurt you when you are using the device Before you clean or maintain the device power off the device and disconnect it from the charger Do not use any chemical detergent powder or other chemical agents such as alcohol and benzene to clean the device and the charger Otherwise parts of the device may be damaged or a fire can be caused You can clean the device and the charger wi...

Страница 55: ...rference will not occur in a particular installation If this equipment does cause harmful interference to radio or television reception which can be determined by turning theequipment off and on the user is encouraged to try to correct the interference by one or more of the following measures Reorient or relocate the receiving antenna Increase the separation between the equipment and receiver Conn...

Страница 56: ...u are on another screen drag the notifications bar downwards to open the notifications panel Then touch the current call notification to return to the calling screen How do I create an application shortcut on the Home screen Touch and hold an application icon on the main menu screen until the Home screen is displayed Then drag the icon where you want it to go and release your finger How do I hide ...

Страница 57: ...for Android Android is a trademark of Google Inc Use of this trademark is subject to Google Permissions ...

Отзывы: