background image

Press … 

To … 


Enter 

#


Switch between text input methods. 


Lock the keypad in standby mode (press and hold 
the key for about 3 seconds). 
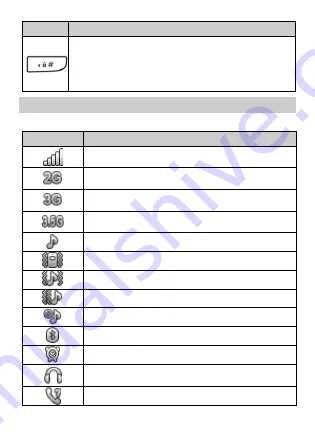
Screen icons 


Icon 

Description 


Signal strength 


2G network available 


3G network available 


3.5G network available 


Ring only

 enabled 


Vib. only

 enabled


Vib. and ring

 enabled


Vib. then ring

 enabled


Silent

 mode activated 


Bluetooth turned on 


Alarms enabled 


Headset connected 


Missed calls 

Содержание U5130

Страница 1: ...U5130 UMTS Mobile Phone User Guide ...

Страница 2: ... this product Therefore Huawei will not provide any warranty of any kind for third party software and applications Neither will Huawei provide support to customers who use third party software and applications nor be responsible or liable for the functions or performance of third party software and applications Third party software and applications services may be interrupted or terminated at any ...

Страница 3: ...PLICABLE LAWS NO WARRANTIES OF ANY KIND EITHER EXPRESS OR IMPLIED INCLUDING BUT NOT LIMITEDTO THE IMPLIED WARRANTIES OF MERCHANTABILITY AND FITNESS FOR A PARTICULAR PURPOSE ARE MADE IN RELATION TOTHE ACCURACY RELIABILITY OR CONTENTS OFTHIS MANUAL TOTHE MAXIMUM EXTENT PERMITTED BY APPLICABLE LAW IN NO EVENT SHALL HUAWEI BE LIABLE FOR ANY SPECIAL INCIDENTAL INDIRECT OR CONSEQUENTIAL DAMAGES OR LOSS ...

Страница 4: ...Privacy Policy To better understand how we protect your personal information please see the privacy policy at http consumer huawei com en privacy policy index htm ...

Страница 5: ...d and battery 5 Installing a microSD card 6 Charging the battery 6 Phone lock 6 PIN and PUK 7 Locking and unlocking the keypad 7 3Voice services 9 Making a call 9 Answering a call 9 4Text input 10 Changing the text input mode 10 Entering a word 11 Entering a digit 12 Entering a symbol 12 5 Phonebook 12 Creating a contact 12 Searching for a contact 12 ...

Страница 6: ...media message 15 9 Multimedia 17 Image viewer 17 Video recorder 17 Media player 18 FM radio 18 Sound recorder 19 10 Organizer 20 Calendar 20 Alarm 20 Calculator 20 Electronic torch 20 Weather 20 Stopwatch 21 Tasks 21 Ebook reader 21 11 STK 22 12 Facebook 22 13 Services 22 Network settings 22 Accessing a website 23 ...

Страница 7: ... 25 Using a Bluetooth headset 25 Transferring data 26 17 Java application 26 Installing a Java application 26 Using a Java application 27 Uninstalling a Java application 27 18 Settings 27 Phone settings 27 Security settings 28 19 Warnings and precautions 30 ...

Страница 8: ...f your phone and is for your reference only 1 Headset jack 9 key 2 Earpiece 10 key 3 Charger jack micro Universal serial bus USB port 11 End Power key 4 Screen 12 Delete key 5 Left soft key 13 Right soft key 6 Speaker key 14 OK Confirm key 7 Call Answer key 15 Navigation keys 8 Number keys 16 Torch ...

Страница 9: ...a call Return to standby mode Select the option displayed in the lower left corner of the screen Access Menu in standby mode Unlock the keypad must also press the right soft key immediately after Select the option displayed in the lower right corner of the screen Access Widget in standby mode Access the selected shortcut one of four on the screen in standby mode Confirm a selection ...

Страница 10: ...Speed dial phone numbers in standby mode press and hold one of the keys from 2 9 for about 3 seconds Select an option labeled with the corresponding number Switch on or off the torch in standby mode press and hold the 0 key for about 3 seconds Enter press once press twice p press three times or w press four times in standby mode Display the symbol list when you enter text Switch between the Meetin...

Страница 11: ...e key for about 3 seconds Screen icons Icon Description Signal strength 2G network available 3G network available 3 5G network available Ring only enabled Vib only enabled Vib and ring enabled Vib then ring enabled Silent mode activated Bluetooth turned on Alarms enabled Headset connected Missed calls ...

Страница 12: ...ing started Installing the SIM USIM card and battery When installing a SIM USIM card ensure that the gold contact area faces down and the beveled edge of the SIM USIM card aligns with that of the SIM USIM card slot Align the battery contacts with those in the battery compartment press the battery into the compartment and close the back cover ...

Страница 13: ...e the battery is charging the charging icon blinks When the charging icon stops blinking the battery is fully charged If the battery level is completely depleted the charging icon may not appear immediately after you connect the phone to the power outlet 4 Disconnect the charger from the phone 5 Disconnect the charger from the power outlet Phone lock The phone lock protects your phone from unautho...

Страница 14: ...ty settings SIM security PIN lock 2 Enter the PIN and press OK or If you enter the incorrect PIN a specified number of times varies by service provider the phone prompts you to enter the PUK If you enter the incorrect PUK a specified number of times varies by service provider the SIM USIM card is permanently locked If this occurs contact your service provider for a new SIM USIM card Locking and un...

Страница 15: ...8 When the keypad is locked you can press Answer or to answer a call or to make an emergency call ...

Страница 16: ...ber To call an extension number enter the phone number press three times to enter p and enter the extension number 2 Press or to dial the number 3 Press to end the call You can also make a call from the call log contacts or messages During a call press to adjust the in call volume You can also press Options select Volume and press to adjust the volume Answering a call When you receive an incoming ...

Страница 17: ...ny key answer function is enabled you can press any key except or to answer the call 4 Text input Changing the text input mode The current text input mode indicator is displayed in the upper left corner of the screen Press to switch between text input modes Indicator Text Input Mode ABC abc Abc Multi tap input modes eZi ABC eZi abc eZi Abc Predictive input modes 123 Number input mode ...

Страница 18: ... mode press to display commonly used symbols and to enter a space Entering a word To enter a word in multi tap input mode press the number key labeled with the desired letter once to enter the first letter on the key twice to enter the second letter on the key and so on To enter a word in predictive input mode 1 Press each key labeled with a letter of the desired word once in the word s spelling s...

Страница 19: ...sired symbol 3 Press OK or to enter the desired symbol 5 Phonebook Creating a contact 1 Choose Menu Phonebook Add new contact 2 Edit the contact information 3 Press or Options and select Save to save the contact Searching for a contact 1 Choose Menu Phonebook 2 Enter the first letter of the contact name in the search box The screen then displays names that begin with this letter ...

Страница 20: ...oll to the desired folder and press to open the folder or Options for the following options Open open the folder New folder create a folder Rename rename the folder Delete delete the folder Sort by sort folders by name type time or size Press to scroll to the desired file and press to open the file or press Options for additional options The operations applicable to files may be different from tho...

Страница 21: ... or configure the camera settings Press or to adjust the brightness Press or to zoom in or out Press the 1 2 4 6 and 7 keys to quickly configure your camera settings Press to switch to simplified mode with no setting icons displayed 3 Focus the camera and press to take a picture 4 Press Back to save the picture and return to the viewfinder or press Options and select Delete to delete the picture ...

Страница 22: ...s Options for the following options Send send the message to the recipient Save save the message to Drafts Writing and sending a multimedia message 1 Choose Menu Messaging Write message 2 Compose a text message 3 Press Options for the following options Switch to MMS change your text message to a multimedia message This feature has a submenu that includes Add picture Add sound Add video and Add sub...

Страница 23: ...d to 5 Select Enter recipient to manually enter the phone number of a recipient or select Add from Phonebook to select a contact from the phonebook 6 Press to send the message or press Options for the following options Send send the message Change to Cc copy the message to a recipient Change to Bcc blind copy the message to a recipient Save to Drafts save the message to Drafts For more information...

Страница 24: ...her options including View Image information Browse style Send Use as Rename Delete Sort by Delete all files and Storage Video recorder To record a video 1 Choose Menu Multimedia Video recorder 2 When recording a video you can Press to configure the recorder settings Press to start or pause the recording Press or to zoom in or out Press or to adjust the brightness Press to stop recording and save ...

Страница 25: ...e previous or next file Press to pause or continue 3 Press to go to the previous menu All audio and video files on your phone and microSD card are automatically added to the Media player list when you use this function for the first time When you change files on your phone or microSD card manually update the Media player list Use the headset for enhanced audio effects FM radio 1 Choose Menu Multim...

Страница 26: ...annel list Manual input Auto search and Settings When the FM radio is playing in the background you can turn it off in standby mode by pressing and then Yes Sound recorder 1 Choose Menu Multimedia Sound recorder 2 Press or Options and select New record 3 Press Pause Continue or to pause or resume the recording 4 Press Stop to stop recording and save the recorded file ...

Страница 27: ...he status bar Calculator The Calculator application lets you perform basic arithmetic operations Electronic torch The electronic torch helps you find your way in the dark To switch on or off the torch in standby mode press and hold the 0 key for about 3 seconds or choose Menu Organizer ElectronicTorch and select On or Off Weather AccuWeather com provides the weather application to keep you informe...

Страница 28: ...ok reader application lets you read ebooks in txt format 1 Choose Menu Organizer Ebook reader The phone automatically adds ebooks stored in the Ebook folder to Bookshelf 2 Select an ebook 3 Press Options and select Open ebook to start reading the ebook You can also press Options and select Global settings to set the font size scroll type and more 4 Press Back to close the ebook When reading an ebo...

Страница 29: ...ial networking service SNS application Facebook allows you to socialize with friends and family Make sure your phone has Internet access before you attempt to use this application To use Facebook 1 Choose Menu Fun Fun Games Facebook 2 Enter your account information 13 Services You can access WAP sites and use WAP based services For more information contact your service provider Network settings Be...

Страница 30: ...vice provider 4 Press OK to save the settings Setting the WAP 1 Choose Menu Services Settings Data account 2 Select your service provider and press OK to select a data account Accessing a website 1 Choose Menu Services Search or input URL 2 Enter a Uniform Resource Locator URL 3 Press to open the webpage 14 Internet tethering Internet tethering is a method for connecting a computer or other device...

Страница 31: ...SB tethering with windows XP you should install a driver on the computer 15 Profiles Your phone provides various profiles General Silent Meeting Outdoor and My style You can customize settings for each profile except Silent To customize a profile 4 Choose Menu Profiles 5 Press or to scroll to the desired profile and press to activate the profile or press Options for the following options Activate ...

Страница 32: ...uetooth headset Using a Bluetooth headset Bluetooth headsets must be purchased separately 1 Choose Menu Settings Connectivity Bluetooth Power Then select On to enable Bluetooth 2 Select Search audio device to search for Bluetooth devices in range 3 Select the desired Bluetooth headset and press Pair 4 Enter the password when prompted When a Bluetooth headset connects to your phone for the first ti...

Страница 33: ...ons provided by third party developers Not all Java applications are compatible with your phone If you have trouble installing or running a Java application press to return to the standby screen and uninstall the application Using Java applications requires a network connection Ensure your phone has network access Installing a Java application To install a Java application 1 Save the Java installa...

Страница 34: ... Java 2 Select an application and press Options 3 Select Launch Uninstalling a Java application To uninstall a Java application 1 Choose Menu Fun Java 2 Select an application and press Options 3 Select Delete 4 Press Yes when prompted When the application is deleted Deleted is displayed 18 Settings Phone settings To configure the phone settings 1 Choose Menu Settings Phone settings 2 Set the follo...

Страница 35: ...te Themes set the theme Smart Desktop set the shortcut icons to be displayed on the standby screen Dedicated keys set shortcuts for and Auto update time enable or disable this function Misc settings query the MRE version Keypad back light set the display mode of the keypad backlight Security settings Changing the PIN To change the PIN enable PIN lock first and perform the following steps 1 Choose ...

Страница 36: ...ing PIN2 PIN2 is the personal identification number that allows you to use special functions provided by your service provider such as billing To change PIN2 perform the same steps as those for changing the PIN ...

Страница 37: ...not use your device where prohibited Some wireless devices may affect the performance of hearing aids or pacemakers Consult your service provider for more information Pacemaker manufacturers recommend that a minimum distance of 15 cm be maintained between a device and a pacemaker to prevent potential interference with the pacemaker If using a pacemaker hold the device on the side opposite the pace...

Страница 38: ...duce the risk of accidents do not use your wireless device while driving Concentrate on driving Your first responsibility is to drive safely Do not hold the device while driving Use hands free accessories When you must make or answer a call pull of the road safely and park the vehicle first RF signals may affect the electronic systems of motor vehicles For more information consult the vehicle manu...

Страница 39: ...e device away from sources of heat and fire such as a heater microwave oven stove water heater radiator or candle Do not place sharp metal objects such as pins near the earpiece or speaker The earpiece may attract these objects and result in injury Stop using your device or applications for a while if the device is overheated If skin is exposed to an overheated device for an extended period low te...

Страница 40: ...plosion or other hazards Choose only accessories approved for use with this model by the device manufacturer The use of any other types of accessories may void the warranty may violate local regulations and laws and may be dangerous Please contact your retailer for information about the availability of approved accessories in your area Charger safety For pluggable devices the socket outlet shall b...

Страница 41: ...ry or other metal materials Doing so may short circuit the battery and cause injuries or burns Keep the battery away from excessive heat and direct sunlight Do not place it on or in heating devices such as microwave ovens stoves or radiators Batteries may explode if overheated Do not attempt to modify or remanufacture the battery insert foreign objects into it or immerse or expose it to water or o...

Страница 42: ...ificantly replace the battery Cleaning and maintenance Keep the device and accessories dry Do not attempt to dry it with an external heat source such as a microwave oven or hair dryer Do not expose your device or accessories to extreme heat or cold These environments may interfere with proper function and may lead to fire or explosion Avoid collision which may lead to device malfunctions overheati...

Страница 43: ...s subject to your cellular network quality service provider policy and local laws and regulations Never rely solely on your device for critical communications like medical emergencies Environmental protection The device and its accessories if included such as the power adapter headset and battery should not be disposed of with household garbage Disposal of the device and its accessories is subject...

Страница 44: ...n This equipment generates uses and can radiate radio frequency energy and if not installed and used in accordance with the instructions may cause harmful interference to radio communications However there is no guarantee that interference will not occur in a particular installation If this equipment does cause harmful interference to radio or television reception which can be determined by turnin...

Страница 45: ...d operation Caution Any changes or modifications to this device not expressly approved by HuaweiTechnologies Co Ltd for compliance could void the user s authority to operate the equipment For More Help Please visit www huaweidevice com worldwide support hotline for recently updated hotline and email address in your country or region ...

Отзывы: