background image

Getting Started

 3

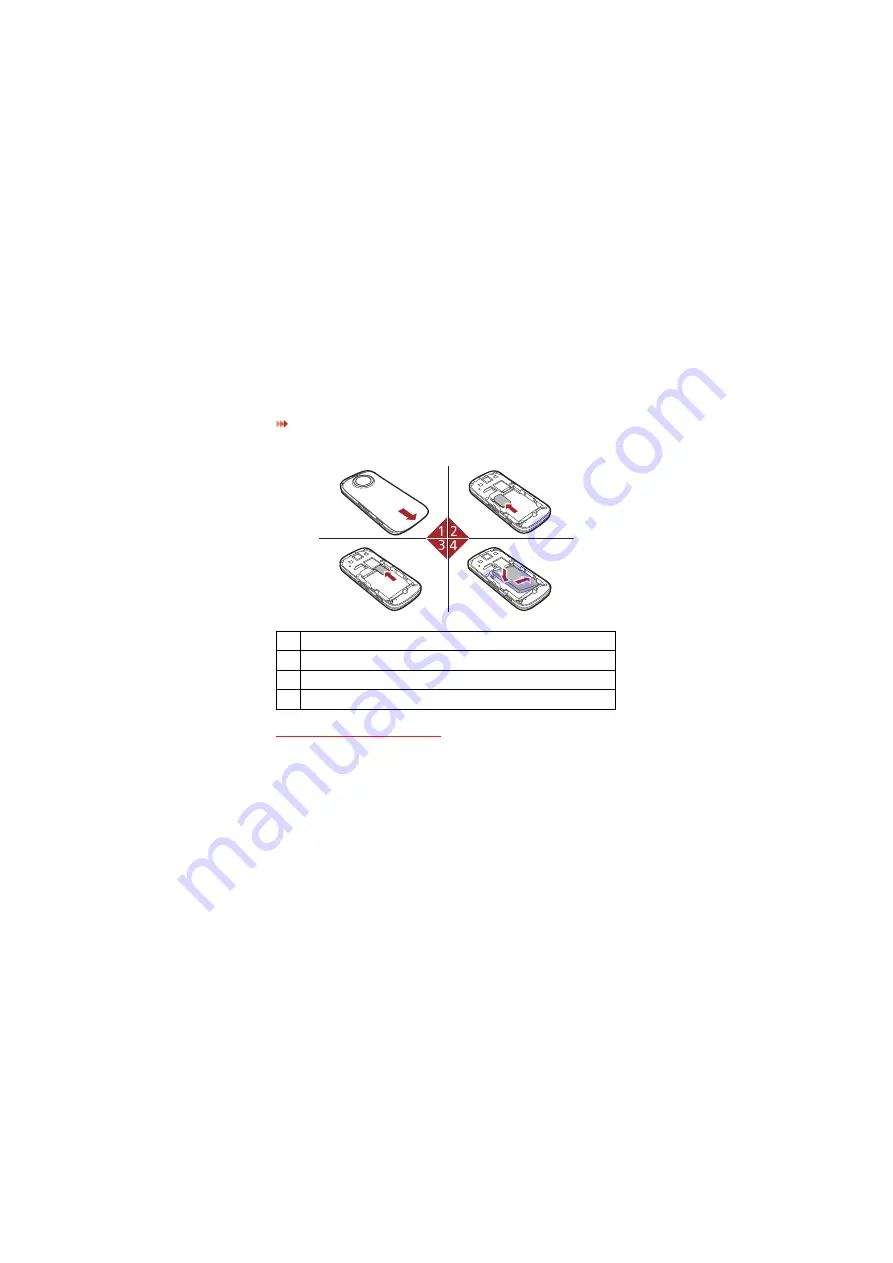
The following figures show the installation of the SIM card and memory 
card.

Charging the Battery

NOTE

:  

The battery discharges even while not being used. If you have not 
used it for a long time, please recharge it first.

1

Remove the battery cover.

2

Insert the SIM card.

3

(Optional) Insert the memory card.

4

Insert the battery.

Содержание u3200

Страница 1: ...Wonderful Communication Mobile Life User Guide ...

Страница 2: ...ns are approved by respective copyright holders under licenses Trademarks and Permissions HUAWEI and are trademarks or registered trademarks of Huawei Technologies Co Ltd Other trademarks product service and company names mentioned are the property of their respective owners Notice Some features of the product and its accessories described herein rely on the software installed capacities and setti...

Страница 3: ... IMPLIED INCLUDING BUT NOT LIMITED TO THE IMPLIED WARRANTIES OF MERCHANTABILITY AND FITNESS FOR A PARTICULAR PURPOSE ARE MADE IN RELATION TO THE ACCURACY RELIABILITY OR CONTENTS OF THIS MANUAL TO THE MAXIMUM EXTENT PERMITTED BY APPLICABLE LAW IN NO CASE SHALL HUAWEI TECHNOLOGIES CO LTD BE LIABLE FOR ANY SPECIAL INCIDENTAL INDIRECT OR CONSEQUENTIAL DAMAGES OR LOST PROFITS BUSINESS REVENUE DATA GOOD...

Страница 4: ...or danger Do not use your phone while driving Follow any rules or regulations in hospitals and health care facilities Switch off your phone near medical apparatus Switch off your phone in aircraft The phone may cause interference to control signals of the aircraft Switch off your phone near high precision electronic devices The phone may affect the performance of these devices Do not attempt to di...

Страница 5: ...ith flammable gas such as a gas station Keep your phone and its accessories away from children Do not allow children to use your phone without guidance Use only approved batteries and chargers to avoid the risk of explosions Observe any laws or regulations on the use of wireless device Respect others privacy and legal rights when using your wireless device Strictly follow the relevant instructions...

Страница 6: ...Messaging Sending a Message 19 Viewing a Message 19 Message Settings 20 Entertaiment Accessing the Internet 21 Playing Music or Video 21 Using Camera or Video Camera 22 Using FM Radio 22 Games and Applications 23 Connection Function microSD Card Reader 24 Bluetooth Based Data Transfer 25 Using Bluetooth Headset 25 Organizer Managing Files 27 Using the Torch 27 Viewing the Calendar 27 Creating a No...

Страница 7: ...Battery and Charger 32 Cleaning and Maintenance 33 Emergency Call 35 Certification Information SAR 35 FCC Statement 36 Industry Canada Compliance 37 ...

Страница 8: ...on your phone All the pictures in this guide are for your reference only The actual appear ance and display depend on the mobile phone you purchase Packing List Your phone package box contains the following One mobile phone One Li ion battery One travel charger One USB data cable One Quick Start Guide One Headset ...

Страница 9: ...nstructions carefully NOTE Keep the SIM card out of the reach of children The SIM card and its metal contacts can be easily damaged by scratching or bending Be careful when you carry insert or remove the SIM card Always disconnect the charger from the phone before loading or removing the SIM card Your phone supports a memory card microSD with a capacity of up to 8 GB To load or remove the memory c...

Страница 10: ... SIM card and memory card Charging the Battery NOTE The battery discharges even while not being used If you have not used it for a long time please recharge it first 1 Remove the battery cover 2 Insert the SIM card 3 Optional Insert the memory card 4 Insert the battery ...

Страница 11: ...or and the USB cable supplied with your phone Before charging the battery ensure that the battery has been properly loaded into your phone 1 Connect the USB interface of the USB cable to the travel charger 2 Plug in the travel charger to a power socket 3 Connect the mini USB interface of the USB cable to the charger connector of your phone When the battery is being charged the charging indicator b...

Страница 12: ...Getting Started 5 NOTE The plug of the cable is in trapezium shape Reversely inserting the plug may damage the mobile phone and the charger ...

Страница 13: ...6 Getting Started Getting to Know Your Phone Appearance of Your Phone 1 Left function key 2 Send key 3 Menu key 4 Scroll key 5 Camera key 6 Clear key ...

Страница 14: ... records in standby mode Menu key Quick access to Menu Scroll key Scroll through a menu Camera key Short press to activate the camera Long press to activate the flashlight Clear key Delete characters to the left of the cursor in input mode Power End key Switch on and off your phone by holding down this key Return to the standby mode and reject or end a call OK key Perform the corresponding functio...

Страница 15: ...8 Getting Started Home Screen 1 Icon bar 2 Desktop 3 Prompt bar Indicates signal strength Alarm clock is enabled Indicates power level of the battery The normal profile is activated ...

Страница 16: ...ettings The phone is currently in a GSM network The headset is plugged in The phone is currently in a WCDMA network You have new text messages You are using the roaming service You have new multimedia messages Bluetooth is enabled You have new PUSH messages Your phone connects with your PC You have a new voice message waiting Call in progress ...

Страница 17: ...y PUK code or PUK2 code The PIN code PIN2 code PUK code or PUK2 code is provided together with the SIM card For details consult your service provider The initial phone password of the phone is 0000 Select Settings Advanced settings Security DRM settings Enter the correct phone password and press OK key to confirm and you can select roaming network Digital Rights Management DRM can protect the digi...

Страница 18: ...n upper case Press the key to display the symbols list Press and hold the key to set the input language Press the clear key to delete the letter before the cursor Using Zi Input Method With the Zi input method you can easily and quickly enter words Zi is a predictive text entry mode Press the relevant key that corresponds to the required letter and Zi will offer you candidate words Press each key ...

Страница 19: ...reen press and hold the character number keys to enter corresponding numeric characters You can also press successively the key to switch to the 123 numeric input method and enter corresponding numeric characters by pressing the character number keys Using Symbol Input Method You can press the key to display the symbols list and then select symbols to input You can also press the key with number 1...

Страница 20: ... to enable the profile or select Edit to modify the profile Phone Settings Select Settings Desired item or Settings Advanced settings Desired item You can set the following Time of your phone Language of your phone Keypad tones Set time to automatically switch phone on and off Display Settings Select Settings Display Desired item you can set the following Wallpaper in standby mode Screensaver mode...

Страница 21: ...s Brightness of the screen Backlight time Enable automatic keypad lock Network Settings Select Settings Network Desired item You can set the following Network mode Manual or automatic network selection Preferreed operators ...

Страница 22: ...aling number Adding a Contact 1 Select Contacts 2 Select Options Create contact to create a new contact in the phone or in the SIM card 3 Enter the information about the contact 4 Select Save to save the contact Searching for a Contact 1 Select Contacts 2 Enter the contact name you are searching for 3 The contacts corresponding to your input are listed ...

Страница 23: ...yed in the candidate list Making a Call NOTE During a call you can select Options to perform operations in the option lists Making a Call from Keyboard 1 In standby mode press number key to enter phone number 2 To make a call perform one of the following operations Press the send key to make a voice call Select Options Voice call to make a voice call 3 Press the end key to terminate a call Making ...

Страница 24: ...the desired call history 3 To make a call perform either of the following operations Press the send key to make a voice call Select Options Call Voice call to make a voice call Answering or Rejecting a Call When there is an incoming call press the send key to answer the call or press the end key to reject the call You can set the any key answer mode or auto answer mode 1 Select Settings Call setti...

Страница 25: ...forwarding type Call barring mode Enable call waiting Prompt to save unknown numbers Automatic redialing after a call fails Answering mode of incoming calls Automatic answering mode Display of your number to the called party If you set it to automatic the displaying is subject to your network Calling line of your mobile phone Set my number You can create edit or delete your records ...

Страница 26: ...erations in the option list 3 After editing the message press OK key to add a recipient s number 4 Press OK key to send the message Viewing a Message Your phone provides four folders for messages Received messages are storied in Inbox Messages that are created but not yet sent saved in Drafts Messages that are failed to be delivered are stored in Outbox Messages that are successfully delivered are...

Страница 27: ...hone is enabled with the broadcast function select Messages Broadcast inbox to view broadcast messages Message Settings 1 Select Messages Settings Text and picture messaing or select Settings Advanced settings Applications Message settings Text and picture messaing 2 Set the parameters related to messages NOTE Select Messages Settings You can also change the settings of Push message Broadcast or C...

Страница 28: ... to it Saving or editing frequently visited websites Browsing saved web pages offline Browsing history web pages Setting the Browser Playing Music or Video 1 Enter Media to select music files video files or playlists 2 Press the OK key to play music or video 3 During the playing of a file you can perform the following operations Press the OK key to pause or resume the playing ...

Страница 29: ...the camera 2 In the viewfinder screen you can Select Options to perform the operations of the option list Press the left and right scroll key to adjust the focus Press the up and down scroll key to adjust the brightness 3 After taking a picture or recording a video clip you can press left and right scroll keys to select icons on the screen to perform the operations of the option list Using FM Radi...

Страница 30: ... the channel list is empty select Options Auto tuning or Manual tuning to set channels Games and Applications You can install and run Java applications on your phone For details please refer to the help of the applications ...

Страница 31: ...d the other functions using the USB cable are incompatible If you enable the microSD card reader other functions using the USB cable are unavailable 1 Insert the microSD card to your phone 2 Connect your phone to the PC by using the USB cable 3 Found New Hardware and a device icon are displayed at the notification area of your PC 4 The PC Options software supplied on your phone will run automatica...

Страница 32: ...data between your phone and another device that device must support Bluetooth and the Bluetooth function must be enabled 1 Select Settings Bluetooth Switch on to enable the Bluetooth function 2 Select Settings Bluetooth Search devices to search a Bluetooth device When the Bluetooth device is found for the first time authentication is required Now you can exchange data between your phone and the ot...

Страница 33: ...be authenticated by a PIN code Now you can use the Bluetooth headset as the connection has been established between your phone and the Bluetooth headset The Bluetooth headset should be set to the status for detecting only when authentication is needed Once the headset has been authenticated you just need to turn on your Bluetooth headset For more information refer to the user manual of your Blueto...

Страница 34: ...uired files in the memory card and perform operations as required In addition you can also format the memory card Using the Torch You can long press the camera key to switch on the torch And then long press the camera key to switch off the torch Viewing the Calendar 1 Select Calendar and then select the desired date 2 Press the OK key to view the reminder 3 Select Options to create a reminder set ...

Страница 35: ...K key to enter edit mode 3 You can select the corresponding option to activate or deactivate the alarm 4 When it is time for an alarm clock to ring the selected alarm tone is played and a prompt is displayed You can stop the ringing or snooze the alarm NOTE If your phone is powered off the alarm clock will still ring When the alarm rings you can choose to power on the phone Using Other Tools Your ...

Страница 36: ...turers recommend that a minimum distance of 15 cm be maintained between a device and a pacemaker to prevent potential interference with the pacemaker If you are using a pacemaker use the device on the opposite side of the pacemaker and do not carry the device in your front pocket Potentially Explosive Atmosphere Power off your device in any area with a potentially explosive atmosphere and comply w...

Страница 37: ...ing the device In addition if using the device while driving a vehicle comply with the following guidelines Concentrate on driving Your first responsibility is to drive safely Do not talk on the device while driving Use hands free accessories When you have to make or answer a call park the vehicle at the road side before using your device RF signals may affect electronic systems of motor vehicles ...

Страница 38: ...der do not use your device when it is being charged to prevent any danger caused by lightning When you are on a call do not touch the antenna Touching the antenna affects the call quality and results in increase in power consumption As a result the talk time and the standby time are reduced While using the device observe the local laws and regulations and respect others privacy and legal rights Ke...

Страница 39: ...approval or warranty applicable to the device result in the non operation of the device and cause danger Battery and Charger Unplug the charger from the electrical plug and the device when not in use The battery can be charged and discharged hundreds of times before it eventually wears out When the standby time and the talk time are shorter than the normal time replace the battery Use the AC power...

Страница 40: ...xplosion or fire If the power cable is damaged for example the cord is exposed or broken or the plug loosens stop using the cable at once Otherwise it may lead to an electric shock a short circuit of the charger or a fire Do not dispose of batteries in fire as they may explode Batteries may also explode if damaged Danger of explosion if battery is incorrectly replaced Recycle or dispose of used ba...

Страница 41: ...he temperature is lower than 0 C performance of the battery is affected Do not place sharp metal objects such as pins near the earpiece The earpiece may attract these objects and hurt you when you are using the device Before you clean or maintain the device power off the device and disconnect it from the charger Do not use any chemical detergent powder or other chemical agents such as alcohol and ...

Страница 42: ...onizing Radiation Protection ICNIRP and include safety measures designed to ensure safety for all users regardless of age and health The Specific Absorption Rate SAR is the unit of measurement for the amount of radio frequency energy absorbed by the body when using a device The SAR value is determined at the highest certified power level in laboratory conditions but the actual SAR level of the dev...

Страница 43: ...which can be determined by turning the equip ment off and on the user is encouraged to try to correct the interference by one or more of the following measures Reorient or relocate the receiving antenna Increase the separation between the equipment and receiver Connect the equipment into an outlet on a circuit different from that to which the receiver is connected Consult the dealer or an experien...

Страница 44: ...omplies with Industry Canada RSS 133 RSS 132 RSS 102 RSS 139 RSS 210 This phone complies with the Class B limits for radio noise emissions as set out in the Industry Canada Interference Causing Equipment Standard standard entitled Digital Apparatus ICES 003 V100R001_01 ...

Отзывы: