background image

User Manual 
EchoLife HG520 Home Gateway 

Chapter 5  Advanced Setup  


Huawei Technologies Proprietary 

57 


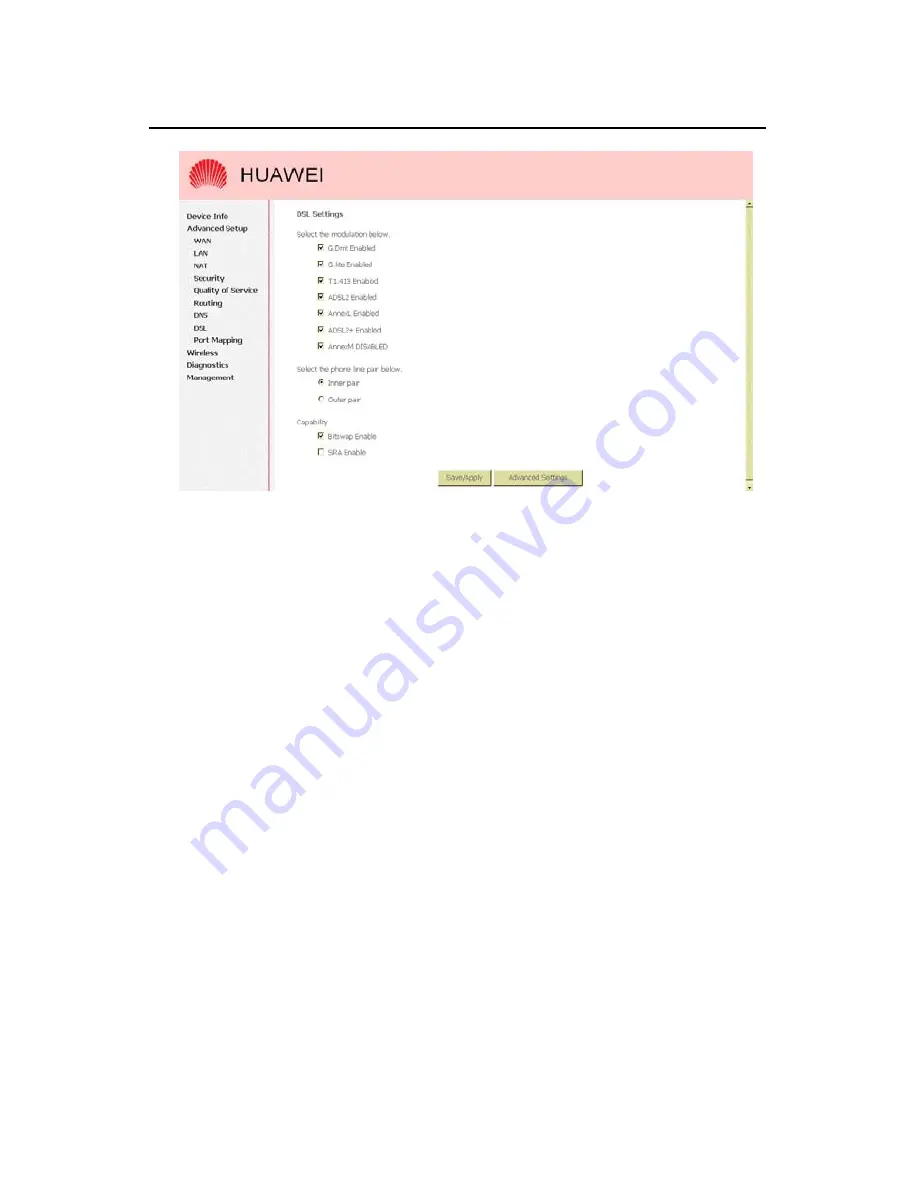
Figure 5-22 

Advanced Setup – DSL  

5.9  Configuring Port Mapping 

Port Mapping supports multiple ports to PVC and bridging groups. 

Each group will perform as an independent network.  

To support this feature, you must create mapping groups with 

appropriate LAN and WAN interfaces using the <Add> button.  

The <Remove> button will remove the grouping and add the 

ungrouped interfaces to the Default group.  

Up to 16 entries can be configured. 

Содержание EchoLife HG520

Страница 1: ...EchoLife HG520 Home Gateway User Manual ...

Страница 2: ...Huawei Technologies Proprietary HUAWEI EchoLife HG520 Home Gateway User Manual V100R001 ...

Страница 3: ...s Co Ltd provides customers with comprehensive technical support and service Please feel free to contact our local office or company headquarters Huawei Technologies Co Ltd Address Administration Building Huawei Technologies Co Ltd Bantian Longgang District Shenzhen P R China Postal Code 518129 Website http www huawei com Email support huawei com ...

Страница 4: ...WEI are trademarks of Huawei Technologies Co Ltd All other trademarks and trade names mentioned in this manual are the property of their respective holders Notice The information in this manual is subject to change without notice Every effort has been made in the preparation of this manual to ensure accuracy of the contents but all statements information and recommendations in this manual do not c...

Страница 5: ...sisting you in data configurations and typical applications EchoLife HG520 Home Gateway Quick Quide It will guide you to install HG520 quickly Organization The manual introduces the system structure hardware description configuration guide of the HG510 There are four chapters in the manual Chapter 1 System Overview profiles the system characteristics main functions system structure external interf...

Страница 6: ... 5 Advanced Setup presents the advanced setup configuration of the HG520 step by step Chapter 6 Wireless Setup presents the wireless setup configuration of the HG520 step by step Chapter 7 Diagnostics presents the diagnostics service of the HG520 Chapter 8 Management presents the management service of the HG520 Chapter 9 Device Info presents the device info of the HG520 Chapter 10 Technical Specif...

Страница 7: ...ventions Convention Description Arial Normal paragraphs are in Arial Boldface Headings are in Boldface II GUI conventions Convention Description Button names are inside angle brackets For example click the OK button Window names menu items data table and field names are inside square brackets For example pop up the New User window Multi level menus are separated by forward slashes For example File...

Страница 8: ...ned as follows Caution Warning Danger Means reader be extremely careful during the operation Note Comment Tip Knowhow Thought Means a complementary description IV Environmental Protection This product has been designed to comply with the requirements on environmental protection For the proper storage use and disposal of this product national laws and regulations must be observed ...

Страница 9: ...ar Panel 4 2 3 Connecting the Hardware 5 Chapter 3 Preparing Configuration 8 3 1 Setup 8 3 2 Establishing the Connection 8 Chapter 4 Quick Setup 11 4 1 Configuring PPPoE 11 4 2 Configuring IPoA 19 4 3 Configuring Bridge 25 4 4 Configuring MER 32 4 5 Configuring PPPoA 32 Chapter 5 Advanced Setup 34 5 1 Configuring WAN 35 5 2 Configuring LAN 35 5 3 Configuring NAT 36 5 3 1 Virtual Servers Configurat...

Страница 10: ... Configuration 49 5 6 2 Static Route Configuration 50 5 6 3 RIP Configuration 51 5 7 Configuring DNS 53 5 7 1 DNS Server Configuration 53 5 7 2 Dynamic DNS Configuration 54 5 8 Configuring DSL 56 5 9 Configuring Port Mapping 57 Chapter 6 Wireless Setup 60 6 1 Configuring Basic Features 60 6 2 Configuring Security 61 6 2 1 WEP Configuration 61 6 2 2 802 1X Configuration 63 6 2 3 WPA WPA2 Configurat...

Страница 11: ...stem Log 78 8 3 Configuring SNMP Agent 81 8 4 Configuring Internet Time 81 8 5 Configuring Access Control 82 8 6 Updating Software 85 8 7 Auto Update 86 8 8 Save Reboot 88 Chapter 9 Device Info 89 9 1 Summary 89 9 2 WAN 89 9 3 Statistics 90 9 3 1 LAN WAN 90 9 3 2 ATM 91 9 3 3 ADSL 92 9 4 Route 94 9 5 ARP 94 Chapter 10 Technical Specifications 96 Chapter 11 Abbreviations 99 ...

Страница 12: ...the Internet This User Manual will show you how to install and set up the HG520 1 1 System Features z Built in ADSL modem for high speed Internet access z Network Address Translation NAT and IP filtering functions to provide network sharing and firewall protection for your computers z 4 port switch to build your own local network z Easy configuration through a web browser z IEEE 802 11g 54Mbit s A...

Страница 13: ... following z ADSL service up and running on your telephone line with at least one public Internet address for your LAN z One or more computers each containing an Ethernet 10Base T 100Base T network interface card NIC or wireless network adapter z For system configuration use the supplied web based program a web browser such as Internet Explorer V5 0 or later or Netscape V4 7 or later ...

Страница 14: ...ion In addition to this manual the HG510 shall arrive with the following Item Quantity HG520 ADSL AP router 1 Power adapter 1 Ethernet cable 1 Phone cable 1 Splitter 1 Product certificate Qualitication Card 1 HUAWEI EchoLife HG520 Quick Start 1 CD 1 2 1 Front Panel The front panel provides LEDs that indicate the status of the HG520 ...

Страница 15: ... link established and active Off No LAN link Flashes during data transfer DSL Green Flashes during the ADSL training mode On ADSL link established and active Tx Rx Green On The device is active Flashes during data transfer through ADSL line WLAN Green On The WLAN enabled Off The WLAN disabled Flashes during data transfer 2 2 Rear Panel The rear panel provides ports for the HG520 to receive send da...

Страница 16: ...efault settings turn off the device first Hold the Reset button and then turn on the device wait for 5 8 seconds and then release the button Reset device s configuration to factory default LAN1 4 RJ 45 connector connects the device to your computer s Ethernet port or to the uplink port on your LAN s hub using the cable provided ADSL RJ 11 connector connects the device to a telephone jack using the...

Страница 17: ...ided by your service provider normally MODEM port of the attached splitter II Connect the Ethernet cable Connect one end of the Ethernet cable to the one of the four RJ 45 connectors on the rear panel of HG520 connect the other end to your computer s network adaptor NIC If you are connecting a LAN to HG520 attach one end of the Ethernet cable to a regular hub port and the other end to the LAN port...

Страница 18: ... on the rear panel of the device Turn on and boot your computer s and any LAN devices such as hubs or switches V Configure HG520 through the WEB interface The detailed steps are described in Chapter 4 Quick Setup It will help you configure the HG520 Quick Setup VI Save the configurations and Reboot To make the settings you made on the HG520 take effect save the configurations and reboot ...

Страница 19: ...nfiguration 3 1 Setup z Connect HG520 and computer with cross over straight through Ethernet cable z Power on HG520 z The default IP address of HG520 is 192 168 1 1 3 2 Establishing the Connection Enter the IP address default 192 168 1 1 of HG520 in the address line of Web Browser 1 The dialog box displayed as shown in Figure 3 1 ...

Страница 20: ...s Proprietary 9 Figure 3 1 Authentication 1 Please enter the management username password into the fields the default username password is admin admin 2 Click on the OK button 3 If the authentication is valid the home page Device Info Summary will be displayed on the screen Refer to Figure 3 2 ...

Страница 21: ...User Manual EchoLife HG520 Home Gateway Chapter 3 Preparing Configuration Huawei Technologies Proprietary 10 Figure 3 2 HG520 Home Page ...

Страница 22: ...he configuration procedure is started Quick Setup allows system administrator to select the appropriate operation mode and configure the corresponding settings step by step to create a connection The following five operation modes are supported z PPP over Ethernet PPPoE z IP over ATM IPoA z Bridging z MAC Encapsulation Routing MER z PPP over ATM PPPoA 4 1 Configuring PPPoE Click on Quick Setup in ...

Страница 23: ...tary 12 I ATM PVC Configuration Figure 4 1 Quick Setup ATM PVC Configuration 1 Enter the VPI VCI values The actual parameter is provided by your ISPs and you can contact them to get the detailed information 2 Disable DSL Auto connect 3 Check to enable QoS 4 Click on Next to go to next step ...

Страница 24: ...ction Type and Encapsulation Mode Configuration Figure 4 2 Quick Setup Connection Type and Encapsulation Mode 1 Select PPP over Ethernet PPPoE and the Encapsulation Mode The actual parameter is provided by your ISPs and you can contact them to get the detailed information 2 Click on Next to go to next step ...

Страница 25: ...O PAP CHAP The actual parameter is provided by your ISPs and you can contact them to get the detailed information 2 The Dial on demand function if checked will tear down the PPP link automatically when there is no outgoing packet for the programmed period of time that is set below 3 The PPP IP extension is a special feature provided by some ISPs Unless your service provider specifically requires t...

Страница 26: ... wants to access Internet and there is no active PPPoE connection z The users are able to assign some specific ATM PVC s to run PPPoE if HG520 has multiple ATM PVC connections IV IGMP Multicast WAN service configuration Figure 4 4 Quick Setup IGMP Multicast WAN service 1 Check to Disable Enable IGMP Multicast and WAN Service 2 Click on Next to go to next step ...

Страница 27: ...and Subnet Mask 2 Select to Disable Enable DHCP Server use DHCP Server Relay and configure related settings for that mode 3 HG520 will assign IP address subnet mask Default gateway IP address and DNS server IP address to host computers which connect to its LAN 4 Select Configure the second IP Address and Subnet Mask for LAN interface and configure if the second IP Address is used ...

Страница 28: ...Note Network Address Translation NAT function is default enabled and is not showing on the page to prevent it from being disabled 5 Click on Next to go to next step VI Wireless Configuration Figure 4 6 Quick Setup Wireless Setup 1 Check Enable Wireless to enable wireless radio or uncheck to disable ...

Страница 29: ...ss network It is case sensitive and must not exceed 32 alphanumeric characters 3 Click on Next to go to next step VII WAN Setup Summary Figure 4 7 Quick Setup WAN Setup Summary The last page displays a summary of previous settings Make sure that the configurations match the settings provided by ISP and then click on Save Reboot button to complete the configuration procedure ...

Страница 30: ... Quick Setup in the left frame and follow the steps below to create an IPoA Routed connection I ATM PVC Configuration Figure 4 8 Quick Setup ATM PVC Configuration 1 Enter the VPI VCI values The actual parameter is provided by your ISPs and you can contact them to get the detailed information 2 Click on Next to go to next step ...

Страница 31: ...p Huawei Technologies Proprietary 20 II Connection Type Configuration Figure 4 9 Quick Setup Connection Type and Encapsulation Mode 1 Select IP over ATM IPoA and the Encapsulation Mode Please contact you ISP for the information 2 Click on Next to go to next step ...

Страница 32: ...rietary 21 III WAN IP Settings Configuration Figure 4 10 Quick Setup WAN IP Settings 1 Set WAN IP Subnet Mask default gateway and DNS server settings The actual parameter is provided by your ISPs and you can contact them to get the detailed information 2 Click on Next to go to next step ...

Страница 33: ...ies Proprietary 22 IV NAT IGMP Multicast and WAN Service Configuration Figure 4 11 Quick Setup IPoA NAT IGMP Multicast and WAN service 1 Check to Enable Disable NAT and Firewall functions 2 Check to Enable Disable IGMP Multicast and WAN Service 3 Click on Next to go to next step ...

Страница 34: ...Setup Device Setup 1 Enter IP LAN IP Address and Subnet Mask to HG520 2 Select to Disable Enable DHCP Server use DHCP Server Relay and configure related settings for that mode 3 Select Configure the second IP Address and Subnet Mask for LAN interface and configure if the second IP Address is used 4 Click on Next to go to next step ...

Страница 35: ...s Setup Figure 4 13 Quick Setup Wireless Setup 1 Check Enable Wireless to enable wireless radio or uncheck to disable 2 Configure SSID SSID is the network name shared among all devices in a wireless network It is case sensitive and must not exceed 32 alphanumeric characters 3 Click on Next to go to next step ...

Страница 36: ...ck Setup WAN Setup Summary The last page gives a summary of previous steps Make sure that the settings match the settings provided by ISP and then click on Save Reboot button to complete the configuration procedure 4 3 Configuring Bridge Click on Quick Setup in the left frame and follow the steps below to create a Bridging connection ...

Страница 37: ...eway Chapter 4 Quick Setup Huawei Technologies Proprietary 26 I ATM PVC Configuration Figure 4 15 Quick Setup ATM PVC Configuration 1 Enter the VPI VCI values Please contact you ISPs for the information 2 Click on Next to go to next step ...

Страница 38: ...ietary 27 II Connection Type Configuration Figure 4 16 Quick Setup Connection Type and Encapsulation Mode 1 Select Bridging and the Encapsulation Mode The actual parameter is provided by your ISPs and you can contact them to get the detailed information 2 Click on Next to go to next step ...

Страница 39: ... Gateway Chapter 4 Quick Setup Huawei Technologies Proprietary 28 III WAN Service Configuration Figure 4 17 Quick Setup WAN Service 1 Give a service name and check the box to enable this WAN service 2 Click on Next to go to next step ...

Страница 40: ... EchoLife HG520 Home Gateway Chapter 4 Quick Setup Huawei Technologies Proprietary 29 IV Device Setup Figure 4 18 Quick Setup Device Setup 1 Enter LAN IP Address and Subnet Mask 2 Click on Next to go to next step ...

Страница 41: ... Setup Figure 4 19 Quick Setup Wireless Setup 1 Check Enable Wireless to enable wireless radio or uncheck to disable 2 Configure SSID SSID is the network name shared among all devices in a wireless network It is case sensitive and must not exceed 32 alphanumeric characters 3 Click on Next to go to next step ...

Страница 42: ...nologies Proprietary 31 VI WAN Setup Summary Figure 4 20 Quick Setup WAN Setup Summary The last page gives a summary of previous steps Make sure that the settings match the settings provided by ISP and then click on Save Reboot button to complete the configuration procedure ...

Страница 43: ... Encapsulation Mode Configuration of MER is similar to IPoA Select MAC Encapsulation Routing MER in Connection Type For other configuration please refer to IPoA settings 4 2 Configuring IPoA 4 5 Configuring PPPoA Configuration of PPPoA is similar to PPPoE Select PPP over ATM PPPoA in Connection Type For other configuration please refer to 4 1 Configuring PPPoE ...

Страница 44: ...User Manual EchoLife HG520 Home Gateway Chapter 4 Quick Setup Huawei Technologies Proprietary 33 Figure 4 22 Quick Setup Connection Type and Encapsulation Mode ...

Страница 45: ...pter 5 Advanced Setup Huawei Technologies Proprietary 34 Chapter 5 Advanced Setup Advanced Setup allows system administrator to configure the following topics z WAN z LAN z NAT z Security z Quality of Service z Routing z DNS z DSL z Port Mapping ...

Страница 46: ...onfiguring WAN Figure 5 1 Advanced Setup WAN This page shows the current existing WAN interfaces in the system User can choose Add Edit or Remove to configure WAN interfaces For details about Add and Edit procedure please refer to Chapter 4 Quick Setup 5 2 Configuring LAN Please refer to 4 1 V Device Setup ...

Страница 47: ...1 Virtual Servers Configuration Figure 5 2 Advanced Setup NAT Virtual Server allows you to direct incoming traffic from WAN side identified by Protocol and External port to the Internal server with private IP address on the LAN side The Internal port is required only if the external port needs to be converted to a different port number used by the server on the LAN side Up to 32 entries can be con...

Страница 48: ... add your own rule s Some commonly used servers Web FTP Mail and so on are pre defined in HG520 User can simply select the desired server from the pull down menu and assign the IP address of the local PC 2 To delete the configured rule s check the Remove box of the specific rule s and click on Remove Figure 5 3 Advanced Setup NAT Virtual Servers ...

Страница 49: ...pens the Open Ports in the firewall when an application on the LAN initiates a TCP UDP connection to a remote party using the Triggering Ports The Router allows the remote party from the WAN side to establish new connections back to the application on the LAN side using the Open Ports Up to 32 entries can be configured Figure 5 4 Advanced Setup NAT Port Triggering 1 Click on Add to enter configura...

Страница 50: ... port settings from this screen by selecting an existing application or creating your own Custom application and click Save Apply to add it 2 To delete the configured rule s check the Remove box of the specific rule s and click on Remove Figure 5 5 Advanced Setup NAT Add Port Triggering 5 3 3 DMZ Host Configuration The DSL router will forward IP packets from the WAN that do not belong to any of th...

Страница 51: ...ost Clear the IP address field and click Apply to inactivate the DMZ host Figure 5 6 Advanced Setup NAT DMZ Host 5 4 Configuring Security Two functions are supported in Security Outgoing IP Filtering and MAC Filtering 5 4 1 Outgoing IP Filtering Configuration By default all outgoing IP traffic from LAN is allowed but some IP traffic can be blocked by setting up filters ...

Страница 52: ...ow All of the specified conditions in this filter rule must be satisfied for the rule to take effect Figure 5 7 Advanced Setup Security Outgoing IP Filtering 1 Click Add to configure outgoing IP filters up to 32 entries can be configured 2 To remove check the item and click Remove 3 Click Save Apply to save and activate the filter Figure 5 8 shows the configuration that prevents a local computer I...

Страница 53: ...ion By default all incoming IP traffic from the WAN is blocked when the firewall is enabled However some IP traffic can be accepted by setting up filters The screen allows you to create a filter rule to identify incoming IP traffic by specifying a new filter name and at least one of the conditions below All of the specified conditions in this filter rule must be satisfied for the rule to take effe...

Страница 54: ...Setup Security Outgoing IP Filter 1 Click Add to configure outgoing IP filters up to 32 entries can be configured 2 To remove check the item and click Remove 3 Click Save Apply to save and activate the filter Figure 5 10 shows the configuration that allows a remote PC IP address 10 0 12 254 to access the local FTP server ...

Страница 55: ...ed Setup Security Add new outgoing IP Filter 5 4 3 Parental Control Configuration Parental Control allows user to create time of day restriction to a special LAN device connected to the Router Click Add to configure restriction rules To remove check the item and click Remove Up to 16 entries can be configured and used ...

Страница 56: ... Control 1 The MAC Address of the Browser automatically displays the MAC address of the LAN device click the Other MAC Address button and enter the MAC address of the other LAN device 2 To find out the MAC address of a Windows based computer go to command window and type ipconfig all 3 Click Save Apply to save and activate the restriction rule ...

Страница 57: ...2 Advanced Setup Firewall Add new Parental Control 5 5 Configuring Quality of Service Quality of Service QoS including IP Precedence IP TOS and IEEE 802 1P refers to a combination of mechanisms that jointly provide a specific quality level to application traffic crossing a network or multiple disparate networks ...

Страница 58: ...520 Home Gateway Chapter 5 Advanced Setup Huawei Technologies Proprietary 47 Figure 5 13 Advanced Setup Quality of Service 1 Click on Add to create a class to identify the IP traffic by specifying at least one condition below ...

Страница 59: ...Setup Huawei Technologies Proprietary 48 Figure 5 14 Advanced Setup Add new QoS rule 2 If multiple conditions are specified all of them take effect 3 Click Save Apply button to save it 5 6 Configuring Routing There are three routing information related settings ...

Страница 60: ...5 Advanced Setup Routing Default Gateway 1 If Enable Automatic Assigned Default Gateway checkbox is selected HG520 will accept the first received default gateway assignment from one of the PPPoA PPPoE or MER DHCP enabled PVC s 2 If the checkbox is not selected enter the static default gateway AND OR a WAN interface 3 Click Apply button to save it ...

Страница 61: ...cted you must reboot HG520 to activate the automatic assigned default gateway 5 6 2 Static Route Configuration 1 Click on Add to create a new Static Route up to 32 entries can be configured Figure 5 16 Advanced Setup Routing Static Route 2 Enter the destination network address subnet mask gateway AND OR available WAN interface and then click Apply to add the entry to the routing table ...

Страница 62: ...Advanced Setup Huawei Technologies Proprietary 51 Figure 5 17 Advanced Setup Routing Add new Static Route 5 6 3 RIP Configuration The Routing Information Protocol RIP is designed for exchanging routing information within a small to medium size network ...

Страница 63: ...ration z RIP Version 1 Class based IP network z RIP Version 2 Classless IP network z Operation Active Broadcast and listen to other RIP enabled devices z Operation Passive Listen only 1 Placing a check in the Enabled checkbox for the interface to complete the configuration 2 Click the Apply button to save the configuration 3 To start stop RIP for HG520 select the Enabled Disabled radio button for ...

Страница 64: ...5 19 Advanced Setup DNS Server 1 If Enable Automatic Assigned DNS checkbox is selected HG520 will accept the first received DNS assignment from one of the PPPoA PPPoE or MER DHCP enabled PVC s during the connection establishment 2 If the checkbox is not selected enter the primary and optional secondary DNS server IP addresses 3 Click Apply button to save it ...

Страница 65: ... 7 2 Dynamic DNS Configuration The Dynamic DNS service allows you to alias a dynamic IP address to a static hostname in any of the domains This function allows your HG520 to be more easily accessible from various locations of the Internet Before you proceed please visit one of these two website to apply your own Dynamic DNS service www dnadns org or www tzo com 1 Click Add to configure Dynamic DNS...

Страница 66: ...ter 5 Advanced Setup Huawei Technologies Proprietary 55 Figure 5 20 Advanced Setup DNS Dynamic DNS 3 Select your Dynamic DNS service provider from D DNS provider and enter your registration information 4 Click Save Apply to save the configuration ...

Страница 67: ...ed Setup DNS Add Dynamic DNS 5 8 Configuring DSL This page allows you configure DSL related settings including Modulations Phone Line Pair and Capability Due to the characteristics of DSL any change to default settings is not recommended Please consult your service provider for advice only if configuration is mandatory ...

Страница 68: ...Port Mapping supports multiple ports to PVC and bridging groups Each group will perform as an independent network To support this feature you must create mapping groups with appropriate LAN and WAN interfaces using the Add button The Remove button will remove the grouping and add the ungrouped interfaces to the Default group Up to 16 entries can be configured ...

Страница 69: ... the Group name and select interfaces from the available interface list and add it to the grouped interface list using the arrow buttons to create the required mapping of the ports The group name must be unique 2 Click Save Apply button to make the changes take effect immediately Note The selected interfaces will be removed from their existing groups and added to the new group ...

Страница 70: ...User Manual EchoLife HG520 Home Gateway Chapter 5 Advanced Setup Huawei Technologies Proprietary 59 Figure 5 24 Advanced Setup Configuration ...

Страница 71: ...This page allows you to configure basic features of the wireless LAN interface Figure 6 1 Wireless Setup Basic 1 You can enable or disable the wireless LAN interface hide the network from active scans no broadcasting of your network name set the wireless network name also known as SSID default ingrid and restrict the channels based on nation s requirements ...

Страница 72: ...6 2 Configuring Security Four types of wireless security are provided z Shared WEP z 802 1X z WPA WPA2 z WPA WPA2 PSK 6 2 1 WEP Configuration Wired Equivalent Privacy WEP provides security by encrypting data over radio waves when data is transmitted from one end point to another WEP is the weakest security method but the easiest one to configure ...

Страница 73: ...eless Setup Security WEP To enable WEP select the following items step by step z Network Authentication Shared z Data Encryption Enabled z Encryption Strength 128 bit recommended for better security or 64 bit Click Set Encryption Key to enter your WEP keys Four keys for both encryption strengths can be stored here ...

Страница 74: ...for 128 bit encryption keys 2 Enter 5 ASCII characters or 10 hexadecimal digits for 64 bit encryption keys 3 Select which key 1 4 to use from Current Network Key 4 Click Save Apply to save the configuration 6 2 2 802 1X Configuration 802 1X addresses the WEP weakness by adding user authentication through RADIUS server So you need to have your RADIUS server up and running before using 802 1X ...

Страница 75: ...r your RADIUS server IP address port number default 1812 and key 3 Follow 6 2 1 WEP to configure your WEP key 4 Click Save Apply to save your configuration 6 2 3 WPA WPA2 Configuration WPA Wi Fi Protected Access is the strongest wireless security provided by HG520 Like 802 1X WPA must co work with RADIUS server as well To enable WPA select the following items step by step z Network Authentication ...

Страница 76: ... Server IP Address Port Key must match your RADIUS server z WPA Encryption TKIP select AES or TKIP AES for WPA2 Check your wireless network adapter security capability before you decide which one to use Figure 6 5 Wireless Setup Security WPA 6 2 4 WPA WPA2 PSK Configuration WPA PSK lets you take advantage of WPA without the trouble of setting up your own RADIUS server ...

Страница 77: ...up Security WPA PSK 1 To enable WPA PSK select WPA PSK in Network Authentication 2 Enter 8 to 63 ASCII codes or 64 hexadecimal 0 9 A F digits in WPA Pre Shared Key 3 Click Save Apply to save the configuration 6 3 Configuring MAC Filter Wireless MAC filter allows you to implement access control based on device s MAC address ...

Страница 78: ... data from devices with matching MAC addresses in filter table can access HG520 2 If you select Deny in MAC Restrict Mode every device can access HG520 except those which have matching MAC addresses in the filter table 3 To add filter entry click on Add and enter the MAC address of HG520 4 Click Save Apply to save the configuration To delete the entry select the entry and click Remove ...

Страница 79: ...oprietary 68 6 4 Configuring Wireless Bridge Wireless Bridge also known as Wireless Distribution System can bridge data between two APs which is particularly useful while wired cabling is not available Note Only APs in same channel can be bridged Figure 6 8 Wireless Setup Wireless Bridge ...

Страница 80: ...ss default settings Modification is not recommended unless you are very familiar with these parameters z Channel Select the appropriate channel from the provided list to correspond with your network settings All devices in your wireless network must use the same channel in order to function correctly Default is 7 z Rate The range is from 1 to 54Mbit s The data transmission rate should be set accor...

Страница 81: ...nism will not be enabled HG520 sends Request to Send RTS frames to a particular receiving station and negotiates the transmission of a data frame After receiving an RTS the wireless station responds with a Clear to Send CTS frame to acknowledge the right to begin transmission z DTIM Interval This value between 1 and 255 milliseconds indicates the interval of the Delivery Traffic Indication Message...

Страница 82: ...e widest compatibility Select 54g Performance for the fastest performance Select 54g LRS if you are experiencing difficulty with legacy 802 11b equipment z 54g protection In Auto mode HG520 will use RTS CTS to improve 802 11g performance in mixed 802 11g 802 11b network Turn off protection to maximize 802 11g throughput under most conditions Figure 6 9 Wireless Setup Advanced 6 6 Viewing Station I...

Страница 83: ...User Manual EchoLife HG520 Home Gateway Chapter 6 Wireless Setup Huawei Technologies Proprietary 72 Figure 6 10 Wireless Setup Station Info ...

Страница 84: ...o test the Ethernet port connection DSL port connection and connection to the Internet Service Provider If a test displays a fail status click Return Diagnostic Tests at the bottom of the page to make sure the fail status is consistent If the test continues to show fail click Help to go to the troubleshooting procedures Figure 7 1 Diagnostics ...

Страница 85: ...tore default here The settings can be saved from HG520 to computer The saved setting file can also be loaded from computer to HG520 These 2 functions can help the system administrator to manage large amount of HG520 efficiently Restore Default will set the HG520 with the factory default configuration Backup the current configurations click on Backup Settings and a File Download window will pop up ...

Страница 86: ...ter 8 Management Huawei Technologies Proprietary 75 Figure 8 1 Management Settings Backup Settings Click on Save and select the destination of the backup file backupsettings cfg in your local computer Click on Save again to save your backup file ...

Страница 87: ...awei Technologies Proprietary 76 Figure 8 2 Management Settings File Download To update the configuration click on Browse and a Choose File window will pop up Locate the saved file and click on Update Settings HG520 will modify its settings based on the update file ...

Страница 88: ...l EchoLife HG520 Home Gateway Chapter 8 Management Huawei Technologies Proprietary 77 Figure 8 3 Management Settings Update To restore the router to its factory default settings click on Restore Default Settings ...

Страница 89: ...ome Gateway Chapter 8 Management Huawei Technologies Proprietary 78 Figure 8 4 Management Settings Restore Default 8 2 Viewing System Log This allows System Administrator to view the System Log and configure the System Log options ...

Страница 90: ...ions There are 8 events of Log Level and Display Level Emergency Alert Critical Error Warning Notice Informational and Debugging If the log mode is enabled the system will begin to log all the selected events For the Log Level all events above or equal to the selected level will be logged For the Display Level all logged events above or equal to the selected level will be displayed ...

Страница 91: ...vents will be sent to the specified IP address and UDP port of the remote syslog server If the selected mode is Local or Both events will be recorded in the local memory Click on Save Apply to save the configuration Figure 8 6 Management System Log Configuration Click on View System Log to see the router log based on your configuration ...

Страница 92: ...NMP Agent System Administrator could enable or disable the embedded SNMP Agent here SNMP Agent will allow a management application to retrieve HG520 statistics and status Figure 8 7 Management SNMP Agent 8 4 Configuring Internet Time HG520 can synchronize its internal time with Internet time server when available ...

Страница 93: ...er from the pull down menu Or select Other and define your preferred NTP server 3 Choose the time zone from Time zone offset 4 Click on Save Apply to save the configuration 8 5 Configuring Access Control HG520 browser management tool is protected by three categories Services IP addresses and Passwords All three must be matched if configured to gain access to the management tool All services are en...

Страница 94: ...es contained in the Access Control List If the Access Control mode is disabled the system will not validate IP addresses for incoming packets The services are the system applications listed in the Service Control List Click Add to add an IP address to the Access Control List To remove mark the Remove option of the specified IP address and then click Remove to remove the IP address from the Access ...

Страница 95: ...r accounts admin support and user admin has unrestricted access to change and view HG520 configuration support is used to allow an ISP technician to access HG520 for maintenance and to run diagnostics user can access HG520 to view configuration settings and statistics as well as update HG520 software Use the fields below to enter up to 16 characters and click Save Apply to change or create passwor...

Страница 96: ...6 Updating Software The new software can be updated from the Local computer connected to HG520 through Ethernet cable 1 Click on Browse to locate the new software image file in the computer 2 Click on Update Software to implement the software update Note The update process takes about 2 minutes to complete and your HG520 will reboot automatically ...

Страница 97: ...ersion description file name Auto Update Server IP Address or Domain Name the IP address or domain of server get it from Huawei web site or use the default Update Time Interval Second 0 to disable other number indicates the period time of HG520 checking the update server Version Description File Name the version description file name indicates the file name on the server and the default is Huawei ...

Страница 98: ...ent Huawei Technologies Proprietary 87 Click on Save Apply to enable the setting Note Please make sure the wan setting to keep the connection of Internet When HG520 finds new software it will automatically update and reboot Figure 8 13 Management Auto Update ...

Страница 99: ...anagement Huawei Technologies Proprietary 88 8 8 Save Reboot Click Reboot Router to reboot HG520 HG520 will automatically save the configuration before reboot so that modified settings will take effect after reboot Figure 8 14 Management Save and Reboot ...

Страница 100: ...uawei Technologies Proprietary 89 Chapter 9 Device Info 9 1 Summary This page displays HG520 s hardware software information and DSL connection status Figure 9 1 Device Info Summary 9 2 WAN This page displays HG520 s WAN interface information and connection status ...

Страница 101: ... HG520 Home Gateway Chapter 9 Device Info Huawei Technologies Proprietary 90 Figure 9 2 Device Info WAN 9 3 Statistics 9 3 1 LAN WAN This page displays packets transmitted and received status of HG520 s LAN WAN interfaces ...

Страница 102: ...ual EchoLife HG520 Home Gateway Chapter 9 Device Info Huawei Technologies Proprietary 91 Figure 9 3 Device Info Statistics WAN 9 3 2 ATM This page displays the statistics of HG520 s ATM interface including AAL5 ...

Страница 103: ... Home Gateway Chapter 9 Device Info Huawei Technologies Proprietary 92 Figure 9 4 Device Info Statistics ATM 9 3 3 ADSL This page displays HG520 s ADSL connection information and status such as rate SNR ES Error Second and so on ...

Страница 104: ...User Manual EchoLife HG520 Home Gateway Chapter 9 Device Info Huawei Technologies Proprietary 93 Figure 9 5 Device Info Statistics ADSL ...

Страница 105: ...l EchoLife HG520 Home Gateway Chapter 9 Device Info Huawei Technologies Proprietary 94 9 4 Route This page displays HG520 s routing table Figure 9 6 Device Info Route 9 5 ARP This page displays HG520 s ARP table ...

Страница 106: ...User Manual EchoLife HG520 Home Gateway Chapter 9 Device Info Huawei Technologies Proprietary 95 Figure 9 7 Device Info ARP ...

Страница 107: ...port up to 128 MAC learning addresses II Security z Stateful Packet Inspection Firewall z Access Control List z IP Port MAC Filtering z Supports PAP and CHAP with PPP RFC 1334 III WAN Protocols z Multiple protocol over AAL5 LLC and VC Mux RFC 1483 2684 z PPP over AAL5 RFC2364 z Classical IP RFC 1577 z PPPoA RFC 2364 z PPPoE RFC 2516 IV ATM z Support ATM Forum UNI 3 1 4 0 z Up to 8 ATM VCCs Virtual...

Страница 108: ... HTTP FTP and TFTP z System log z Safe against mis upgrade z Configuration backup and restore VI Radio z Media Access Control CSMA CA with ACK z Modulation 802 11b DSSS 802 11g OFDM z Frequency Range depending on countries z USA FCC 2412 MHz 2462MHz z Canada IC 2412 MHz 2462MHz z Europe ETSI 2412 MHz 2472MHz z Japan STD T66 STD 33m 2412 MHz 2484MHz z Operating Channels z 11 channels US Canada z 13...

Страница 109: ...Mbit s 11 Mbit s 12 Mbit s 18 Mbit s 24 Mbit s 36 Mbit s 48 Mbit s 54Mbit s with auto fallback VII Environment z Operating temperature range 0 C 40 C 32 F 104 F z Operating humidity range 10 95 non condensing VIII Physical Interfaces z One ADSL port RJ 11 z Four 10 100BaseT Ethernet ports RJ 45 with Auto detection IX Power z External power supply z Power consumption 10W ...

Страница 110: ...criber Line ATM Asynchronous Transfer Mode D DHCP Dynamic Host Configuration Protocol DNS Domain Name Server DSLAM Digital Subscriber Line Access Multiplex H HTML Hypertext Markup Language I IP Internet Protocols IPoA Internet Protocols Over ATM ISP Internet Service Provider L LAN Local Area Network M MAC Media Access Control N NIC Network Interface Card ...

Страница 111: ...0 P PPP Point to Point Protocol PPPoA PPP over ATM PPPoE PPP over Ethernet PVC Permanent Virtual Connection R RIP Routing Information Protocol S SNMP Simple Network Management Protocol T TCP Transfer Control Protocol V VCI Virtual Channel Identifier VPI Virtual Path Identifier W WAN Wide Area Network ...

Страница 112: ...Huawei Technologies Co Ltd Administration Building Huawei Technologies Co Ltd Bantian Longgang District Shenzhen P R China Postal Code 518129 Website http www huawei com ...

Отзывы: