background image

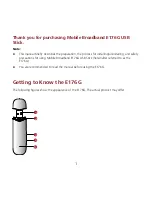
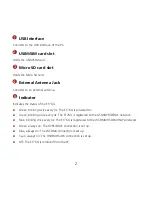
 USB Interface 

Connects to the USB interface of the PC. 

  USIM/SIM card slot 

Holds the USIM/SIM card.     

3

  Micro SD card slot 

Holds the Micro SD card.   

  External Antenna Jack 

Connects to an external antenna. 

5

 Indicator 

Indicates the status of the E176G. 

„


Green, blinking twice every 3s: The E176G is powered on. 

„


Green, blinking once every 3s: The E176G is registered to the GSM/GPRS/EDGE network. 

„


Blue, blinking once every 3s: The E176G is registered to the WCDMA/HSDPA/HSUPA network. 

„


Green, always on: The GPRS/EDGE connection is set up. 

„


Blue, always on: The WCDMA connection is set up. 

„


Cyan, always on: The HSDPA/HSUPA connection is set up. 

„


Off: The E176G is removed from the PC.

1

2

4

Содержание E176G

Страница 1: ...ns are approved by respective copyright holders under licenses Trademarks and Permissions and are trademarks or registered trademarks of Huawei Technologies Co Ltd Other trademarks product service and company names mentioned are the property of their respective owners Notice Some features of the product and its accessories described herein rely on the software installed capacities and settings of ...

Страница 2: ...TO THE MAXIMUM EXTENT PERMITTED BY APPLICABLE LAW IN NO CASE SHALL HUAWEI TECHNOLOGIES CO LTD BE LIABLE FOR ANY SPECIAL INCIDENTAL INDIRECT OR CONSEQUENTIAL DAMAGES OR LOST PROFITS BUSINESS REVENUE DATA GOODWILL OR ANTICIPATED SAVINGS Import and Export Regulations Customers shall comply with all applicable export or import laws and regulations and will obtain all necessary governmental permits and...

Страница 3: ...Table of Contents Getting to Know the E176G 1 Requirements for the PC 3 Preparing the E176G 3 Installation Guide 5 Safety Information 8 i ...

Страница 4: ...ess for installing uninstalling and safety precautions for using Mobile Broadband E176G USB Stick hereinafter referred to as the E176G You are recommended to read the manual before using the E176G Getting to Know the E176G The following figures show the appearance of the E176G The actual product may differ 1 2 4 5 3 1 ...

Страница 5: ...s of the E176G Green blinking twice every 3s The E176G is powered on Green blinking once every 3s The E176G is registered to the GSM GPRS EDGE network Blue blinking once every 3s The E176G is registered to the WCDMA HSDPA HSUPA network Green always on The GPRS EDGE connection is set up Blue always on The WCDMA connection is set up Cyan always on The HSDPA HSUPA connection is set up Off The E176G i...

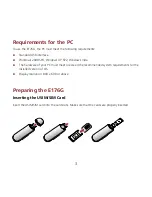
Страница 6: ...SP4 Windows XP SP2 Windows Vista The hardware of your PC must meet or exceed the recommended system requirements for the installed version of OS Display resolution 800 600 or above Preparing the E176G Inserting the USIM SIM Card Insert the USIM SIM card into the card slots Make sure that the cards are properly inserted 3 ...

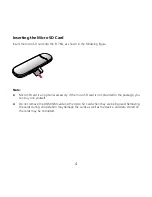
Страница 7: ... card is an optional accessory If the micro SD card is not provided in the package you can buy one yourself Do not remove the USIM SIM card and the micro SD card when they are being used Removing the cards during an operation may damage the cards as well as the device and data stored on the cards may be corrupted 4 ...

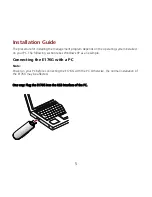
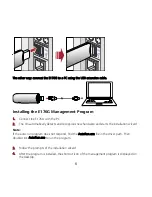
Страница 8: ...g system installed on your PC The following section takes Windows XP as an example Connecting the E176G with a PC Note Power on your PC before connecting the E176G with the PC Otherwise the normal installation of the E176G may be affected One way Plug the E176G into the USB interface of the PC 5 ...

Страница 9: ... detects and recognizes new hardware and starts the installation wizard Note If the auto run program does not respond find the AutoRun exe file in the driver path Then double click AutoRun exe to run the program 3 Follow the prompts of the installation wizard 4 After the program is installed the shortcut icon of the management program is displayed on the desktop 6 ...

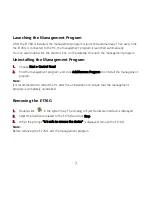
Страница 10: ...Start Control Panel 2 Find the management program and click Add Remove Program to uninstall the management program Note It is recommended to restart the PC after the uninstallation to ensure that the management program is completely uninstalled Removing the E176G 1 Double click in the system tray The Unplug or Eject Hardware interface is displayed 2 Select the hardware related to the E176G and cli...

Страница 11: ...r If you are using an electronic medical device consult the doctor or device manufacturer to confirm whether the radio wave affects the operation of this device Area with Inflammables and Explosives To prevent explosions and fires in areas that are stored with inflammable and explosive devices do not use your wireless device and observe the rules Areas stored with inflammables and explosives inclu...

Страница 12: ...g inflates Observe the rules and regulations of airline companies When boarding switch off your wireless device Otherwise the radio signal of the wireless device may interfere with the plane control signals Safety of Children Do not allow children to use the wireless device without guidance Small and sharp components of the wireless device may cause danger to children or cause suffocation if child...

Страница 13: ... device and accessories from water and vapor and keep them dry Do not drop throw or bend your wireless device Clean your wireless device with a piece of damp and soft antistatic cloth Do not use any chemical agents such as alcohol and benzene chemical detergent or powder to clean it Do not leave your wireless device and accessories in a place with a considerably low or high temperature Use only ac...

Страница 14: ...t safety information regarding radio frequency radiation RF exposure To ensure compliance with RF exposure guidelines the device must be used with a minimum of 1 5 cm separation from the body Failure to observe these instructions could result in your RF exposure exceeding the relevant guideline limits Regulatory Information The following approvals and notices apply in specific regions as noted CE ...

Отзывы: