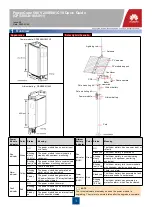
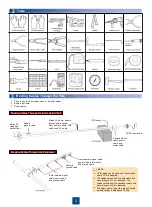
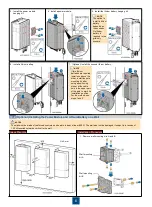
background image

2

2

Tools

3

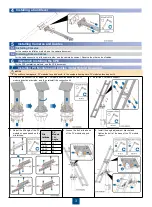
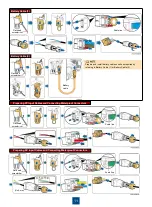
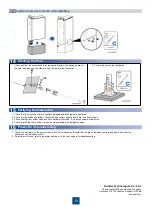
Routing Cables Through the Pole

1. Place  the pole  on a wooden  case  or a similar object.
2. Route  a pull wire.
3. Route  cables.

Bullet  camera  signal 
cable,  power  cable, 
and  ground  cable

Dome camera signal cable, 
power  cable,  alarm  cable, 
and  ground  cable

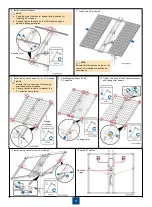
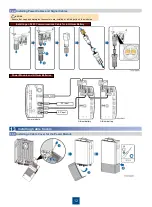
Routing Cables Through the Cantilever

Camera 
ground  cable

Routing Cables Through the Solar Hybrid Pole

Mains AC 
cable  and 
optical  fiber

Module 
ground  cable

Mains AC cable,  module 
ground  cable,  optical 
fiber, camera  cable,  CPE 
cable,  and  PV cable

CPE cable

Camera  signal 
cable,  power 
cable,  and 
alarm  cable

PV DC input  cable

CPE cables  can be used only  in scenarios 
where  CPE is adopted.

The cables  routed  from the pole  cable  hole 
have  a length  of 1.5 m reserved.  The 
cables  routed  from the cantilever  cable  hole 
have  a length  of 0.5 m reserved.

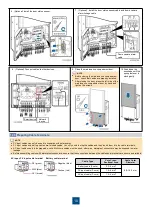
The object  where  the pole  is placed  should 
be able  to bear  a load  above  700 kg.

NOTE

Содержание CPS300-N18A1H1

Страница 1: ... on The lithium battery has generated a fault alarm and needs to be replaced Blinking slowly 0 5 Hz The lithium battery has generated a protection alarm which can be cleared Power Module Indicator Color Status Meaning Run indicator Green Off The power module has no power input or is faulty Blinking slowly 0 5 Hz The power module is communicating properly with upstream monitoring equipment Blinking...

Страница 2: ...the Solar Hybrid Pole Mains AC cable and optical fiber Module ground cable Mains AC cable module ground cable optical fiber camera cable CPE cable and PV cable CPE cable Camera signal cable power cable and alarm cable PV DC input cable CPE cables can be used only in scenarios where CPE is adopted The cables routed from the pole cable hole have a length of 1 5 m reserved The cables routed from the ...

Страница 3: ...d Scenario In the northern hemisphere PV modules face due south In the southern hemisphere PV modules face due north 1 Remove the connective kit adjust the PV module direction based on the PV module direction principles and then reinstall the connective kit 2 Install the PV module support 3 Adjust the tilt angle of the PV module support based on the site latitude NOTICE Site Latitude PV Module Til...

Страница 4: ...0 Tighten the bolts at the horizontal beams and raking strut beams 11 Install raking struts for the PV modules 12 Install PV cables Adhesive tape Spacing shim Ensure that the openings of the raking strut beams face outwards Partially tighten the bolts to prevent the PV modules from sliding 9 Install spacing shims for the PV modules NOTE NOTE Ensure that the junction boxes on the rear of PV modules...

Страница 5: ...ked off repaint the area to avoid corrosion Installing the Power Module and Lithium Battery on a Pole 10 1 9 Installing an Antenna For the antenna installation method see the antenna document 1 Use a positioning sticker to mark the installation position for the pole mounting kit Pole Diameter 105 140 mm Ensure that the arrow on the top of the pole mounting kit points exactly to the middle point on...

Страница 6: ...g kit B Unit mm 3 Install the power module hanging kit 4 Install a power module 5 Install the lithium battery hanging kit 6 Install a lithium battery If two lithium batteries are required install one above the other Install the pole mounting kit after using a positioning sticker at the cable hole in the upper part of the pole to mark its installation position For the method see steps 1 and 2 7 Opt...

Страница 7: ...ing kit B are used for each module Determine the number of wall mounting kits based on the number of modules to be installed NOTE Unit mm Hammer drill 6 Install the power module hanging kit 7 Install a power module onto the wall 8 Install the lithium battery hanging kit The option to install a lithium battery depends on the scenario No lithium battery is required in the grid only scenario NOTE ...

Страница 8: ...ables between the power module and lithium batteries 2 Connect the other end of the module ground cable to the pole ground bar Pole ground bar Power module Lithium battery Lithium battery NOTE If two lithium batteries are required install them onto two adjacent wall hanging kits NOTE 9 Install a lithium battery onto the wall 10 Optional Install the second lithium battery onto the wall ...

Страница 9: ...unications cable 3 DI Network device power cable 4 DO Dome camera alarm linkage cable 5 12VDC Bullet camera power cable 9 3 0 4 mm 6 24VAC Dome camera power cable 3 Install the dome camera power cable The power cable for the dome camera can only be connected to the 24VAC port 4 Install the bullet camera power cables 5 Install the NetEco cable Network device Use waterproof tape to protect the cable...

Страница 10: ...ut cable terminal L L1 brown Preparing Cable Terminals 12 3 NOTE 6 Optional Install the door status sensor Dome camera alarm cable 10 Push down the sunshade until the spring fastener is stuck gently 8 Optional Connect cables to other devices 9 Close the maintenance compartment door NOTE Before closing the maintenance compartment door check that cables are properly installed After closing the door ...

Страница 11: ...aring AC Input Cables and Connecting Waterproof Connectors Unit mm Flat head screwdriver Scale line Scale line Flat head screwdriver Battery Cable 2 Prepare and install battery cables onsite as required by referring to Battery Cable 1 or Battery Cable 2 Flat head screwdriver Battery cable Battery Cable 1 ...

Страница 12: ...m battery Installing Power Cables and Signal Cables 12 4 Installing an RJ45 Communications Cable for a Lithium Battery Ensure that caps and waterproof connectors are installed at all idle ports on the modules NOTICE 13 Installing Cable Covers Installing a Cable Cover for the Power Module 13 1 ...

Страница 13: ...2 If a problem is found refer to the alarm definitions in the user manual for troubleshooting Install a Cable Cover for the Lithium Battery 13 2 1 Check that the mounting kits are securely installed and all screws are tightened 2 Check that all cables are reliably connected with correct polarity and there is no short circuit 3 Check whether any screw holes are not installed with screws If so insta...

Отзывы: