background image

160  Internet

To subscribe to news channels

1. 

Tap 

Start > Programs > RSS Hub

, then tap 

Continue

.

2. 

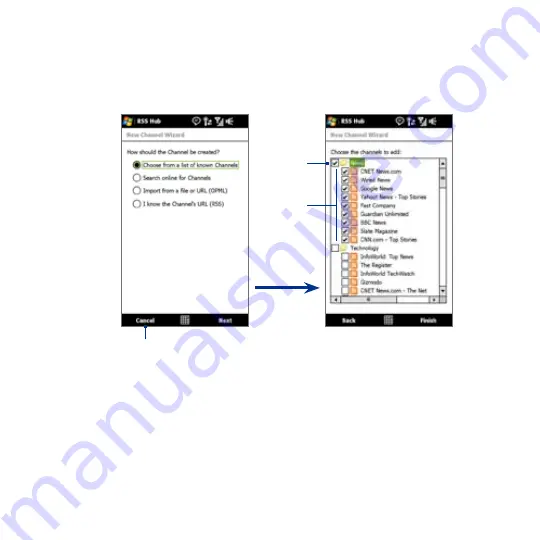
In the New Channel Wizard screen, select the 

Choose from a list of known 

Channels 

option, then tap 

Next

. A list of RSS channels is displayed.

Channels

Category

Tap to load pre-selected RSS channels.

Note

  If the RSS channel you want to subscribe to is not in the list of known channels, 

tap Back, then select another option on the New Channel Wizard screen. For 

more information on these other options, see the Help on your device.

3. 

Select the checkboxes of the RSS channels you want to subscribe to, then tap 

Finish

.

Tip


Channels are grouped by categories. If you want to select all channels in a 

category, select the category check box.

4. 

The channel list appears. Tap 

Refresh

 to update the channels.

Содержание T8290 QUAR100

Страница 1: ...www htc com User Manual...

Страница 2: ...vation ExtUSB TouchFLO HTC MAX 4G and HTC Care are trademarks and or service marks of HTC Corporation Microsoft MS DOS Windows Windows NT Windows Server Windows Mobile Windows XP Windows Vista ActiveS...

Страница 3: ...4 796 5 657 420 5 416 797 All other company product and service names mentioned herein are trademarks registered trademarks or service marks of their respective owners HTC shall not be liable for tech...

Страница 4: ...or course of performance Without limiting the foregoing it is further understood that HTC and its Providers are not responsible for Your use or misuse of the Weather Information Data and or Documentat...

Страница 5: ...THEREOF Important Health Information and Safety Precautions When using this product the safety precautions below must be taken to avoid possible legal liabilities and damages Retain and follow all pr...

Страница 6: ...rovider or local power company For a product that operates from battery power or other sources refer to the operating instructions that are included with the product Handle battery packs carefully Thi...

Страница 7: ...ry leaks Do not allow the leaking fluid to come in contact with skin or clothing If already in contact flush the affected area immediately with clean water and seek medical advice Do not allow the lea...

Страница 8: ...ere the air contains chemicals or particles such as grain dust or metal powders Please be aware that sparks in such areas could cause an explosion or fire resulting in bodily injury or even death EXPL...

Страница 9: ...ld be avoided INTERFERENCE WITH MEDICAL EQUIPMENT FUNCTIONS This product may cause medical equipment to malfunction The use of this device is forbidden in most hospitals and medical clinics If you use...

Страница 10: ...a Use of unauthorized or modified antennas may impair call quality and damage the phone causing loss of performance and SAR levels exceeding the recommended limits as well as result in non compliance...

Страница 11: ...fore should not be interpreted as a problem with the device Heed service markings Except as explained elsewhere in the Operating or Service documentation do not service any product yourself Service ne...

Страница 12: ...binet slots or other openings in the product Slots and openings are provided for ventilation These openings must not be blocked or covered Mounting accessories Do not use the product on an unstable ta...

Страница 13: ...d 28 SIM card 28 Battery 29 Storage card 31 1 3 Charging the Battery 31 1 4 Starting Up 32 Turn your device on and off 32 Auto configure the data connection settings 33 Switch to Sleep mode when not i...

Страница 14: ...lished 49 Make an emergency call 49 Make an international call 49 Call voice mail 50 2 3 Answering and Ending Calls 50 Accepting or rejecting an incoming call 50 Call functions 51 Check missed calls 5...

Страница 15: ...l Mode 87 4 7 Using Block Recognizer 88 4 8 Using Letter Recognizer 88 4 9 Using Transcriber 89 Chapter 5 Synchronizing Information With Your Computer 91 5 1 About Synchronization 92 Ways to synchroni...

Страница 16: ...107 Change the MMS settings 107 Create and send MMS messages 109 View and reply to MMS messages 111 6 4 Types of E mail Accounts 112 Set up your device to synchronize Outlook e mail with the computer...

Страница 17: ...Search for e mails on the Exchange Server 130 Flag your messages 131 Out of office auto reply 132 7 3 Managing Meeting Requests 132 7 4 Finding Contacts in the Company Directory 134 Chapter 8 Interne...

Страница 18: ...ernet Sharing 166 WiMAX modem 168 Chapter 9 Bluetooth 169 9 1 Bluetooth Modes 170 9 2 Bluetooth Partnerships 171 9 3 Connecting a Bluetooth Hands free or Stereo Headset 172 9 4 Beaming Information Usi...

Страница 19: ...iew screen 193 Advanced Options 194 11 2 Viewing Photos and Videos Using Album 198 Select a photo or video to view 198 View an image 199 Play back video 203 Close Album 203 11 3 Using Windows Media Pl...

Страница 20: ...cts 222 Share contact information 222 12 6 Comm Manager 223 12 7 Microsoft Office Mobile 225 12 8 Notes 226 12 9 Java 227 Installing and launching MIDlets MIDlet suites 228 Managing MIDlets MIDlet sui...

Страница 21: ...ng to an External Display 250 Connect the device to an external display 250 13 7 Protecting Your Device 251 Protect your SIM card with a PIN 251 Protect your device with a password 251 Encrypt files o...

Страница 22: ...ions Commission Notice 262 Modifications 263 Safety precautions for RF exposure 263 Exposure to Radio Frequency RF Signals 263 Body worn Operation 265 SAR Information 265 Telecommunications Internet A...

Страница 23: ...and Accessories 1 2 Installing the SIM Card Battery and Storage Card 1 3 Charging the Battery 1 4 Starting Up 1 5 Navigating Your Device 1 6 Home Screen 1 7 Status Icons 1 8 Start Menu 1 9 Quick Menu...

Страница 24: ...power press and hold for about 5 seconds For more information see Starting Up in this chapter Left panel Right panel VOLUME UP During a call or when playing music press this button to increase the vo...

Страница 25: ...brates and plays a sound when you press any of the virtual buttons TALK SEND HOME and END To disable any of these notifications tap Start Settings Personal tab Buttons Virtual Buttons tab then clear t...

Страница 26: ...26 Getting Started Back panel Back Cover Push the back cover upward to remove it 3 2 Megapixel Camera See Taking Photos and Videos in Chapter 11 for details...

Страница 27: ...or hands free conversation or for listening to audio media Connect the HTC composite video and audio cable purchased separately to output the device s screen and audio to an external display device wi...

Страница 28: ...he device and then slide it up to remove 1 2 3 SIM card The SIM card contains your phone number service details and phonebook message memory Your device supports both 1 8V and 3V SIM cards Note Some l...

Страница 29: ...ice the features and or settings you select and use items attached to connecting ports and your voice data and other program usage patterns Battery life estimates approximations Standby time Up to 350...

Страница 30: ...y compartment Insert the contact s side of the battery first and then gently push the battery into place Replace the back cover 1 2 3 R E S E T To remove the battery Make sure your device is turned of...

Страница 31: ...D card press it to eject it from the slot 1 2 R E S E T 1 3 Charging the Battery New batteries are shipped partially charged Before you start using your device it is recommended that you install and c...

Страница 32: ...battery and charging the battery you can now power on and start using your device Turn your device on and off To turn on the power Press the POWER button When you turn on your device for the first tim...

Страница 33: ...ar with network profile choices Select the profile you want to use and tap OK 3 Connection Setup then starts to configure your device s data connection settings 4 After the Connection Setup completes...

Страница 34: ...apping means to touch lightly and quickly with your finger pad or fingertip On screens that display smaller size items you can more accurately select an item by tapping it with your fingertip Swipe To...

Страница 35: ...er 3 Advancing playback In players that have a progress bar such as the Home screen s Music tab and Windows Media Player Mobile slide your finger horizontally on their progress bar to advance forward...

Страница 36: ...p with the stylus to open programs and select items on the screen and you tap and hold on the screen to open a shortcut menu You can also use the stylus the same way as what you do with finger gesture...

Страница 37: ...st important functions such as contacts text messages e mail Internet and more For more information about using the TouchFLO 3D Home screen see Chapter 3 Start menu Notification Signal strength Adjust...

Страница 38: ...ed call Speakerphone on Roaming Alarm Other wireless network s detected Wired headset connected Bluetooth on Icons that appear in this area Vibrate mode Sound on Sound off Icons that appear in this ar...

Страница 39: ...o signal Phone is turned off No phone service Searching for phone service Voice call in progress Call on hold Calls are forwarded Dialling while no SIM card is inserted No SIM card inserted Tip You ca...

Страница 40: ...more programs Open a recently used program Open a program When you are on another screen touch or tap this item to return to the TouchFLO 3D Home screen Open the Start menu By default the Start menu i...

Страница 41: ...grams stop programs and see how much program memory is being used Touch this icon to open the Quick Menu To switch to a running program touch the program name To stop a running program touch Customize...

Страница 42: ...1 Touch the Speaker icon on the Title bar 2 To switch between the Ring Volume and System Volume screens touch Ring or System on top of the screen 3 On either screens you can do the following To incre...

Страница 43: ...d vice versa faster To use the device s internal storage as a USB flash drive Do any of the following Connect the device to your PC using the USB sync cable When the Connect to PC screen appears selec...

Страница 44: ...44 Getting Started...

Страница 45: ...Chapter 2 Using Phone Features 2 1 Using the Phone 2 2 Making Calls 2 3 Answering and Ending Calls 2 4 Call History 2 5 Speed Dial 2 6 Setting Up Bluetooth SIM Access for Car Kit Phones...

Страница 46: ...Start Phone Press the TALK SEND button TALK SEND button Enter your PIN Most SIM cards are preset with a PIN personal identification number that is provided by your wireless service provider 1 Enter th...

Страница 47: ...core in a contact name For example if you tap number 2 on the phone keypad which is associated with a b and c on the Phone keypad contact names such as the following will be considered matches Ben Mil...

Страница 48: ...tered list flick through the list or slide your finger up or down the list slowly 4 To call a number or contact do one of the following Tap the desired phone number or contact from the list To call a...

Страница 49: ...call is established You can set the device to vibrate once to alert you that the call has been established with the other party 1 On the Phone screen tap Menu Options Advanced tab 2 Select the Vibrate...

Страница 50: ...keypad to call voice mail and retrieve your voice mail messages 2 3 Answering and Ending Calls When you receive a phone call the Incoming Voice Call screen will appear allowing you to either answer or...

Страница 51: ...dvanced tab while on the Phone screen Call functions When a call is in progress tap the available buttons on the Phone screen to put a call on hold dial another contact for a phone conference enter no...

Страница 52: ...support conference calling Contact your wireless service provider for details To turn on and off the Speakerphone During a call tap to toggle between turning on or off the speakerphone The speakerpho...

Страница 53: ...ber to Contacts at end of call check box then tap OK When you enable this option a pop up message appears after you end the phone call and lets you add the phone number to Contacts Check missed calls...

Страница 54: ...call All Calls Missed Dialed Received 2 5 Speed Dial Use Speed Dial to call frequently used numbers with a single tap For example if you assign a contact to the location 2 in Speed Dial you can tap an...

Страница 55: ...device are stored in the SIM card and not in the device memory Configure the car kit to download contacts only from the SIM card 1 On your device make sure that Bluetooth is turned on and set to visi...

Страница 56: ...d car kit phone Tap OK Note You will not be able to make receive calls send receive messages or perform related activities on your device when the SIM Access Profile connection is active You ll be abl...

Страница 57: ...Chapter 3 TouchFLO 3D 3 1 About TouchFLO 3D 3 2 Using the TouchFLO 3D Home Screen 3 3 Finger Gestures...

Страница 58: ...Home screen that allows finger touch access to the most widely used functions such as People Messages Mail Music Internet and more Allows you to use finger gestures to navigate screens 3 2 Using the T...

Страница 59: ...h or tap the desired tab on the Home screen Press and hold your finger on the active tab then slide your finger right or left over the tabs Release when you have selected the desired tab Note Apply so...

Страница 60: ...screen to move to the previous tab Home The Home tab displays the current date a flip style clock and an Alarm icon that indicates whether the alarm is on or off Missed calls and your upcoming calenda...

Страница 61: ...and view more appointments Touch this area to view details about missed calls in the Call History See Chapter 2 for details Home tab with flip clock Swipe downward on the screen to change back to the...

Страница 62: ...creen slide your finger to the People tab 2 Touch the small or big Plus icon or touch Add Favorite 3 On the Select a Contact screen touch the name of the desired contact Tips To create a new contact t...

Страница 63: ...r finger up or down the screen On the picture strip at the right side of the People screen Touch the picture of the desired favorite contact or Press and hold on the currently selected contact picture...

Страница 64: ...on the center screen to access his or her contact card On the contact card you will see the last outgoing or incoming call as well as contact details such as phone numbers e mail address and more Tip...

Страница 65: ...nformation about working with text messages and MMS see Text Messages and MMS in Chapter 6 Mail The Mail tab is where you send and receive e mail messages Including Outlook E mail you can add up to fo...

Страница 66: ...ved e mails swipe up or down on the envelope image Touch the e mail on the screen to open and read the message Touch Inbox to access all e mail messages of the currently selected account After selecti...

Страница 67: ...For more information about using Opera Mobile see Chapter 8 Photos and Videos The Photos and Videos tab lets you visually flip through your photos and video clips and view them in full screen From thi...

Страница 68: ...tails Touch here to take a photo Touch Slideshow to view the photos as a slideshow If a video is selected touch Play To flip through photos and videos swipe upward downward on the screen or touch the...

Страница 69: ...olders My Documents including all subfolders Storage Card Storage Card including all subfolders To play music On the Music tab flip through albums and all the music in each album then touch the Play i...

Страница 70: ...led Repeat One Repeat All Shuffle On To browse and play music in the Library The Library organizes music into categories such as Now Playing Artists Albums Genres All Songs and more When you add more...

Страница 71: ...o return to the Playlists tab To play back a playlist On the Playlists tab touch a playlist to open it Touch the first song in the playlist The Music tab starts playing the first song After each song...

Страница 72: ...hows you the current weather as well as weather information for the next five days of the week To add a city The Weather tab can display weather information of your local city and other added cities F...

Страница 73: ...tion Your device automatically connects to the Internet via the EDGE GPRS data connection WiMAX or Wi Fi to download and display weather information The current temperature temperature range type of w...

Страница 74: ...ownloaded every time an ActiveSync connection is established through over the air or USB connections Clear this option if you prefer to manually download weather information Download weather when roam...

Страница 75: ...access all the programs of your device When you have filled up the screen with programs scroll down the Programs tab to access more empty slots and add more programs To scroll down press and hold on t...

Страница 76: ...such as the contacts list file list message list calendar appointments list and more When finger scrolling swipe or flick your finger on the touch screen To scroll up and down To scroll down swipe yo...

Страница 77: ...ies in different programs To zoom in on a web page in Opera Mobile tap your finger twice on the screen See Using Opera Mobile in Chapter 8 for details To zoom in on a photo in Album make a full circle...

Страница 78: ...78 TouchFLO 3D...

Страница 79: ...Information 4 2 Using the Full QWERTY 4 3 Using the Compact QWERTY 4 4 Using the Phone Keypad 4 5 Using Multitap and T9 Modes 4 6 Using Numeric and Symbol Mode 4 7 Using Block Recognizer 4 8 Using Let...

Страница 80: ...ut Panel icon to open a menu where you can select a text input method and customize input options After selecting a text input method the corresponding Input Panel is displayed which you can use to en...

Страница 81: ...n language versions of the device When in landscape mode the Compact QWERTY and Phone Keypad are not available 4 2 Using the Full QWERTY The Full QWERTY is a full on screen QWERTY keyboard layout simi...

Страница 82: ...c and Symbol Mode for details Tap to create a new line Tap to delete the previous character Displays the word candidate list in T9 mode Tap a word to insert it into your text Tap to add a word to the...

Страница 83: ...ap to open a keyboard layout that lets you easily enter numbers and symbols See Using Numeric and Symbol Mode for details Tap to create a new line Tap to delete the previous character Displays the wor...

Страница 84: ...oggle between using Multitap or T9 mode Tap to open a keyboard layout that lets you easily enter numbers and symbols See Using Numeric and Symbol Mode for details Tap to create a new line Tap to delet...

Страница 85: ...econd letter tap twice To enter a punctuation mark symbol or number that appears on top of a key tap and hold the key T9 mode T9 is a predictive text input mode which displays a word candidate list as...

Страница 86: ...ptions according to your preferences Spell Correction Lets you correct typographical errors by selecting from a list of possible words that reflect the characters of the keys you have tapped as well a...

Страница 87: ...p to switch to the numeric keyboard See To lock the keyboard in Numeric and Symbol mode Compact QWERTY and Phone Keypad Full QWERTY To switch to Numeric and Symbol mode 1 While using Full QWERTY Compa...

Страница 88: ...iting area Enter letters by writing in the abc left area of the box Enter numbers by writing in the 123 right area of the box Enter symbols and punctuation by tapping the left or right area of the box...

Страница 89: ...criber introductory screen appears Read the introduction and tap OK 3 Position the cursor where you want text to appear 4 Use the stylus to write anywhere on the screen The handwriting will be convert...

Страница 90: ...ant to edit 2 After you lift the stylus from the screen the line disappears and the selected text will be highlighted 3 Do either of the following Rewrite the text Use gestures to capitalize letters i...

Страница 91: ...our Computer 5 1 About Synchronization 5 2 Setting Up Windows Mobile Device Center on Windows Vista 5 3 Setting Up ActiveSync on Windows XP 5 4 Synchronizing With Your Computer 5 5 Synchronizing via B...

Страница 92: ...computer For more information see Setting Up Windows Mobile Device Center on Windows Vista and Setting Up ActiveSync on Windows XP in this chapter Note ActiveSync or Windows Mobile Device Center only...

Страница 93: ...back up your files To back up files from the storage card to your computer use Windows Explorer to copy files from the storage card to the computer 5 2 Setting Up Windows Mobile Device Center on Wind...

Страница 94: ...transfer media files check for updates and explore your device but not synchronize Outlook information 4 Select the items you want to synchronize then click Next 5 Enter a device name then click Set U...

Страница 95: ...ic and Video XX new pictures video clips are available for import a wizard guides you to tag and transfer photos from your device to the Photo Gallery on your computer Click Pictures Music and Video A...

Страница 96: ...Select the ActiveSync check box then click Install 4 Read the license terms then click Accept 5 When installation is completed click Done 6 On the Getting Started with Windows Mobile screen click Clos...

Страница 97: ...uch Sync Data or Tap Start Programs ActiveSync then tap Sync To end synchronization before it completes tap Stop Tip To delete a partnership with one computer completely disconnect your device from th...

Страница 98: ...st 3 To change synchronization settings for an information type for instance E mail select it and tap Settings You can then set the download size limit specify the time period of information to downlo...

Страница 99: ...adapter or dongle To synchronize with a computer via Bluetooth 1 Set up Windows Mobile Device Center or ActiveSync on your computer to synchronize through Bluetooth See the program s Help for instruc...

Страница 100: ...ttings must be set in Windows Media Player Before media can be synchronized you must do the following Install Windows Media Player Version 11 on your computer Windows Media Player 11 works only in Win...

Страница 101: ...Chapter 6 Exchanging Messages 6 1 Messaging 6 2 Text Messages 6 3 MMS 6 4 Types of E mail Accounts 6 5 E mail Setup Wizard 6 6 Using E mail...

Страница 102: ...ging to access the Account Picker screen While you are in a message list of a certain account for example SMS MMS tap Menu Go To to switch to other types of messaging accounts To configure message acc...

Страница 103: ...sages SMS up to 160 characters long to other mobile phones Create a new text message Depending on your preference there are a number of alternative ways you can create a new text message From the Touc...

Страница 104: ...Text and tap a desired message To check the spelling tap Menu Spell Check 3 Tap Send Tips For more information about entering text and symbols see Chapter 4 If you want to know when a text message is...

Страница 105: ...anging Messages 105 To reply to a text message 1 In the SMS MMS inbox tap a message thread to open it 2 At the bottom of the screen type your reply message and then tap Send Enter your reply message h...

Страница 106: ...messages in the Inbox folder when your SIM card is in use To delete a message in the thread 1 In the SMS MMS inbox tap a message thread to open it 2 Select a message in the thread that you want to del...

Страница 107: ...e provider to have MMS provisioned as part of your calling plan Make sure the size of MMS messages that you send is within the limits allowed by your wireless service provider Change the MMS settings...

Страница 108: ...your device uses for MMS messages Send limit Select the maximum MMS message size allowed by your wireless service provider WAP version Select either WAP 1 2 or WAP 2 0 depending on which one is being...

Страница 109: ...address from Contacts Note You may need to scroll up to see Cc and Bcc 4 Enter a subject for your message 5 Tap the Insert icon to select and insert a photo or video clip When selecting a photo or vid...

Страница 110: ...Favorites link Add an emoticon Insert contact information Insert calendar appointment Tip To edit or delete a phrase on the My Text list tap and hold a string then tap Edit or Delete from the shortcut...

Страница 111: ...se the playback controls and Tap Contents to see a list of files included in the message On the Message Contents screen you can do the following To save a file select it and tap Menu Save To save the...

Страница 112: ...cklist 5 Tap Done Tip To unblock a phone number and allow the sender to send you MMS messages remove the number from the Blacklist Go to the SMS MMS inbox tap Menu MMS Options Blacklist tab tap and ho...

Страница 113: ...l server see Chapter 7 Add an e mail account To add a new e mail account you can do one of the following On the TouchFLO 3D Home screen slide to the Mail tab and then touch Menu Accounts New Account o...

Страница 114: ...found preconfigured on your device the E mail Setup wizard shows a successful message Tap Next If the settings are not found on your device select the Try to get e mail settings automatically from th...

Страница 115: ...tion for more secured e mail From the Network connection list select the data connection that you use for connecting to the Internet To customize download and format settings Before you tap Finish whe...

Страница 116: ...ferent e mail provider for example your e mail address may be Benjamin startup com but Email com hosts the e mail account and provides e mail services select the Custom Domain option in the E mail Set...

Страница 117: ...ter setting up e mail accounts on your device you can start sending and receiving e mail messages Create a new e mail message Depending on your preference there are two ways you can create a new e mai...

Страница 118: ...lso tap To if you want to add e mail addresses stored in Contacts 2 Enter a subject and compose your message Tip To choose from preset messages tap Menu My Text and tap a desired message To check the...

Страница 119: ...ters the message list narrows down to the sequence of characters you have entered For example entering J then O narrows the list to only the e mails that contain sender names and e mail subjects that...

Страница 120: ...tch Mail is also available for Outlook E mail See Instant download through Fetch Mail in Chapter 7 for details Download may take some time depending on the speed of your Internet connection size of th...

Страница 121: ...text box enter e mail addresses you want to exclude Synchronize e mails Synchronizing e mails ensures that new e mails are downloaded to the device Inbox folder e mails in the Outbox folder are sent a...

Страница 122: ...it select the desired e mail size 5 Close ActiveSync and reconnect your device to the computer To change the download size and format for Internet e mail 1 Tap Menu Options on the Account Picker scree...

Страница 123: ...ame of your IMAP4 e mail account 3 Tap Download Size Settings 4 In Download attachments Select All attachments to always download file attachments or Select a file size limit for auto downloading atta...

Страница 124: ...124 Exchanging Messages...

Страница 125: ...7 Working With Company E mails and Meeting Appointments 7 1 Synchronizing with the Exchange Server 7 2 Working With Company E mails 7 3 Managing Meeting Requests 7 4 Finding Contacts in the Company Di...

Страница 126: ...your device Exchange Server name must be Outlook Web Access server name Domain name User name and password that you use at work If you have not synchronized your device with your computer follow these...

Страница 127: ...xchange Server settings open ActiveSync on your device then tap Menu Configure Server Start synchronization Before you start synchronizing with the Exchange Server make sure your device has been set u...

Страница 128: ...ve in your Inbox on the Exchange Server Items such as contacts calendar and tasks are also immediately updated onto your device when these items have been changed or new entries have been added on the...

Страница 129: ...ttom of the screen Instant download through Fetch Mail The Fetch Mail feature downloads an entire e mail immediately without the need for you to perform a full Send Receive action This limits the down...

Страница 130: ...r must also be set up to allow access to SharePoint document libraries or internal file servers Search for e mails on the Exchange Server You can access e mails that are not available on your device b...

Страница 131: ...ags are disabled or hidden if e mails are synchronized with earlier versions of Microsoft Exchange Server To flag or unflag a message 1 Open Outlook on your device and access the Inbox 2 Select a mess...

Страница 132: ...ging Meeting Requests When you schedule and send meeting requests from your device you can invite attendees to your meeting and check their status to know about their availability When you receive a m...

Страница 133: ...sponse e mail before sending then tap OK If you accepted the meeting request it will automatically be added as an appointment in Calendar on your device To view the list of meeting participants 1 Tap...

Страница 134: ...Finding Contacts in the Company Directory In addition to having contacts on your device you can access contact information from your organization s Company Directory By having over the air access to...

Страница 135: ...ppointments 135 In a new e mail message tap the To box or tap Menu Add Recipient then tap Company Directory on the top of the list When creating a meeting request and selecting required and optional a...

Страница 136: ...a contact to select it Notes You can save a contact from the Company Directory to your device by selecting the contact then tapping Menu Save to Contacts You can search on the following information as...

Страница 137: ...apter 8 Internet 8 1 Ways of Connecting to the Internet 8 2 Starting a Data Connection 8 3 Using Opera Mobile 8 4 Using YouTube 8 5 Using Windows Live 8 6 Using RSS Hub 8 7 Using Your Device as a Mode...

Страница 138: ...iMAX Worldwide Interoperability for Microwave Access provides wireless Internet access over greater distances than Wi Fi and delivers data transfer rates of up to 30 Mbps Note You cannot connect to a...

Страница 139: ...atus to the WiMAX network The configuration and signal quality of the WiMAX network connection are also shown Wi Fi Wi Fi provides wireless Internet access over distances of up to 300 feet 100 meters...

Страница 140: ...available Wi Fi networks in your area 1 The network names of the detected wireless networks are displayed on a pop up message window Tap the desired Wi Fi network then tap OK Note When you select an o...

Страница 141: ...k It may be necessary to provide a username and password for certain closed wireless networks To check Wi Fi network status You can check the current Wi Fi connection status from any of the following...

Страница 142: ...of the Wi Fi network are also shown Configure Wireless Networks screen On the Home screen slide to the Settings tab and then tap All Settings In the Connections tab tap Wi Fi This screen displays the...

Страница 143: ...tion For example move the slider to the left Best Performance to have the optimal wireless network performance move to the right Best Battery to obtain the maximum battery usage EDGE Use EDGE or GPRS...

Страница 144: ...en tap All Settings 2 On the Connections tab tap Connections 3 In My ISP tap Add a new modem connection 4 On the Make New Connection screen enter a name for the connection 5 In the Select a modem list...

Страница 145: ...6 Enter your user name password and any other information required by your ISP then tap Finish 8 2 Starting a Data Connection After setting up a data connection such as EDGE GPRS or ISP dial up on you...

Страница 146: ...2 Tap the Data Connection button 8 3 Using Opera Mobile Opera Mobile is a full featured Internet browser optimized for use on your device Note You can also use Internet Explorer Mobile to browse the w...

Страница 147: ...settings check downloads view History and more 8 Close tab Tap to close the current tab This is only enabled if you have more than one tab opened 9 Zoom control Tap to open the zoom control bar and zo...

Страница 148: ...the slider to the right to zoom in or to the left to zoom out on the page Tip Touch and hold an empty area on a web page to open a shortcut menu that lets you go back to the previous page reload the...

Страница 149: ...nloaded You can also resume or stop current downloads Tap to view information about the Web page you are browsing Tap to see web pages that you have viewed Tap to manage and view web pages that you ha...

Страница 150: ...YouTube Tap Start Programs YouTube Tap to open the Program Guide list The Program Guide list only appears if you are subscribed to a channel Displays the current program channel being viewed Tap to cl...

Страница 151: ...am Guide list 3 Tap Search YouTube searches for the channel and then displays the available videos from it 4 Tap and then on the confirmation screen tap OK The channel you just subscribed to will now...

Страница 152: ...r History screen tap a video to launch the YouTube Video Player Tap to go back to the beginning of the video Tap to toggle between playing and pausing the video Tap to stop the video playback Tap to r...

Страница 153: ...page of related videos If no action is taken it automatically goes to the next page after 10 seconds Tap to go back to the previous page of related videos Bookmarks You can store frequently viewed vid...

Страница 154: ...p Edit 2 Tap on the video you want to remove from Bookmarks 3 On the confirmation screen tap Yes 4 Tap Done History View recently watched videos on the History screen To view History On the YouTube sc...

Страница 155: ...eneration of Hotmail Live Contacts your address book for storing Live Mail Live Messenger and Hotmail contacts Set up Windows Live The first time you use Windows Live sign in using your Windows Live I...

Страница 156: ...mail inbox messages will be downloaded to your device 6 Tap Next 7 After synchronization is complete tap Done The Windows Live interface On the Windows Live main screen you will see a search bar navig...

Страница 157: ...os Change status display name View contacts by online status groups and more Send messages even when a contact is offline Note Before you can use Windows Live Messenger your device must be connected t...

Страница 158: ...he message screen 3 To add an emoticon tap Menu Add emoticon then tap an icon from the list 4 Tap Send 5 To end a conversation with the current contact tap Menu End conversation Tips To send a file ta...

Страница 159: ...4 Tap OK 5 Follow the remaining instructions to add the new contact to your Windows Live contact list 8 6 Using RSS Hub RSS Hub is an RSS reader that keeps you up to date with the latest news from th...

Страница 160: ...e If the RSS channel you want to subscribe to is not in the list of known channels tap Back then select another option on the New Channel Wizard screen For more information on these other options see...

Страница 161: ...1 In the channel list tap Menu Channel New to open the New Channel Wizard screen 2 Select an option then follow screen instructions to add new channels For more information on New Channel Wizard opti...

Страница 162: ...category then tap Menu Rename or Menu Delete If you want to change the channel category tap and hold the channel in the channel list then tap Change Category Select a new category and tap OK View and...

Страница 163: ...display the news summary Headline and read status Audio Video Image file attachment Tap to download the file News summary Tap to open the news item in Opera Mobile See Using Opera Mobile in this chap...

Страница 164: ...Play audio Play video below the audio video file icon to play back the file Tap Menu Podcast Save to save a copy of the file to the device s main memory or storage card To send the headline link via e...

Страница 165: ...been set up with a data connection yet tap Menu Connection Settings on the Internet Sharing screen For more information about setting up these connections see EDGE and Dial up in this chapter If you...

Страница 166: ...connection of your device activate Internet Sharing on your device then set up a Bluetooth Personal Area Network PAN between the computer and your device 1 On your device turn on Bluetooth and set it...

Страница 167: ...nder Network Tasks click View Bluetooth network devices d In the Bluetooth Personal Area Network Devices dialog box select your device then click Connect Note If the Bluetooth adapter or dongle on you...

Страница 168: ...lier in this chapter to know how to turn WiMAX on 2 Connect the device to your desktop or notebook computer using the USB sync cable 3 Do any of the following When the Connect to PC screen appears sel...

Страница 169: ...Chapter 9 Bluetooth 9 1 Bluetooth Modes 9 2 Bluetooth Partnerships 9 3 Connecting a Bluetooth Hands free or Stereo Headset 9 4 Beaming Information Using Bluetooth 9 5 Printing Files via Bluetooth...

Страница 170: ...it on then turn off your device Bluetooth also turns off When you turn on your device again Bluetooth automatically turns on Turn off Bluetooth when not in use to conserve battery power or in places w...

Страница 171: ...luetooth partnership 1 On the Home screen slide to the Settings tab and then tap All Settings 2 On the Connections tab tap Bluetooth Devices tab 3 Tap Add new device Your device displays the names of...

Страница 172: ...me a Bluetooth partnership tap and hold the partnership s name on the Devices tab of the Bluetooth screen then tap Edit To delete a Bluetooth partnership tap and hold the partnership s name on the Dev...

Страница 173: ...etooth You can beam information such as contacts calendar items tasks and files from your device to your computer or to another Bluetooth enabled device Note If your computer does not have built in Bl...

Страница 174: ...ow the Bluetooth icon in the notification area e To enable your computer to receive Bluetooth beams right click the Bluetooth icon in the notification area at the bottom right corner of your computer...

Страница 175: ...f vcs file formats Before you start printing make sure to turn on the Bluetooth printer and to turn on Bluetooth on your device To turn on Bluetooth tap Start Programs Comm Manager then tap the Blueto...

Страница 176: ...nd then on the menu tap Print via Bluetooth 3 Follow steps 3 to 5 in the To print contact information procedure To print a text file 1 In File Explorer locate the text file you want to print 2 Tap and...

Страница 177: ...Chapter 10 Navigating on the Road 10 1 Google Maps 10 2 Guidelines and Preparation for Using GPS 10 3 Downloading Satellite Data via QuickGPS...

Страница 178: ...open Google Maps you will be asked to accept the terms and conditions when using Google Maps You must agree to the terms and conditions before you can proceed Tap to zoom out on the map Tap to zoom in...

Страница 179: ...of interest from your current location Note You can also search for keywords addresses and postal codes 1 On the Google Maps screen tap Search 2 Enter the place of interest you want to go to for examp...

Страница 180: ...contact saved on your device via SMS For more information about Google Maps go to http www google com gmm index html 10 2 Guidelines and Preparation for Using GPS If you install a GPS software on you...

Страница 181: ...affected by obstructions such as high rise buildings tunnels bridges forests weather rainy or cloudy days etc If the vehicle s visor contains metal it will be difficult for the GPS signal to pass thro...

Страница 182: ...a from a web server instead of from the satellites using the Internet connection on your device which can be via Wi Fi ActiveSync or EDGE GPRS This significantly speeds up the time for determining you...

Страница 183: ...e reminded again Tap OK to open the QuickGPS program and download the latest data Auto download when data expires Allows ephemeris data to be automatically updated onto your device when the data has e...

Страница 184: ...184 Navigating on the Road...

Страница 185: ...Chapter 11 Experiencing Multimedia 11 1 Taking Photos and Videos 11 2 Viewing Photos and Videos Using Album 11 3 Using Windows Media Player Mobile 11 4 Using Audio Booster...

Страница 186: ...hen you open Camera Tip You can also tap Start Programs Camera to open the Camera program To exit the Camera Tap the Exit icon on the Camera screen Tap the screen to show the Camera screen icons Captu...

Страница 187: ...suitable for sending with MMS messages Contacts Picture Captures a still image and gives you the option to immediately assign it as a Photo ID for a contact Picture Theme Captures still images and pla...

Страница 188: ...Note For more information about the different shoot options see Advanced Options in this chapter By default you need to touch do not press the Virtual Camera button to activate auto focus and then wh...

Страница 189: ...rted by the Resolution you have selected See Zooming for details 2 Auto focus indicator Displays a flashing bracket when focusing When focus is set the flashing bracket changes to a steady green brack...

Страница 190: ...p to toggle among different templates 11 Progress indicator In Picture Theme and Panorama modes this shows the number of consecutive shots Picture Theme mode 10 11 Menu Panel The Menu Panel provides a...

Страница 191: ...ss bar at the bottom of the screen On the Brightness bar tap to increase or tap to decrease the brightness level Tap outside the Brightness bar to apply the change 4 Camera Tap to select the camera to...

Страница 192: ...he camera zoom range for a photo or a video clip depends on the capture mode and resolution Refer to the table for more information Capture mode Resolution Zoom range Photo W 2048 x 1216 1 0x to 1 6x...

Страница 193: ...pturing the Review screen lets you view send or delete the photo or video clip by tapping an icon Review screen icons Icon Function Back Return to the live Camera screen Delete Delete the captured ima...

Страница 194: ...ured image video on the Review screen Select No Limit if you do not want to impose a time limit Select No Review to immediately return to the live Camera screen after capturing and saving Quality Sele...

Страница 195: ...uch and hold the Virtual Camera button to activate auto focus When focus is set keep touching the button to take the shot or start recording video Otherwise lift your finger from the Virtual Camera bu...

Страница 196: ...Camera Images naming standard and will be saved to the DCIM 100MEDIA folder on the storage card Counter To reset the file naming counter back to 1 tap Reset Flicker Adjustment When taking indoor shots...

Страница 197: ...vice s Main Memory If you transferred some templates to a storage card via File Explorer set this option to Main Card to specify that templates are located in both the main memory and the storage card...

Страница 198: ...me screen slide to the Photos and Videos tab and tap Album In the Camera program tap Tap Start Programs Album Note When you open Album from the Camera program the screen orientation of Album is switch...

Страница 199: ...r for details View an image While viewing an image in full screen tap the screen to open the on screen menu Tap to go back to the main Album screen Photos and Videos tab or Camera Tap to start the sli...

Страница 200: ...otate the image by simply turning your device sideways To view the next or previous image When viewing images in Portrait or Landscape mode go to the next image by swiping your finger across the scree...

Страница 201: ...ckwise on an area to zoom in on that area Tips When you zoom in on an image double tap the screen to automatically zoom out and fit the image to the screen When you zoom in on an image tap and hold th...

Страница 202: ...e previous image Tap to open the slideshow options where you can set the transition effect to use time per slide and orientation of the images Tap to return to the main Album screen or the Photos and...

Страница 203: ...orward or backward in the video Elapsed time Total duration Tip If the video is in your favorite album you can start the video playback from the Photos and Videos tab on the Home screen On the Photos...

Страница 204: ...ed File Extensions Windows Media Video MPEG4 Simple Profile H 263 H 264 Motion JPEG wmv asf mp4 3gp 3g2 mp4 3gp 3g2 m4v avi Audio File Formats Supported File Extensions Windows Media Audio WAVE MP3 MI...

Страница 205: ...se volume About the screens and menus Windows Media Player Mobile has three primary screens Playback screen The screen that displays the playback controls such as Play Pause Next Previous and Volume a...

Страница 206: ...your device to your computer 2 In the Device Setup Wizard select Yes search my computer now Note If you have previously opened Windows Media Player and searched for media on your computer you will not...

Страница 207: ...automatically To synchronize content manually to your device 1 If you have not set up media synchronization between your device and computer follow steps 1 to 3 in To synchronize content to your devic...

Страница 208: ...top of the screen then tap the media storage that you want use for example Storage Card 3 In most cases Windows Media Player Mobile automatically updates the library However you can manually update th...

Страница 209: ...to the Now Playing list Note You cannot select multiple files simultaneously 4 After adding the media files tap Menu Now Playing 5 On the Now Playing screen tap Menu Save Playlist 6 Enter the playlist...

Страница 210: ...er 1 2 3 4 Control Function 1 On Select the check box to enable or disable the equalizer 2 Frequency band Drag the sliders to adjust the frequency 3 Menu Tap Menu Cancel to exit Audio Booster without...

Страница 211: ...2 Save your equalizer settings as a preset by tapping Menu Save as Preset 3 Enter a preset name and then tap Done The preset you created will be added to the list box To delete a custom equalizer pres...

Страница 212: ...212 Experiencing Multimedia...

Страница 213: ...grams 12 1 Programs on your Device 12 2 Adding and Removing Programs 12 3 Adobe Reader LE 12 4 Calendar 12 5 Contacts 12 6 Comm Manager 12 7 Microsoft Office Mobile 12 8 Notes 12 9 Java 12 10 SIM Mana...

Страница 214: ...allow you to uninstall most of the preinstalled programs Note Before you purchase additional programs for your device make sure that they are compatible with your device To install a program 1 Downlo...

Страница 215: ...Adobe Reader LE or Open File Explorer find the PDF file then tap the file to open it To navigate through a PDF document You can use the controls in the program and finger gestures to navigate a PDF do...

Страница 216: ...28 bit encryption When you open a password protected PDF file you will be prompted to enter the password before opening it 12 4 Calendar Use Calendar to create appointments including meetings and othe...

Страница 217: ...appear in banners at the top of the calendar To remove an appointment tap Menu Delete Appointment Tip To have the time entered automatically in Day view tap and drag to select a time slot for the new...

Страница 218: ...dicate that there are conflicting appointments To see detailed appointment information in any view tap the appointment To view appointments by category tap Menu Filter then select the desired category...

Страница 219: ...signated as required For more information see Managing Meeting Requests in Chapter 7 4 When you have finished adding attendees tap Done 5 Tap OK to send Tip To choose the e mail account to use for sen...

Страница 220: ...can add the following types of contacts to your device Outlook contacts Contacts that are stored on your device which can be created on your device or synchronized with your PC or the Exchange Server...

Страница 221: ...ed tap OK Tips If a person who is not in your list of contacts called you and you want to save that person s phone number tap and hold the phone number in the Call History and then tap Save to Contact...

Страница 222: ...ed text box until the contact you want is displayed Filter the list by categories In the contact list tap Menu Filter then tap a category you ve assigned to a contact To show all contacts again select...

Страница 223: ...ining contact information as file attachment in an MMS message 1 On the Contacts screen select a contact 2 Tap Menu Send as vCard 3 A new MMS message is created with the vCard file attached Enter the...

Страница 224: ...Tap Settings Bluetooth to configure Bluetooth on your device See Chapter 9 for details 4 Switch Wi Fi on or off Tap Settings Wireless LAN to configure wireless network connection settings See Chapter...

Страница 225: ...oft Office Word and Microsoft Office Excel To see a complete list of features that are not supported in Word Mobile and Excel Mobile see Help on your device Tips By default Word Mobile saves documents...

Страница 226: ...ap OK to save and return to the note list Notes To select handwritten text tap and hold next to the writing As soon as dots appear and before they form a complete circle quickly drag across the writin...

Страница 227: ...n you are finished recording Tip To select the voice recording format return to the note list and then tap Menu Options Global Input Options link at the bottom of the Options screen On the Input scree...

Страница 228: ...MIDlets MIDlet suites on your device and displays them in a list 2 From the list tap the MIDlet MIDlet suite that you want to install 3 Select root or a folder where to install the MIDlet suite to the...

Страница 229: ...M Manager 2 Tap New and enter a contact name and phone number 3 Tap Save to save the information on your SIM card Tip To change contact information on your SIM card tap a SIM contact edit the informat...

Страница 230: ...ers are left empty for you to define them 1 On the SIM Manager screen tap Menu Tools Options 2 Select the check boxes of the types of phone numbers that you want to be added to the SIM card 3 Under th...

Страница 231: ...once or repeatedly recurring Your tasks are displayed in a task list Overdue tasks are displayed in red A reminder will be displayed when you have new tasks to be completed To create a task 1 Tap Star...

Страница 232: ...the Show start and due dates check box then tap OK To send task information as a vCalendar After selecting the task to send in the Task screen tap Menu Send as vCalendar to send a vCalendar containing...

Страница 233: ...acted to then touch Extract 5 Touch Menu File Close Archive to close the zip file To create a new zip archive 1 Touch File New Archive 2 On the Save As screen enter the zip file name and choose a fold...

Страница 234: ...234 Programs To select all files use the stylus to tap and hold on the screen and then tap Select All 7 Touch Add 8 Touch Menu File Close Archive to save and close the zip file...

Страница 235: ...Settings on your Device 13 3 Changing Basic Settings 13 4 Using Connection Setup 13 5 Using Task Manager 13 6 Connecting to an External Display 13 7 Protecting Your Device 13 8 Managing Memory 13 9 R...

Страница 236: ...your computer a Browse the contents of your device right click the file you want to copy then click Copy b Right click a folder on your computer then click Paste 4 To copy a file from your computer t...

Страница 237: ...then select Paste on the menu Tip You can configure programs such as Word Mobile and Excel Mobile to directly save edited files onto a storage card In the program s file list tap Menu Options then se...

Страница 238: ...e the appearance and the information to be displayed on the Home screen System tab Icon Description About This is where you can see basic information such as the Windows Mobile version and type of pro...

Страница 239: ...ation ports if required You may need to do this when there are programs on your device that access GPS data or you have connected a GPS receiver to your device See Help for details G Sensor Recalibrat...

Страница 240: ...rmation see Using Task Manager in this chapter TouchFLO You can enable or mute the finger scrolling and panning sound You can also enable or disable the large Start menu TV Out Set the video standard...

Страница 241: ...nnections for your device such as phone dial up GPRS and more so that your device can connect to the Internet or a private local network Domain Enroll Enroll your device in your company s domain to le...

Страница 242: ...u visit or communicate with someone in a particular time zone often you can select it as your visiting time zone 1 On the Home screen Home tab tap the time display and then tap the Time tab 2 Tap Visi...

Страница 243: ...the backlight to dim after a time delay 1 On the Home screen slide to the Settings tab and then tap All Settings 2 On the System tab tap Power Advanced tab 3 In On battery power and On external power...

Страница 244: ...g tone 1 On the Home screen slide to the Settings tab and then tap Sound 2 Scroll down and then tap Ring Type Select the Ring Type you want to use and then tap Done 3 Tap Ringtone and then select the...

Страница 245: ...hoose a flashing light a single sound a repeating sound or vibration 6 If you choose to play a sound tap the list next to the Play sound check box and tap the sound you want To choose how to be notifi...

Страница 246: ...Get Settings 4 Choose your desired options then tap OK For more information about customizing settings of phone services see Help on your device 13 4 Using Connection Setup Connection Setup configures...

Страница 247: ...from Connection Setup s settings screen Connection Setup will then reconfigure your device s data connections settings based on the operator that you selected 1 On the Home screen slide to the Setting...

Страница 248: ...tap and hold the program name on the Running tab then tap Activate To configure the Exit button You can configure the Exit button to shut down running programs when the button is tapped or to just tem...

Страница 249: ...add a running program to the Exclusive Programs List it will not be closed when you tap Stop Selected or Stop All and will not be listed in the Quick Menu on the Home Screen 1 On the Task Manager scr...

Страница 250: ...en to music on your device You can check the HTC web site for other audio accessories for your device Connect the device to an external display 1 Turn off the external display 2 Connect the ends red w...

Страница 251: ...time tap Change PIN Tip Emergency calls can be placed at any time without requiring a PIN Protect your device with a password You can help keep your data more secure by requiring a password every tim...

Страница 252: ...is chapter Encrypt files on your storage card You can set your device to encrypt files as they are saved on the storage card 1 On the Home screen slide to the Settings tab and then tap All Settings 2...

Страница 253: ...tab and then tap All Settings 2 On the System tab tap Memory Storage Card tab If your device is running low on memory try the following to free memory on your device Close programs which are not in us...

Страница 254: ...tton located at the center right side of device s back panel Your device restarts and displays the Home screen R E S E T Hard reset You can also perform a hard reset also known as a full reset A hard...

Страница 255: ...ET button but continue pressing the TALK SEND and END buttons until you see this message on the screen 4 Release the TALK SEND and END buttons then replace the back cover This operation will delete al...

Страница 256: ...p Windows Update 3 On the Update Setup screen tap Next 4 Choose how you want to check for updates Manual or Automatic then tap Next Note If you select Automatic you will be asked if you want to use yo...

Страница 257: ...lasts depends on the battery type and how you use your device Try the following to help conserve battery life When the device is not in use press POWER to switch off the display On the Home screen sli...

Страница 258: ...ces only when you are trying to establish a Bluetooth partnership For more information about Bluetooth see Chapter 9 Turn off WiMAX or Wi Fi when not in use For more information about WiMAX and Wi Fi...

Страница 259: ...Appendix A 1 Specifications A 2 Regulatory Notices...

Страница 260: ...GHz Tri band GSM GPRS EDGE 900 1800 1900 MHz Band frequency data speed and WiMAX availability are operator dependent Device Control TouchFLO 3D GPS Internal GPS antenna Connectivity Bluetooth 2 0 with...

Страница 261: ...croSD memory card SD 2 0 compatible AC Adapter Voltage range frequency 100 240V AC 50 60 Hz DC output 5V and 1A Notes The memory size figures are the total ROM and RAM memory available for use and sto...

Страница 262: ...found to comply with the limits for a Class B digital device pursuant to Part 15 of the FCC Rules These limits are designed to provide reasonable protection against harmful interference in a residenti...

Страница 263: ...els of RF energy for the general population The guidelines are based on the safety standards previously set by international standards bodies American National Standards Institute ANSI IEEE C95 1 1992...

Страница 264: ...ng positions specified by the FCC with the phone transmitting at its highest certified power level in all tested frequency bands Although the SAR is determined at the highest certified power level the...

Страница 265: ...damaged antenna comes into contact with the skin a minor burn may result Please contact your local dealer for replacement antenna SAR Information 0 527 W kg 1g Telecommunications Internet Association...

Страница 266: ...taining this information Turn the phone OFF in health care facilities when any regulations posted in these areas instruct you to do so Hospitals or health care facilities may be using equipment that c...

Страница 267: ...conserving natural resources Moreover proper recycling of the electronic and electrical waste equipment will ensure safety of human health and environment For more information about electronic and ele...

Страница 268: ...268 Appendix...

Страница 269: ...AP4 to automatically receive attachments 123 set Outlook to automatically receive attachments 122 Audio Booster 210 B Back cover remove 28 Backlight adjust brightness 243 set backlight timeout 243 Bas...

Страница 270: ...e to Internet Dial up 145 start a connection 145 ways of connecting 138 Connection Setup 33 246 Contacts 220 Contacts Picture capture mode 187 Copy contacts to SIM card 229 copy and manage files 236 m...

Страница 271: ...l 121 Full QWERTY 81 G G Sensor 239 Google Maps 178 GPS 180 182 H Hard reset 254 255 Home screen 37 58 Home tab Home screen 60 I IMAP4 114 Input methods Block Recognizer 88 Compact QWERTY 83 Full QWER...

Страница 272: ...t 112 create MMS message 109 MMS settings 107 reply message 111 view message 111 MMS Video capture mode 187 Mobile WiMAX 138 To check the WiMAX status 139 Turn WiMAX on and off 138 Modem Bluetooth 166...

Страница 273: ...262 Reply e mail 121 MMS 111 text SMS 65 105 Reset clear storage 255 hard reset 254 soft reset 254 Review screen Camera 193 Ring tone 74 244 Ring type 244 RSS Hub about 159 headline list 162 news chan...

Страница 274: ...screen 74 SIM Access Profile SAP 55 SIM card install 28 PIN 251 remove 29 SIM Manager about 229 copy contacts to SIM card 229 copy SIM contacts to device 229 create SIM contact 229 Sleep mode 33 Smart...

Страница 275: ...ring 166 WiMAX Modem 168 V Vibrate 38 42 49 245 Video capture mode 187 Voice call about 47 answer call 50 end call 53 Voicemail 50 W Weather tab Home screen 72 Wi Fi 139 224 WiMAX 224 241 WiMAX Modem...

Страница 276: ...276 Index...

Отзывы:

Похожие инструкции для T8290 QUAR100